background image

2-56

COPYRIGHT  © 1999 CANON INC.

CANON ADF FOR iR600 REV.0 JAN.  1999 PRINTED IN JAPAN (IMPRIME AU JAPON)

CHAPTER 2  OPERATIONS

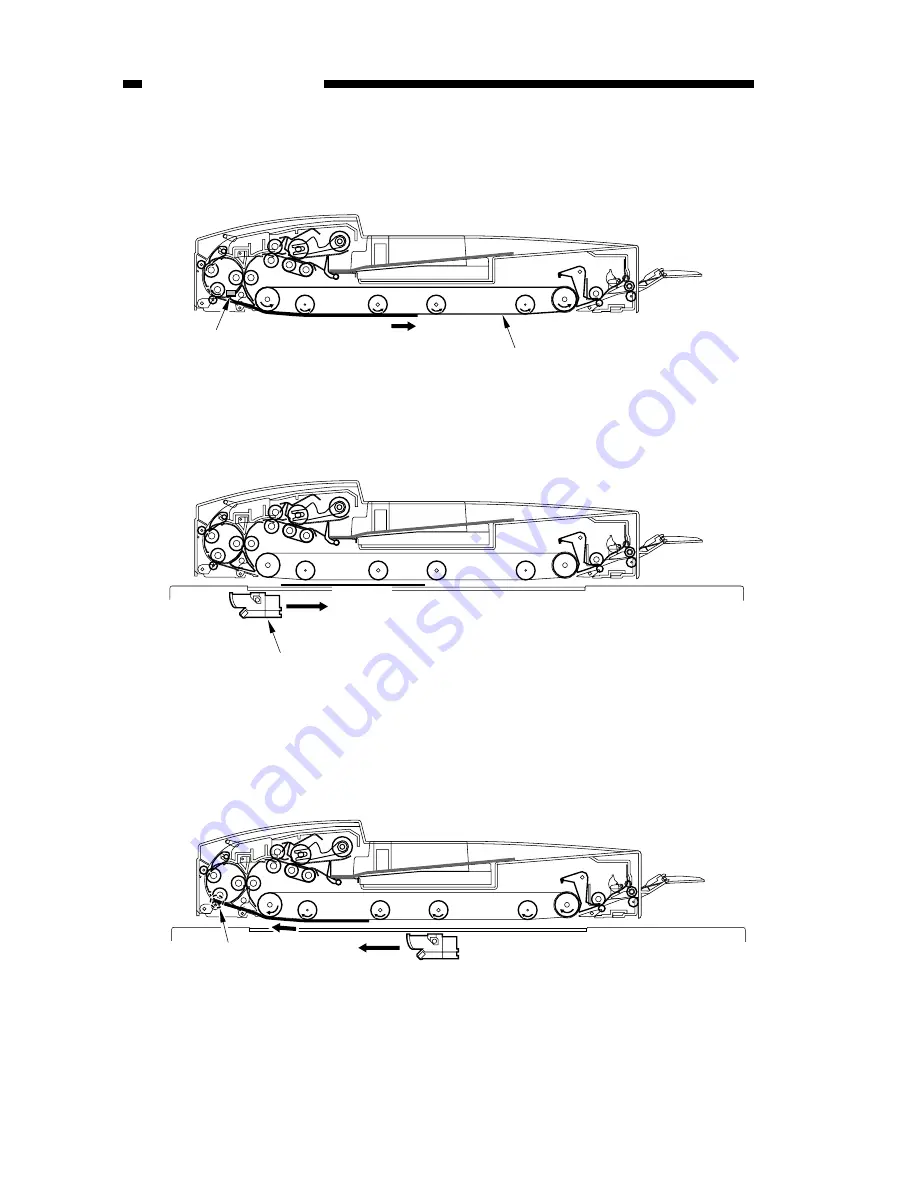
3] The reversing roller and the feeding belt are rotated to move the original.

The feeding belt is rotated after the trailing edge of the first original has moved past the reversal

sensor (S1), and the original is stopped.

Figure 2-258

4] The copier starts to make a copy by moving its scanner.

Figure 2-259

5] When the copier's scanner starts to move in reverse, the feeding belt is rotated to move the first

original to the reversing assembly. At this time, the leading edge of the original is butted against

the reversing roller to remove the skew.

Figure 2-260

Reversal sensor (S1)

Feeding belt

Copy

Scanning lamp

Butted.

Summary of Contents for DU7-1101-000

Page 1: ...COPYRIGHT 1999 CANON INC CANON ADF FOR iR600 REV 0 JAN 1999 PRINTED IN JAPAN IMPRIME AU JAPON DU7 1101 000 REVISION 0 JAN 1999 SERVICE MANUAL ADF FOR imageRUNNER 600 ...

Page 2: ...ATION CONTAINED HEREIN IS PUBLISHED BY CANON INC JAPAN SPECIFICATIONS AND OTHER INFORMATION CONTAINED HEREIN MAY DIFFER SLIGHTLY FROM ACTUAL MACHINE VALUES OR THOSE FOUND IN ADVERTISING AND OTHER PRINTED MATTER ANY QUESTIONS REGARDING INFORMATION CONTAINED HEREIN SHOULD BE DIRECTED TO THE COPIER SERVICE DEPARTMENT OF THE COMPANY IMPORTANT Prepared by OFFICE IMAGING PRODUCTS TECHNICAL SUPPORT DIVIS...

Page 3: ...ious mechanical workings are constructed and how the ADF may be disassembled assembled and adjusted CHAPTER 4 Maintenance and Servicing provides tables of periodically replaced parts and consumables durables and scheduled servicing charts CHAPTER 5 Troubleshooting provides tables of maintenance inspection standards adjustments and problem identification image fault malfunction APPENDIX contains a ...

Page 4: ...nal 2 11 5 Manual Feeder Pickup Delivery 2 13 C Detecting an Original 2 14 1 Outline 2 14 2 Detecting the Presence Absence of an Original 2 15 3 Original Size Detection 1 2 16 4 Original Size Detection 2 2 17 5 Pre Last Original Detection 2 22 6 Detecting the Presence Absence of an Original in the Manual Feed Assembly 2 23 D Original Pickup Separation 2 24 1 Outline 2 24 2 Moving Up Down the Picku...

Page 5: ...ck 3 6 II DRIVE SYSTEM 3 7 1 Removing the Reversal Motor Unit 3 7 2 Removing the Separation Motor Unit 3 7 3 Removing the Pickup Motor Unit 3 8 4 Removing the Belt Motor Unit 3 9 5 Removing the Delivery Motor 3 10 III FEEDING SYSTEM 3 12 1 Removing the Delivery Roller 3 12 2 Removing the Pickup Roller 3 14 3 Removing the Separation Roller 3 15 4 Removing the Manual Feed Registration Roller 3 19 5 ...

Page 6: ...er 5 41 2 Tray Pickup Counter Manual Feed Pickup Counter 5 42 3 Jam History 5 43 4 Software Version 5 44 E Cleaning 5 45 1 Cleaning the Separation Assembly 5 45 2 Cleaning the Registration Roller 5 47 F Others 5 49 1 Checking the Original Width Detecting Switch SW301 5 49 2 Initializing the Back Up RAM 5 50 3 Setting Mix Size Mode 5 51 II TROUBLESHOOTING 5 57 A Troubleshooting Malfunctions 5 57 1 ...

Page 7: ... Roller Sensor Circuit Diagram A 28 I Separation Sensor Skew Sensor Circuit Diagram A 29 J Original Sensor light emitting Circuit Diagram A 30 K Original Sensor light receiving Circuit Diagram A 30 L Tray Circuit Diagram A 31 M Pre Last Original Paper Sensor Circuit Diagram A 33 N Original Set Indicator Circuit Diagram A 33 O Manual Feed Registration Roller Paper Sensor Circuit Diagram A 34 P Spec...

Page 8: ...RIME AU JAPON CHAPTER 1 GENERAL DESCRIPTION I FEATURES 1 1 II SPECIFICATIONS 1 2 A ADF for iR600 1 2 III NAMES OF PARTS 1 4 A External View 1 4 B Cross Section 1 5 IV OPERATION 1 6 A Original Set Indicator 1 6 B Warnings and Actions to Take 1 6 C Routine Maintenance by the User 1 7 ...

Page 9: ...sesareversingmecha nism 2 Pre Reversing Mechanism Themachine spre reversingmechanismaddstoproductivitywhenprocessingdouble sidedorigi nals 3 Clip On Feeding Belt Unit Compared with the exiting models the machine s feeding belt can be removed much more easily facilitatingservicingwork 4 Stream Reading of All Sizes Themachinemayusestreamreadingforallsizes includinglargesize oforiginals forreproducti...

Page 10: ... sheets A3 B4 LGL 279 4 431 8 mm 11 17 Single sided double sided Provided all sizes single sided between 50 and 150 Provided single sheet only Provided default sizes only Provided Provided same feeding width only Supported 40 mm or less in thickness Table 1 202 1 II SPECIFICATIONS A ADF for imageRUNNER 600 Item Pickup Original placement Originalposition Original separation Original type Original s...

Page 11: ...mensions Serial No Operating environment Temperature range Humidity range Specifications IPC communication 2 24 VDC from copier 21 kg approx 646 W 569 5 D 143 H mm A ZRBxxxxx Inch A ZRCxxxxx AB ZRDxxxxx Inch AB ZRExxxxx Same as copier Remarks Not including delivery tray Not including delivery tray The above specifications are subject to change for product improvement Table 1 202 2 ...

Page 12: ...1999 CANON INC CANON ADF FOR iR600 REV 0 JAN 1999 PRINTED IN JAPAN IMPRIME AU JAPON III NAMES OF PARTS A External View Figure 1 301 1 Upper cover 2 Sideguide 3 ADF controller cover 4 Manualtray 5 Upper front cover 6 Lower front cover 1 2 3 4 5 6 ...

Page 13: ...rationroller 6 Pull outroller 7 Pulloutlockingroller 8 Feedingroller 9 Pickuproller 10 Manualfeedregistrationroller 11 Manual feed stopper plate 12 DeliveryrollerAroll 13 DeliveryrollerBroll 14 Deliveryroller 15 Deliveryjumpingflapper 16 Feedingbelt 17 Stopper plate 18 Separationbelt 19 Feedingbeltdriveroller 20 Jumpingflapper 21 Pre reversal flapper 22 ReversingrollerA 23 ReversingrollerAroll 1 2...

Page 14: ...asheswhenan originaljams Original Set indicator Figure 1 401 B Warnings and Actions to Take Suspect a jam if the Original Set indicator starts to flash while an original is being fed Perform the followingstepsforcorrection 1 Removealloriginalsfromtheoriginaltray 2 Open the upper cover and remove the jam if any 3 Open the ADF and remove the original if any from the copyboard 4 Put the originals in ...

Page 15: ... Parts Copyboard glass Feeding belt Registration roller Description Wipe it with a cloth moistened with water or alcohol then dry wipe it Wipe it with a cloth moistened with water or alcohol then dry wipe it Execute the copier s user mode C Routine Maintenance by the User Instruct the user to clean the following parts at least once a week ...

Page 16: ...V POWER SUPPLY 2 79 1 In outline diagrams represents mechanical drive paths and indicates electrical signal paths 2 Signals in digital circuits are identified as 1 for High and 0 for Low The voltage of signals however depends on the circuit Nearly all operations of the machine are contorolled by the CPU the internal workings of the CPU are not relevant to the service person s work and therefore ar...

Page 17: ... signals to drive the motors solenoids and other DC loads Figure 2 101 B Communication with the Copier The machine communicates using IPC communication 2 which enables communication at a higher speed than the existing IPC methods CPU Q1 ROM IC1 EEPROM IC2 RAM Q4 D A Q9 IPC Q2 5 VDC power supply Q28 5V 24R Power supply PCB Copier Solenoid Clutch Original indicator LD PCB Tray PCB Reversal motor dri...

Page 18: ...e speed of the belt motor Belt motor clock sensor Separation motor clock sensor Left cover sensor rear Pre reversal sensor Registration roller clock sensor Left cover sensor front Pickup roller home position sensor Pickup roller height sensor 1 Pickup roller height sensor 2 ADF open closed sensor Delivery motor clock sensor Manual feed sensor Original delivery sensor Pulses according to the speed ...

Page 19: ...2 2 3 1 J56 2 1 3 SW301 J51 Paper reference signal When paper is present 0 Paper reference signal When paper is present 0 Paper reference signal When paper is present 0 Paper reference signal When paper is present 0 Paper reference signal When paper is present 0 When paper is present 0 Paper reference signal When paper is present 0 Paper reference signal When paper is present 0 Signal according to...

Page 20: ...1 J2 11 12 2 1 2 1 1 2 11 12 M3 M5 M4 J24 J81 J21 J111 J601 J602 J21 J22 J101 J92 J91 J102 CL SL1 SL2 SL3 SL4 24V 5V REF CLK MO1 MO2 CW CCW B Vref J7 9 11 6 1 2 3 4 5 M2 J71 J72 When 0 the separation clutch turns on When 0 the solenoid turns on When 0 solenoid turns on position 1 When 0 the solenoid turns on position 2 When 0 the solenoid turns on When 0 the solenoid turns on position 1 When 0 the...

Page 21: ...ng up separating feeding and delivering originals Name notation Reversal motor M1 Belt motor M2 Pickup motor M3 Separation motor M4 Delivery motor M5 Separation clutch CL Function Moves or reverses originals Moves originals Moves up down the pickup roller Separates originals Delivers originals or picks up manually fed originals Disengages or engages the pull out roller and separation feeding assem...

Page 22: ...signal Separation clutch drive signal CLD Stopper plate solenoid drive signal 2 SL2D2 Stopper plate solenoid drive signal 1 SL2D1 Pickup motor drive signal Belt motor drive signal Belt motor clock signal BTCLK Reversal motor drive signal Reversing solenoid drive signal SL3D Registration roller clock signal TRCLK Delivery solenoid drive signal 2 SL4D2 Delivery motor drive signal Delivery motor cloc...

Page 23: ...oller paper detection signal RGBS Original sensor light emit signal DTSAJ Original detection signal DTS Original set indicator light emit signal DTLED Pre last original detection signal LAS Original width detection signal SSW _ Original trailing edge detection signal TAILS ADF open closed detection signal RFOP Manual feeding registration paper detection signal MFRGS Manual feed set signal MFST Ori...

Page 24: ...inalfrom thepickupassembly and deliversitaftercopying Corresponding copying mode Single sidedoriginal à single sided copy Single sidedoriginal à double sided copy Double sided original à double sided copy Double sided original à single sided copy Manual copying Copying operation Stream reading fixed reading if ratio is not between 50 and 150 Fixed reading Fixed reading B Operations 1 Outline The m...

Page 25: ... 0 JAN 1999 PRINTED IN JAPAN IMPRIME AU JAPON 2 9 CHAPTER 2 OPERATIONS Pickup Pre reversal Feeding Copying 1st side Feeding Original To next page Figure 2 204 1 3 Pre Reversal Pickup Reversal Delivery small size original An original moves as follows ...

Page 26: ...2 10 COPYRIGHT 1999 CANON INC CANON ADF FOR iR600 REV 0 JAN 1999 PRINTED IN JAPAN IMPRIME AU JAPON CHAPTER 2 OPERATIONS Reversal Copying 2nd side Delivery From previous page Figure 2 204 2 ...

Page 27: ...0 JAN 1999 PRINTED IN JAPAN IMPRIME AU JAPON 2 11 CHAPTER 2 OPERATIONS Figure 2 205 4 Reversal Pickup Reversal Delivery large size original An original moves as follows Pickup Feeding Reversal feeding 1 Reversal feeding 2 Copying 1st side To next page ...

Page 28: ...PYRIGHT 1999 CANON INC CANON ADF FOR iR600 REV 0 JAN 1999 PRINTED IN JAPAN IMPRIME AU JAPON CHAPTER 2 OPERATIONS Reversal feeding 1 Reversal feeding 2 Copying 2nd side Delivery From previous page Figure 2 206 ...

Page 29: ...C CANON ADF FOR iR600 REV 0 JAN 1999 PRINTED IN JAPAN IMPRIME AU JAPON 2 13 CHAPTER 2 OPERATIONS Figure 2 207 5 Manual Feeder Pickup Delivery An original moves as follows Pickup Stopping original Switch back Copying Delivery ...

Page 30: ...or not Detects the presence absence of an original in the manual feeder Sensor notation Original sensor S6 Original trailing edge sensor S7 Registration roller clock sensor PI5 Original width detecting switch SW301 Pre last original sensor S8 Manual feed sensor PI12 Function Original detection Original size detection 1 Original size detection 2 Pre last original detection Manual feeder original de...

Page 31: ...ght emitting side of the origi nal sensor will be blocked causing the light receiving side of the sensor to send the original detection signal DTS to the ADF controller PCB In response the ADF controller PCB turns on the Original Set indicator ADF controller PCB S6 light receiving side S6 light receiving side ADF controller PCB If an original is detected If an original is not detected ADF controll...

Page 32: ...When the original covers the original trailing edge sensor the light from the LED of the original trailing edge sensor is reflected by the original to hit the photo transistor causing the machine to assume that the original is a large size original The machine then sends original size information large or small size to the copier which in turn determines the stop position for the scanner in prepar...

Page 33: ...e slide guide are in contact with the original width detecting switch and information indicating the combination of states ON or OFF of the contact plates is sent to the ADF controller PCB which will in response identify the width of the original The table that follows show the state of each contact plate in relation to default sizes combi nations other than shown will be assumed to represent a no...

Page 34: ...er of the registration roller The ADF controller PCB identifies the length of an original in feeding direction based on the number of rotations made by the clock plate Figure 2 211b The machine determines a default size based on the width of the original and the length of the original obtained by original detection 2 and sends the result to the copier which uses the informa tion when selecting cop...

Page 35: ...8 277 to 337 120 to 180 259 to 309 310 to 343 343 to 396 162 to 222 344 to 404 196 to 256 361 to 411 412 to 472 190 to 250 400 to 460 Original width mm 180 to 184 208 to 212 213 9 to 217 9 255 to 259 277 4 to 281 4 295 to 299 Default size STMT LTRR FOOLSCAP LGL LTR COMPUTER paper 279 4 431 8mm 11 17 Original length mm 120 to 180 259 to 309 310 to 343 343 to 396 196 to 256 361 to 411 412 to 472 Ori...

Page 36: ...slideguidelockfromspreadingwiderthanA4 A3 paper 297 mm To use an original wider than 297 mm the slide guide lock must be removed Without the lock originals may be as wide as 305 mm but their length in feeding direction must be 432 mm or less Figure 2 212 Caution Theslideguidemustalwaysbeadjustedtotheoriginalsizeduringcopying otherwise theoriginals may move askew Slide guide lock ...

Page 37: ...ncorrect positions because of the limited distance between stop positions To avoid such a problem the machine uses two slide guide positioning rolls allowing the stop positions of the slide guide to be changed by relocating the rolls Figure 2 213 Slide guide positioning roll gray Slide guide positioning rolls black Reposition Reposition For Inch configuration For A B configuration Slide guide posi...

Page 38: ...ed The machine picks up the first original small size and then sends the second original from the original tray to the separation as sembly At this time if no original covers the pre last original sensor S8 the machine will identify the condition as indicating the absence of an original and communicates the fact to the copier Table 2 210 Small size A5 A4 B5 STMT LTR Large size A4R B5R A3 B4 LTRR L...

Page 39: ...s the sensor flag causing it to cover the sensor and ultimately causing the machine to assume the presence of an original in the manual feeder When the manual feeder sensor detects an original the machine will automatically start to pick up the originals in about 0 3 sec for the copier to start copying operation Note The auto pickup function may be disabled using the copier s user mode feeder manu...

Page 40: ...he pickup roller is driven by the separation motor M4 and the separation clutch CL Originals are separated by the separation roller and the separation belt and the feeding roller Each roller and the belt are driven in turns by the separation motor M4 and the separation clutch CL The separation assembly is equipped with a separation sensor S4 and a skew sensor S5 to monitor the movement of original...

Page 41: ... at either of the following three points as determined by the output of its respective sensor or by combinations of sensor outputs and pulses from the pickup motor Home position Wait position Pickup position M3 PI 9 PI 8 PI 8 9 PI 7 PI 7 Pickup roller units Separation unit Stop position Home position Wait position Pickup position Operation Waits until the next copying run Waits until the next pick...

Page 42: ...pickup roller to move down to the stack of originals The pickup motor stops when the pickup roller unit reaches a point about 1 mm below the pickup height sensor 1 PI8 and the pickup height sensor 2 PI9 Figure 2 218 Figure 2 219 Whenthepickuprollerunitstopstomovedown theseparationclutch CL andtheseparationmotor M3 start to operate thereby moving the first original to the separation assembly Figure...

Page 43: ...otor M3 starts to rotate moving the pickup roller unit away from the stack of originals The pickup roller unit stops at the escape position which is about 1 mm from the stack of originals Figure 2 221 As soon as the first original leaves the separation assembly the pickup roller unit moves down to the stack of originals once again to pick up the second original M3 Separation sensor S4 1 mm approx ...

Page 44: ...igh The pressure may be switched by operating the separation pressure lever located in front of the separation assembly When the lever is operated the position of the separation belt moves up or down to change the overlap with the feeding roller thereby switching the pressure Note At time of shipment from the factory the separation switching lever is set to low Figure 2 223 Moves up down the separ...

Page 45: ...ing If the separation sensor does not detect an original a specific period of time after the separation motor starts to rotate the machine will identify the condition as being a separation error delay Separation sensor S4 If the separation sensor does not detect an original within a specific time If the separation sensor detects an original within a specific time Separation sensor S4 Check on Sepa...

Page 46: ...nged in a row in front to rear direction and the machine checks for skew movement based on a discrepancy occurring when an original moves past these two sensors The machine will identify a skew movement when the discrepancy is 10 mm or more stopping its operation to protect the origi nal and causing the copier to indicate the Jam message Skew original Skew sensor S5 Separation sensor S4 Discrepanc...

Page 47: ...CKA PICKB to the motor driver Q24 In response the motor driver controls the output timing of the pulse signals to suit the phase control signal thereby switching the rotation of direction of the pickup motor In the absence of the phase control signal PICKA PICKB from the CPU the motor retention signal goes 1 applying 5 R to the pickup motor for retention thereby holding the motor shaft from rotati...

Page 48: ...sends the speed control signal SPMFV to the CPU The CPU varies the rotation speed signal based on the speed control signal it receives LED3 turns on as long as the rotation speed of the motor remains within a specific range and turns off when it is otherwise The current detection circuit monitors the current flowing into the separation motor at all times and will generate the separation motor stop...

Page 49: ...sition sensor PI7 Pickup roller height sensor 1 2 PI8 9 Pickup motor M3 Separation motor M4 Separation clutch CL Separation sensor S4 Skew sensor S5 yyyy yyyy yyy yyy UP DOWN UP UP yyyyy yyyyy DOWN 1st original picked up separated 2nd original picked up separated Operation ended Pickup roller moved to home position Original Pickup Separation Pickup position Wait position Pickup position Wait posit...

Page 50: ...are moved by rotating the feeding belt using the belt motor M2 The direction of their movement is either to the right or left depending on the selected operation mode Originals are delivered by rotating the delivery roller using the delivery motor M5 Originals are always delivered to the original delivery tray M5 Delivery tray Delivery roller Feeding belt M2 Figure 2 229 ...

Page 51: ...gnal to the belt motor driver PCB The belt motor driver PCB in response controls each specific motor according to the signal Signal REF CLK MO1 MO2 CW CCW B Vref BTCLK Description Serves as reference clock pulses Sets motor operation mode Sets motor operation mode Sets direction of rotation Sets motor torque Monitors motor operation Sets belt stop position Related Error Code Error in the belt moto...

Page 52: ...the motor Figure 2 231 The CPU Q1 on the ADF controller PCB sends the motor rotation speed signal EJMPWM to the drive control assembly which in response generates the motor drive signal EJMD The motor rotation signal EJCLK occurs when the motor rotates used by the CPU to monitor the operation of the motor Signal EJMPWM EJMD EJCLK Table 2 214 Related Error Code Error in the delivery motor M5 Error ...

Page 53: ...first original is picked up and its leading edge is butted against the registration roller to remove the skew For details of pickup operation see D Original Pickup Separation on p 2 24 Figure 2 232 Registration roller 1st original F CW Rotation Pickup Delivery 1 Outline The operation referred to as CW rotation pickup delivery is performed during copying in fixed or stream reading mode CW rotation ...

Page 54: ...d original is picked up advance pickup Figure 2 233 3 The registration roller and the feeding belt is rotated to move the first original The first original is moved over a specific distance by the feeding belt after its trailing edge has moved past the pre registration roller sensor S2 and is then stopped Figure 2 234 4 The copier makes a copy by moving its scanner Figure 2 235 Separation sensor S...

Page 55: ...ion roller is rotated to move the second original Figure 2 236 6 The first and second originals are moved by the feeding belt after the trailing edge of the second original has moved past the pre registration roller sensor S2 the feeding belt is rotated for a specific length to stop the second original The first original is moved in the direction of delivery and is stopped on the copyboard glass F...

Page 56: ...2 40 COPYRIGHT 1999 CANON INC CANON ADF FOR iR600 REV 0 JAN 1999 PRINTED IN JAPAN IMPRIME AU JAPON CHAPTER 2 OPERATIONS ...

Page 57: ... M1 Belt motor M2 Delivery motor M5 yyyyy yyyyy yyyyy yyyyyyyyyyyyy yyyyyyyyyyyyy yyyyyyyyyyyyy yyyy yyyy yyyy UP DOWN UP yyyyy yyyyy yyyyy DOWN UP UP yyyyy yyyyy yyyyy DOWN Separating 1st original Feeding 1st original into delivery direction Reading 2nd original Separating 3rd original Delivering 1st original Moving 2nd original into delivery direction Reading 3rd original Delivering 2nd original...

Page 58: ...2 42 COPYRIGHT 1999 CANON INC CANON ADF FOR iR600 REV 0 JAN 1999 PRINTED IN JAPAN IMPRIME AU JAPON CHAPTER 2 OPERATIONS ...

Page 59: ...ure 2 239 2 The registration roller and the feeding belt are rotated to move the original When the trailing edge of the first original moves past the separation sensor S4 the second original is picked up Figure 2 240 3 The registration roller and the feeding belt are rotated to move the original The first original is moved for a specific length after its trailing edge has moved past the pre regist...

Page 60: ...tion of delivery At the same time the second original is picked up Figure 2 243 6 The first and second originals are moved by the feeding belt the feeding belt is rotated for a specific length after the trailing edge of the second original has moved past the pre registration roller paper sensor S2 to stop the second original at a specific position The first original is delivered by the delivery ro...

Page 61: ... 1 2 PI8 9 Stopper plate solenoid SL2 Pickup motor M3 Separation motor M4 Separation clutch CL Reversal motor M1 Belt motor M2 Delivery motor M5 yyy yyy yyy yyyyyyyy yyyyyyyy yyyyyyyy yyy yyy DOWN UP UP yyy yyy yyy Separating 1st original Delivering 1st original Reading 2nd original Delivering 2nd original Reading 1st original 2nd original separated A3 2 Single Sided Originals Fixed Reading UP DOW...

Page 62: ...ze Original 1 The first original is picked up and its leading edge is butted against the registration roller to remove the skew For details of pickup operation see D Original Pickup Separation on p 2 24 Figure 2 246 2 The registration roller and the feeding belt are rotated to move the original When the trailing edge of the 1st original moves past the separation sensor S4 the second original is pi...

Page 63: ...on roller paper sensor S2 Figure 2 248 4 The feeding belt is rotated to move the original for a specific length When the first original has been moved for a specific length as determined by the counts issued after the trailing edge of the original has moved past the pre registration paper sensor S2 the machine sends the image leading edge signal to the copier In response the copier starts reading ...

Page 64: ...2 48 COPYRIGHT 1999 CANON INC CANON ADF FOR iR600 REV 0 JAN 1999 PRINTED IN JAPAN IMPRIME AU JAPON CHAPTER 2 OPERATIONS ...

Page 65: ...clutch CL Reversal motor M1 Belt motor M2 Delivery motor yyyyy yyyyy yyyyy yyyyyyyyyyyyy yyyyyyyyyyyyy yyyyyyyyyyyyy yyyy yyyy yyyy UP DOWN UP DOWN UP UP yyyyy yyyyy yyyyy yyyyyy yyyyyy yyyyyy DOWN Separating 1st original Holding 1st original Separating 2nd original Reading 1st original Holding 2nd original Separating 3rd original Delivering 1st original Reading 2nd original Holding 3rd original D...

Page 66: ...2 50 COPYRIGHT 1999 CANON INC CANON ADF FOR iR600 REV 0 JAN 1999 PRINTED IN JAPAN IMPRIME AU JAPON CHAPTER 2 OPERATIONS ...

Page 67: ...moves past the separation sensor S4 the second original is picked up If the original size is 279 4 431 8 mm 11 17 after the original is moved in step 4 Figure 2 252 3 When the leading edge of the original has moved past the post registration roller paper sensor S3 the feeding belt is rotated for a specific length and the original is stopped in wait position At this time the machine starts to track...

Page 68: ...moved for a specific length in reference to the counts generated after the trailing edge of the original has moved past the pre registration roller paper sensor S2 the machine sends the image leading edge signal to the copier which in response starts reading the original At this time the second original is also moved and stopped at wait position Figure 2 254 Pre registration roller paper sensor S2...

Page 69: ...2 PI8 9 Stopper plate solenoid SL2 Pickup motor M3 Separation motor M4 Separation clutch CL Reversal motor M1 Belt motor M2 Delivery motor M5 yyyyyyyyyyyyy yyyyyyyyyyyyy yyyyyyyyyyyyy yyyy yyyy yyyy UP DOWN UP UP DOWN Separating 1st original Reading and delivering 1st original Moving 2nd original to hold position Reading 2nd original Delivering 2nd original Moving 1st original to hold position Sep...

Page 70: ...2 54 COPYRIGHT 1999 CANON INC CANON ADF FOR iR600 REV 0 JAN 1999 PRINTED IN JAPAN IMPRIME AU JAPON CHAPTER 2 OPERATIONS ...

Page 71: ...leading edge is butted against the registration roller to remove the skew For details of pickup operation see D Original Pickup Separation on p 2 24 Figure 2 256 2 The registration roller and the reversing roller are driven to reverse the original in advance The first original is moved by the reversing roller for a specific length after its trailing edge has moved past the pre registration paper s...

Page 72: ...iginal has moved past the reversal sensor S1 and the original is stopped Figure 2 258 4 The copier starts to make a copy by moving its scanner Figure 2 259 5 When the copier s scanner starts to move in reverse the feeding belt is rotated to move the first original to the reversing assembly At this time the leading edge of the original is butted against the reversing roller to remove the skew Figur...

Page 73: ...iling edge has moved past the pre registration roller paper sensor S2 and is stopped Figure 2 261 7 The copier s scanner starts to make a copy At this time the second original is picked up and reversed in advance See steps 1 and 2 Figure 2 262 8 When the copier s scanner starts to move in reverse the reversing roller and the feeding belt are rotated to move the first and second originals Figure 2 ...

Page 74: ...U JAPON CHAPTER 2 OPERATIONS 9 The feeding belt is rotated for a specific length after the second original has moved past the reversal sensor S1 and the original is stopped Figure 2 264 10 The copier starts to make a copy by moving its scanner Figure 2 265 Reversal sensor S1 2nd original Copy ...

Page 75: ...yyyyy yyyyyy yyyyyy yyy yyy yy yy yyy yyy yy yy DOWN DOWN UP UP UP DOWN UP A4 3 Double Sided Originals Copying Separating 1st original Pre reversing 1st original Moving 2nd original to copyboard glass Reading back of 1st original Reading back of 2nd original Reversing 1st original Separating 2nd original Reversing 2nd original Separating 3rd original Reading face of 1st original Pre reversing 2nd ...

Page 76: ...2 60 COPYRIGHT 1999 CANON INC CANON ADF FOR iR600 REV 0 JAN 1999 PRINTED IN JAPAN IMPRIME AU JAPON CHAPTER 2 OPERATIONS ...

Page 77: ...roller to remove the skew For details of pickup operation see D Original Pickup Separation on p 2 24 Figure 2 267 2 The reversing roller and the feeding belt are driven to move the original The first original is moved for a specific length by the feeding belt after its trailing edge has moved past the pre registration roller paper sensor S2 and is stopped Figure 2 268 Reversal pickup delivery Oper...

Page 78: ...l is butted against the reversing roller to remove the skew Figure 2 269 4 The reversing roller and the feeding belt are rotated to move the original to the copyboard glass The first original is moved for a specific length by the feeding belt after its trailing edge has moved past the pre registration roller sensor S2 and is stopped Figure 2 270 5 The copier s scanner starts to make a copy Figure ...

Page 79: ...roller to remove the skew Figure 2 272 7 The reversing roller and the feeding belt are rotated to move the original to the copyboard glass The first original is moved for a specific length by the feeding belt after its trailing edge has moved past the pre registration roller paper sensor S2 and is then stopped Figure 2 273 8 The copier starts to make a copy by moving its scanner At this time the s...

Page 80: ...TIONS 9 The second original is moved for a specific length by the feeding belt after it has moved past the pre registration roller paper sensor S2 and is then stopped The first original is delivered by the delivery roller Figure 2 275 Pre registration roller paper sensor S2 Delivery roller 2nd original 1st original ...

Page 81: ...ds various motor control signals to the reversal motor driver PCB In response the reversal motor driver PCB controls the respective motors to suit the incom ingsignals Table 2 218 Q1 CPU ADF controller PCB Reversal motor driver PCB Q601 24R 24R A A B B M1 5R M1OB M1OB M1OA M1OA T Vref J62 J61 J6 13 12 11 10 9 8 7 6 5 4 3 2 1 1 2 3 4 5 6 7 8 9 10 11 12 13 3 1 4 5 2 6 Signal M10A M10A M10B M10B T Vr...

Page 82: ...2 66 COPYRIGHT 1999 CANON INC CANON ADF FOR iR600 REV 0 JAN 1999 PRINTED IN JAPAN IMPRIME AU JAPON CHAPTER 2 OPERATIONS ...

Page 83: ...aration motor M4 Separation clutch CL Reversal motor M1 Reversing solenoid SL1 Belt motor M2 Delivery motor M5 yy yy yy yy yy yy DOWN UP UP yyy yyy yyy DOWN Separating 1st original Moving 1st original to copyboard glass Reading back of 1st original Reading back of 2nd original Reading face of 1st original Separating 2nd original Reading face of 2nd original Delivering 2nd original Delivering 1st o...

Page 84: ...2 68 COPYRIGHT 1999 CANON INC CANON ADF FOR iR600 REV 0 JAN 1999 PRINTED IN JAPAN IMPRIME AU JAPON CHAPTER 2 OPERATIONS ...

Page 85: ...feeder the manual set sensor PI12 turns on to indicate the presence of an original Figure 2 278 2 In about 0 3 sec the original is moved by the delivery roller so that its leading edge butts against the registration roller to remove the skew Figure 2 279 3 The original is moved by the delivery roller and the feeding belt The original is stopped when its leading edge reaches the reversal sensor S1 ...

Page 86: ...nal is moved for a specific length and stopped after its trailing edge has moved past the reversal sensor S1 Figure 2 281 5 The copier starts to make a copy by moving its scanner Figure 2 282 6 When the copier s scanner starts to move in reverse the feeding belt and the delivery roller are rotated to move the original to the delivery assembly Figure 2 283 Reversal sensor S1 Copy ...

Page 87: ...ations Figure 2 284 Manual feed original set Belt motor M2 Delivery motor M5 Delivery solenoid SL4 Manual feed set sensor PI12 Reversing solenoid SL1 Reversal sensor PI1 Original delivery sensor PI13 yyyyyyy yyyyyyy yyyyyyy yyyyyyy yyyyyyyyyyyyyyyy yyyyyyyyyyyyyyyy Pickup Copying Delivery Feeding Original set 0 3 sec approx 0 4 sec approx ...

Page 88: ...r LED2 on the machine s ADF controller PCB may be used to check the code Screen of the Copier s Service Mode Figure 2 301 Indicator of the Machine The indicator LED2 on the ADF controller PCB expresses codes by turning on four times each time flashing a different segment s EX Code J 13 Figure 2 302 Display I O Adjust Option Test Counter Function OK JAM 1 25 READY AAA BBBB CCCC DDDD E FFff G HHHHHH...

Page 89: ...d the original before the reversal motor M4 started to operate When reversing an original the pre registration roller paper sensor did not detect the original after the original had been moved a specific length When starting to reverse an original the reversal sensor did not detect the original after the original had been moved a specific length 104 mm When performing pre reversal the discrepancy ...

Page 90: ...eeding length When performing pre reversal the post registration roller sensor did not detect an original after the reversal motor M1 had been operated for 50 mm in terms of feeding length When performing pre reversal the reversal sensor does not detect an original after the post registration roller paper sensor had detected the leading edge of an original and the original had been fed for a speci...

Page 91: ...g edge of an original had moved past the post registration sensor and the original had been moved for a specific length about 100 mm When performing reversal the reversal sensor detected an original after an original had been arched and moved for a specific length original length 1 5 approx When performing reversal the pre registration roller sensor did not detect an original after an original had...

Page 92: ... edge of an original and the original had been moved for a specific distance original length 100 mm When delivering an original the original delivery sensor still detected an original after the trailing edge of an original had moved past the manual feed registration roller paper sensor and had been moved 100 mm When arching an original in manual pickup the manual registration sensor did not detect...

Page 93: ... cover was open The pickup signal was received from the copier before an original had been detected When starting an operation an original exists in the path In stream reading mode LDR the post registration roller paper sensor detected an original after an original had been moved 30 mm from its wait position The ADF was opened in operation The left cover was opened in operation The voltage of powe...

Page 94: ... PI 1 PI 2 PI 11 In stream reading mode the image leading edge signal is generated while an original is accelerated from its wait position to the image leading edge position The last sheet is not moved properly by the feeding belt A jam related to the motor drive system has occurred less than three times Jam type Sensor Copier Conditions Machine Jam code J F4 J FD J FE 00F4 00FD 00FE Table 2 301 6...

Page 95: ...upplied with two channels of 24 V power one J4 1 input is sent to loads through a fuse FU1 while the other J1 6 input is sent to sensors and the ADF controller PCB after conversion by a regulator Q28 to 5 V power The fuse FU1 is used to cut the line to protect the circuit in response to overcurrent Figure 2 401 FU1 Regulator Q28 6 1 J4 J1 24V 24V FU2 5R 24R Motor Clutch Solenoid Sensor 5V Copier A...

Page 96: ...the instructions given when disassembling assembling the finisher s parts while keeping the following in mind 1 Disconnect the power plug before disassembly assembly work 2 Assemble the parts by reversing the steps used to disassemble them unless otherwise noted 3 Identify the screws by type length diameter and location 4 Do not leave out the washer that comes with the screw used for the grounding...

Page 97: ... 5 Upper cover 6 ADF controller cover Remove the covers as follows when clean ing inspecting or repairing the inside of the machine 1 Removing the Machine 1 Turn off the copier 2 Disconnect the communication cable 1 of the machine from the copier 3 Open the machine fully 4 Go to the rear of the copier and lift the machine to remove Reference The hinge support is equipped with a locking mechanism t...

Page 98: ...JAPAN IMPRIME AU JAPON Figure 3 104a Figure 3 104b Figure 3 104c 2 1 1 1 1 2 2 1 1 2 Removing the Lower Front Cover 1 Remove the two screws 1 and slide the lower front cover 2 to the front to re move 3 Removing the Front Cover 1 Remove the four screws 1 and slide the front cover 2 to the front to remove ...

Page 99: ...5 2 4 Removing the Main Cover 1 Free the hook of the pickup assembly cover 1 from the right stay then detach it while paying attention to the hooks on the front and rear side plates 2 After removing the ADF controller cover disconnect the connector 2 and remove the screw 3 then detach the grounding wire 4 Free the harness from the wire saddle 5 and remove the other wire saddle 6 ...

Page 100: ...ve the four screws 7 and detach the main cover 8 Caution The main cover has the original tray 9 attached to it Be sure to take good care not to damage the cable when detaching it 5 Removing the Original Tray 1 Move the side guide front 1 rear 2 to the inside then remove the two screws 3 and detach it Caution After mounting be sure to perform hori zontal registration adjustment ...

Page 101: ... the Upper Cover 1 Remove the front cover and remove the screw 1 then remove the positioning pin 2 from the pickup front side plate 2 Remove the stepped screws used to secure the pickup side plate front rear and the link arm 4 of the upper cover 3 in place then detach the upper cover 3 7 Removing the ADF Controller Cover 1 Remove the screw 1 and detach the ADF controller cover 2 ...

Page 102: ...ED IN JAPAN IMPRIME AU JAPON Figure 3 110 1 8 Side Guide Lock 1 The side guide of the original tray is equipped with a side guide lock 1 fitted to the groove of the original tray Caution When the lock is fitted the tray supports A3 A4 paper when removed the tray will support paper as wide as 305 mm ...

Page 103: ...YSTEM 1 Removing the Reversal Motor Unit 1 Disconnect the connector 2 J602 from the reversal motor driver PCB 1 2 Remove the screw 3 and detach the pre reversal sensor mount 4 3 Remove the screw 5 and detach the cover 6 then remove the two screws 7 and detach the reversal motor unit 8 2 Removing the Separation Motor Unit 1 Remove the screw 1 and detach the separation motor sensor support plate 2 ...

Page 104: ...PRIME AU JAPON Figure 3 204 Figure 3 205 Figure 3 206 2 Disconnect the two connectors 3 3 Remove the three mounting screws 4 and detach the separation motor unit 5 3 Removing the Pickup Motor Unit 1 Remove the separation motor unit 2 Remove the two screws 1 and detach the belt motor driver PCB unit 2 3 4 4 5 1 2 ...

Page 105: ...e 3 209 3 Disconnect the connector 4 of the pickup motor unit 3 and the connector 6 of the open closed sensor rear 5 4 Remove the two mounting screws 7 and detach the pickup motor unit 3 4 Removing the Belt Motor Unit 1 Remove the separation motor unit and the pickup motor unit 2 Disconnect the connector 2 J72 of the belt motor driver PCB 1 4 3 6 5 7 3 1 2 ...

Page 106: ...PON Figure 3 210 Figure 3 211 Figure 3 212 3 Remove the three screws 3 and detach the belt motor unit 4 5 Removing the Delivery Motor 1 Remove the main cover 2 Remove the screw 1 of the bottom of the machine and remove the bearing 2 and the rod 3 3 Remove the four screws 4 and remove the hinge right 5 3 3 4 2 3 1 4 4 4 5 4 ...

Page 107: ...the screw 6 and detach the de livery motor sensor 7 5 Remove the grip ring 8 and detach the clock plate 9 6 Remove the E ring 10 and remove the belt retaining washer 11 and the gear 12 7 Remove the screw 13 and detach the de livery motor 14 Caution If you have replaced the delivery motor be sure to adjust the sensor and the deliv ery motor 7 6 13 9 12 10 11 14 8 ...

Page 108: ...gures 3 104b 3 104c 2 Remove the main cover Figures 3 105a 3 105b 3 Remove the E ring 1 and remove the so lenoid link arm 2 4 Remove the screw 3 and detach the de livery guide plate 4 5 Remove the screw 5 and detach the grounding wire 6 of the static eliminator mounted to the delivery guide 6 Remove the three screws 7 and discon nect the connector 8 then detach the so lenoid unit 9 of the delivery...

Page 109: ... sensor support plate 11 on the de livery assembly rear side plate side 8 Remove the screw 12 and detach the de livery guide support plate 13 on the deliv ery assembly rear side plate side 9 Remove the screw 14 and detach the de livery lower guide support plate 15 10 Remove the E ring 16 of the delivery as sembly front side plate side then remove the screw 17 and detach the bushing 18 10 11 13 12 ...

Page 110: ...ery assembly rear side plate side then remove the gear 20 and the parallel pin 21 12 Remove the E ring 22 and remove the screw 23 then detach the bushing 24 13 Slide down the delivery lower guide 25 then slide out the delivery roller 26 to gether with the manual feed tray 27 2 Removing the Pickup Roller 1 Remove the pickup assembly cover 1 19 20 24 22 23 21 27 25 26 1 Free the claws and detach the...

Page 111: ... 3 309 2 Remove the resin E ring 2 and remove the roller arm 3 then detach the pickup roller 4 3 Removing the Separation Roller 1 Remove the pickup assembly cover Fig ure 3 308 2 Remove the two screws 1 and detach the sensor stay 2 3 Remove the three screws 3 and detach the guide plate 5 3 pc attached to the right stay 4 2 3 4 1 1 2 4 5 5 5 3 3 3 ...

Page 112: ...NON ADF FOR iR600 REV 0 JAN 1999 PRINTED IN JAPAN IMPRIME AU JAPON Figure 3 310a Figure 3 310b Figure 3 311 4 Remove the two screws 6 and detach the lower guide 7 5 Remove the grip ring 8 from the front side plate side and pull out the clutch ring 9 6 7 7 6 9 8 ...

Page 113: ... Figure 3 312 Figure 3 313a Figure 3 313b 6 Remove the screw 11 from the gear sup port plate front 10 then slide the gear support plate front 10 to the left and de tach the clutch 12 to the front 7 Disconnect the two connectors 13 then remove the two mounting screws 14 and detach the separation unit 15 10 11 12 15 14 13 14 15 ...

Page 114: ...TED IN JAPAN IMPRIME AU JAPON Figure 3 314 Figure 3 315 Figure 3 316 8 Remove the E ring 16 and pull out the shaft 17 9 Remove the grip ring 18 at the front and detach the bushing 19 10 Remove the E ring 20 at the rear then remove the bushing 21 and detach the rod arm plate 22 16 17 18 19 22 21 20 ...

Page 115: ...ar 24 12 Remove the separation roller Caution When mounting the one way gear be sure that the protrusion is toward the in side 4 Removing the Manual Feed Registration Roller 1 Remove the front cover Figures 3 104b 3 104c 2 Remove the main cover Figure 3 105 3 Remove the three screws 1 and discon nect the connector 2 then detach the so lenoid unit 3 of the delivery assembly front plate side 23 24 O...

Page 116: ... detach the manual feed registration sensor PCB 5 5 Remove the grip ring 7 and the bearing 8 from the manual feed registration roller 6 delivery assembly front plate side 6 Remove the grip ring 9 of the manual registration roller 6 and the E ring 11 of the feeding belt roller shaft 10 then re move the parallel pin 13 and detach the gear unit 14 and the bushing 15 4 5 7 6 8 10 15 14 11 9 6 13 12 ...

Page 117: ...d registration roller 6 delivery assembly rear side plate side then pull out the manual feed registration roller 6 5 Removing the Feeding pull out Roller 1 Remove the mounting screw 2 of the gear support plate 1 of the pickup front side plate side 2 Remove the E ring 3 washer 4 shim 5 2 pc gear black 6 gear white 7 shim 5 2 pc and spring 8 in the order indicated on the pickup front side plate side...

Page 118: ...t side plate side 4 Remove the E ring 10 gear 11 parallel pin 12 grip ring 13 and bearing of the feeding pull out roller 9 front side plate side 5 Remove the E ring 15 gear 16 parallel pin 17 E ring 18 and bearing of the feeding pull out roller 9 rear side plate side then detach the feeding pull out roller 9 Caution The gear holds a pin Take care not to lose it 10 11 9 13 14 12 19 18 17 9 15 16 ...

Page 119: ...ure 3 329 Figure 3 330 6 Removing the Registration Roller 1 Remove the two screws 1 and detach the reversing guide 2 2 Remove the two screws 3 and detach the registration sensor PCB 4 Caution A cable is connected to the registration sensor Be sure to disconnect the connec tor when removing the PCB 1 1 2 3 3 4 Registration sensor PCB Connector ...

Page 120: ...gistration roller 5 front side plate side 4 Remove the E ring 8 gear 9 E ring 10 and bearing 11 from the registration roller 5 rear side plate side Caution The gear holds a pin Take care not to lose it when removing the gear 7 Removing the Separation Belt 1 Remove the two screws and loosen the separation unit 2 Remove the grip ring 1 at the front then detach the clutch ring 2 and the clutch 3 5 7 ...

Page 121: ...E AU JAPON 3 25 CHAPTER 3 MECHANICAL SYSTEM Figure 3 334a Figure 3 334b Figure 3 335 3 Disconnect the two connectors 4 and re move the two mounting screws 5 then detach the separation unit 6 4 Remove the two mounting screws 7 and detach the separation auxiliary plate 8 6 5 4 5 6 7 7 8 ...

Page 122: ...e 3 336b Figure 3 336c 5 Loosen the screw 11 on the separation pressure change lever 10 of the separa tion roller 9 Caution When mounting the separation pressure change lever be sure to set it at pressure low 6 Loosen the screw 13 on the thrust stopper 12 of the separation roller 9 10 9 11 Separation pressure high Separation pressure low 12 9 13 ...

Page 123: ...er 9 Caution The gear holds a pin Take care not to lose it when removing the gear 8 Remove the E ring at the rear of the sepa ration roller 9 then detach the separation belt 17 8 Removing the Reversing Roller 1 Remove the reversal motor unit Figure 3 201 2 Remove the two screws 1 of the pickup front side plate side and disconnect the connector 2 then detach the pre revers ing solenoid unit 3 9 14 ...

Page 124: ...9 PRINTED IN JAPAN IMPRIME AU JAPON 3 Remove the two screws 4 and detach the reversing guide 5 4 Remove the E ring 7 gear 8 and paral lel pin 9 of the reversing roller 6 2 pc Caution The gear holds a pin Take care not to lose itwhenremovingthegear Figure 3 340 Figure 3 341 4 4 5 7 7 8 8 9 6 6 ...

Page 125: ...CHAPTER 3 MECHANICAL SYSTEM Figure 3 342a Figure 3 342b 5 Remove the grip ring 14 and the bearing 15 of the front side plate side of the re versing roller 6 2 pc then remove the E ring 16 and the bearing 17 of the rear side plate side 6 Pull out the reversing roller 6 14 14 15 6 15 6 17 16 6 6 16 17 ...

Page 126: ... iR600 REV 0 JAN 1999 PRINTED IN JAPAN IMPRIME AU JAPON Figure 3 401 Figure 3 402a Figure 3 402b 2 1 1 3 3 IV REPLACING THE FEEDING BELT 1 Removing the Feeding Belt 1 Remove the two mounting screws 1 and detach the lower front cover 2 2 Release the fixing clip 3 left right ...

Page 127: ...PRINTED IN JAPAN IMPRIME AU JAPON 3 31 CHAPTER 3 MECHANICAL SYSTEM Figure 3 403 Figure 3 404b Figure 3 404a 3 Turn the releasing lever 4 clockwise to reduce the tension 4 Remove the mounting screws 6 2 each and open the left right arm 5 to the out side 4 6 5 6 5 ...

Page 128: ...PON 5 Slip out the feeding belt 7 2 Mounting the Feeding Belt 1 Insert a screwdriver between the machine and the feeding assembly as shown to in crease the gap 2 Fit in the feeding belt and pull up the screwdriver when the belt comes into con tact with it then slip the feeding belt all the way in Figure 3 405 Figure 3 406 7 ...

Page 129: ...U JAPON CHAPTER 4 MAINTENANCE AND SERVICING I PERIODICALLY REPLACED PARTS 4 1 II DURABLES 4 1 III SCHEDULED SERVICING CHART 4 2 This chapter discusses those of the ADF s parts that require inspection and maintenance IV CLEANING 4 4 A Copyboard Glass 4 4 B Belt Assembly 4 4 C Sensors 4 5 ...

Page 130: ...4 201 Note The values in the above table are estimates only and are subject to change based on future data No 1 2 3 4 Parts name Feeding belt Pickup roller Feeding roller Separation belt Parts No FC2 1210 FB4 7640 FG6 2746 separation unit FG6 2748 feeding roller unit FG6 2746 separation unit FE6 3059 separation belt Q ty 1 2 1 1 1 11 Life copies 200 000 250 000 250 000 250 000 As of December 1998 ...

Page 131: ...on paper sensor Skew paper sensor Pre registration paper sensor Post registration paper sensor Reversal paper sensor Manual feed registration roller paper sensor Pickup roller Feeding roller Separation belt Pull out roller Registration roller Reversal rollerA roll Reversal roller B roll Manual roller roll Delivery roller roll Remarks Parts of the copier Scheduled servicing 100 000 copies or 6 mon ...

Page 132: ...ion paper sensor S4 7 Skew papers sensor S5 10 Reversal paper sensor S1 8 Pre registration roller paper sensor S2 9 Post registration roller paper sensor S3 11 Manual feed registration roller paper sensor S9 1 Copyboard glass 2 Original feeding belt 12 Pickup roller 13 Feeding roller 14 Separation belt 15 Pull out roller 16 Registration roller 17 Reversal roller A roll 18 Reversal roller B roll 20...

Page 133: ...N Figure 4 401 Figure 4 402 IV CLEANING A Copyboard Glass 1 Wipe the copier s copyboard glass with a cloth moistened with alcohol B Belt Assembly 1 Dry wipe the original feeding belt while moving it in the direction of the arrow If the dirt is appreciable wipe it with a cloth moistened with mild detergent solu tion then dry wipe it ...

Page 134: ... Original Sensor 1 Clean the window of the sensor on the original tray with a blower brush 2 Original Trailing Edge Sensor 1 Clean the window of the sensor on the original tray with a blower brush 3 Original Sensor 1 Remove the pickup assembly cover Fig ure 3 308a 2 Clean the light receiving area of the sensor stay and the light emitting area at the rear of the guide plate with a blower brush ...

Page 135: ... the registration guide and put a blower brush between the separation stay and the separation guide to clean The separation paper sensor is at the front while the skew paper sensor is at the rear 5 Pre Registration Roller Paper Sensor 1 Remove the reversing guide Figure 3 328 2 Clean the three faces of the prism found behind the reversing guide Side to clean Side to clean Side to clean Side to cle...

Page 136: ...ean the two points of the filter face of the sensor 6 Post Registration Roller Paper Sensor 1 Open the pickup upper cover 2 Remove the reversing guide Figure 3 328 3 Clean the three faces of the prism of the post registration roller paper sensor 7 Reversal Paper Sensor 1 Remove the reversing guide Figure 3 328 2 Remove the screws 1 and detach the re versal sensor 2 Side to clean Side to clean Side...

Page 137: ...IMPRIME AU JAPON Figure 4 412 Figure 4 413 3 Clean the filter face of the reversal sensor 2 with a blower brush 4 Open the ADF fully Figure 3 103 5 While opening the pickup middle guide to the left of the feeding belt clean the prism on the reflecting side of the reversal sensor with a blower brush found in the rear 2 ...

Page 138: ... 8 Manual Feed Registration Roller Paper Sensor 1 Remove the front cover 2 Remove the main cover 3 Clean the detecting hole of the registration sensor on the delivery upper guide with a blower brush 9 Pickup Roller 1 Open the pickup assembly upper cover 2 Remove the pickup cover 3 Clean the roller surface with lint free paper or a cloth moistened with alcohol ...

Page 139: ... SW1 on the ADF control ler PCB as shown 3 Press the push switch SW2 on the ADF controller PBC The separation assembly starts to operate 4 Moisten the copy paper obtained in step 1 with alcohol 5 Hold the copy paper against the pickup slot to clean the roller Caution Thepull outrollerisalsooperating Besure to hold onto the copy paper not letting it go ifA4 asshowninFigure4 417 ifLTR on the other h...

Page 140: ...the DIP switch SW1 on the ADF control ler PCB as shown 3 Press the push switch SW2 on the ADF controller PCB The separation assembly will start to op erate 4 Clean the pull out roller with lint free pa per moistened with alcohol 12 Registration Roller 1 Open the upper cover and open the feed ing guide 2 Remove the reversing guide 3 Remove the ADF controller cover and set the DIP switch SW1 on the ...

Page 141: ...re 4 424 13 Reversing Roller A Roll 1 Open the pickup assembly upper cover 2 Clean the reversing roller A 1 and the roll 2 with lint free paper or a cloth moistened with alcohol 14 Reversing Roller B Roll 1 Open the pickup assembly upper cover 2 Clean the reversing roller B 1 and the roll 2 with lint free paper or a cloth moistened with alcohol 1 2 1 2 ...

Page 142: ...feed tray 2 Clean the manual feed delivery roller 1 and the roll 2 with lint free paper or a cloth moistened with alcohol 16 Delivery Roller Roll 1 With the manual feed tray closed clean the delivery manual fed roller 1 and the roll 2 with lint free paper or a cloth moistened with alcohol 17 Manual Feed Registration Roller Roll 1 Remove the main cover 2 Remove the two screws 1 and detach the manua...

Page 143: ...AN IMPRIME AU JAPON 3 Clean the manual feed registration roller 3 with lint free paper or a cloth moistened with alcohol 4 Shift up the ADF and open the delivery lower guide 4 then clean the manual feed registration roller roll 5 with lint free paper or a cloth moistened with alcohol Figure 4 428 Figure 4 429 3 5 4 ...

Page 144: ...dication 5 41 E Cleaning 5 45 F Others 5 49 II TROUBLESHOOTING 5 57 A Troubleshooting Malfunctions 5 57 III ARRANGEMENT OF ELECTRICAL PARTS 5 63 A Sensors 5 63 B Motors Clutches and Solenoids 5 64 C PCBs 5 65 IV LEDS CHECK PINS AND SWITCHES BY PCB 5 66 A ADF Controller PCB 5 66 B Reversal Motor Driver PCB 5 71 C Belt Motor Driver PCB 5 71 D Pickup Tray PCB 5 72 E Indicator LED PCB 5 72 V SELF DIAG...

Page 145: ... whichmustbeperformedinsequence 1 AdjustingtheheightoftheADF 2 AdjustingtheorientationoftheADF 3 Removingtheskew 4 Adjustingthehorizontalregistration 5 Adjustingtheoriginalstopposition 1 Adjusting the Height of the ADF 1 Remove the two screws and detach the lower front cover 2 With the ADF closed make adjustments by loosening the two fixing screws 5 of the magnet catch 4 so that both rubber feet 3...

Page 146: ...art 2 Adjusting the Orientation of the ADF Adjust the orientation of the machine so that its feeding path is correctly matched with that of the copier 1 Using an A4 or LTR sheet of copy paper prepare a test chart like the one shown in Figure 5 103 2 Place the test chart on the original tray and make a Direct 1 1 copy in stream reading mode Caution Besuretousestreamreadingwhenmaking a copy ...

Page 147: ...e 5 106 Fixing nut Adjusting screw If A 0 turn the adjusting screw counterclockwise If B 0 turn the adjusting screw clockwise 3 Place another sheet of copy paper over the copy made in step 2 to check the angle A 1 mm B 1 mm 4 Iftheangleisnotasindicated loosenthefix ing nut at the rear of the right hinge unit and turn the adjusting screw to make adjust ments Caution Be sure that the ADF is kept ope...

Page 148: ...Skew Adjustmentsmustbemadeforthefollowing three 1 Pickupfromtheoriginaltray 2 Pickupfromthemanualfeedertray 3 Reversaloperation duplexing a Pickup from the Original Tray 1 Remove the screw and detach the ADF controllercover 2 Set the DIP switch SW1 on the ADF con trollerPCBasfollows 3 Place an A4 or LTR sheet of copy paper on theoriginaltray Figure 5 108 Figure 5 109 Copy paper ...

Page 149: ...D2 IC1 SW4SW3SW2 SW2 4 Press the push switch SW2 on the ADF controller PCB once The original will be picked up and placed on the copyboard glass 5 Open the ADF slowly and check to make sure that A and B shown in Figure 5 111 are 2 mm or less Close the ADF and press the push switch SW2 on the ADF controller PCB once Theoriginalwillbedeliveredtothedelivery tray Figure 5 111 A B Original A 2mm B 2mm ...

Page 150: ... iR600 REV 0 JAN 1999 PRINTED IN JAPAN IMPRIME AU JAPON Figure 5 112 1 Screw Front cover If Not as Indicated Adjustthepositionoftheregistrationroller 1 Remove four screws and detach the front cover Figure 5 112 3 Figure 5 112 2 Front cover Screw Screw Screw Front cover ...

Page 151: ...n the fixing screw on the registration roller mounting plate then adjust the mounting angle of the registrationrollerbyslidingmountingplateup or down 3 Aftermakingadjustments tightenthefixing screw on the registration roller mounting plate 4 Put the DIP switch SW1 on the ADF con troller PCB back to its original state and at tach the ADF controller cover b Pickup from the Manual feeder Tray 1 Remov...

Page 152: ...y paper Manual feeder tray Butted J1 J2 J5 J3 J6 J7 J8 J9 J10 J11 J14 J13 J12 J4 FU2 FU1 SW1 LED2 IC1 SW4SW3SW2 SW2 Figure 5 118 3 Open the manual feeder tray and place an A4 or LTR sheet of copy paper Be sure to butt the copy paper against the rear 4 Press the push switch SW2 on the ADF controller PCB once The original will be picked up and placed on the copyboard glass ...

Page 153: ...19 1 A B Original A 2mm B 2mm J1 J2 J5 J3 J6 J7 J8 J9 J10 J11 J14 J13 J12 J4 FU2 FU1 SW1 LED2 IC1 SW4SW3SW2 SW2 Figure 5 119 2 5 Open the ADF slowly and check to make sure that A and B shown in Figure 5 119 1 arewithin2mm Close the ADF and press the push switch SW2 on the ADF controller PCB once Theoriginalisdeliveredtothedeliverytray ...

Page 154: ...0 JAN 1999 PRINTED IN JAPAN IMPRIME AU JAPON Screw Front cover Figure 5 120 1 Figure 5 120 2 Figure 5 120 3 Front cover Screw Screw Screw Front cover If Not as Indicated Adjust the position of the manual feeder registra tionroller 1 Remove the four screws and detach the frontcover ...

Page 155: ...nt andslidethemount ing plate to the left or right to adjust the mountingangleoftheregistrationroller 3 Aftermakingadjustments tightenthefixing screwofthemanualregistrationrollermount ingplate 4 Put the DIP switch SW1 on the ADF con troller PCB back to its original settings and attach the ADF controller cover c Reversal duplexing 1 Remove the screw and detach the ADF controllercover 2 Set the DIP ...

Page 156: ...4 J13 J12 J4 FU2 FU1 SW1 LED2 IC1 SW4SW3SW2 SW2 3 Place an A4 or LTR sheet of copy paper on theoriginaltray 4 Press the push switch SW2 on the ADF controllerPCBtwice A single press on the push switch SW2 causes the machine to pick up an original and stop it on the copyboard glass clock wiserotation Another press will cause the machine to turn over the original and place it on the copyboard glass ...

Page 157: ... ADF slowly and check to make sure that A and B shown in Figure 5 126 are within2mm Close the ADF and press the push switch SW2 on the ADF controller PCB once Theoriginalwillbedeliveredtothedelivery tray Figure 5 126 Figure 5 127 A B Original A 2mm B 2mm J1 J2 J5 J3 J6 J7 J8 J9 J10 J11 J14 J13 J12 J4 FU2 FU1 SW1 LED2 IC1 SW4SW3SW2 SW2 ...

Page 158: ...EV 0 JAN 1999 PRINTED IN JAPAN IMPRIME AU JAPON If Not as Indicated Adjust the position of the reversal registration roller 1 Remove the four screws and detach the frontcover Figure 5 128 1 Figure 5 128 2 Figure 5 128 3 Screw Front cover Front cover Screw Screw Screw Front cover ...

Page 159: ... the mounting plate to adjust the mounting angle oftheregistrationroller 3 Aftermakingadjustments tightenthefixing screw of the reversing registration roller mountingplate 4 Put the DIP switch SW1 on the ADF con troller PCB back to its original setting and attach the ADF controller cover 4 Adjusting the Horizontal Registration Adjust the horizontal registration for the fol lowing 1 Originaltraypic...

Page 160: ...ADF controller PCB once A single press on the push switch SW2 causes the machine to pick up an original and place it on the copyboard 5 Open the ADF and check to make sure that C shown in Figure 5 134 is as follows Table 5 101 Copy paper Figure 5 132 Figure 5 133 J1 J2 J5 J3 J6 J7 J8 J9 J10 J11 J14 J13 J12 J4 FU2 FU1 SW1 LED2 IC1 SW4SW3SW2 SW2 Figure 5 134 C Original Original size A4 LTR C measure...

Page 161: ...e the original tray to the front The value on the left of the slash represents A4 while that on the right LTR 6 Close the ADF and press the push switch SW2 on the ADF controller PCB once Theoriginalwillbedeliveredtothedelivery tray If Not as Indicated Adjustthepositionoftheoriginaltray 1 Loosen the tray fixing screw and adjust the positionoftheoriginaltray 2 Aftermakingadjustments tightentheorigin...

Page 162: ... 5 138 Figure 5 139 Figure 5 140 Manual feeder tray Copy paper Manual feeder tray Butted b Manual Feeder Tray Pickup 1 Remove the screw and detach the ADF controllercover 2 Set the DIP switch SW1 on the ADF con troller PCB as indicated in Figure 5 138 3 Open the manual feeder tray and place an A4 or LTR sheet of copy paper Be sure to butt the copy paper against the rear ...

Page 163: ...to pick up an original and place it on the copyboard glass 5 Open the ADF slowly and check to make sure that C indicated in Figure 5 142 is as indicated Table 5 102 Close the ADF and press the push switch SW2 on the ADF controller PCB once Theoriginalwillbedeliveredtothedelivery tray Figure 5 141 J1 J2 J5 J3 J6 J7 J8 J9 J10 J11 J14 J13 J12 J4 FU2 FU1 SW1 LED2 IC1 SW4SW3SW2 SW2 C Original Figure 5 ...

Page 164: ...1 Loosenthefixingscrewofthemanualfeeder tray and adjust the position of the manual feeder tray 2 Aftermakingadjustments tightenthemanual feedertrayfixingscrew 3 Put the DIP switch SW1 on the ADF con trollerPCBbacktoitsinitialstate andmount the ADF controller cover 5 Adjusting the Original Stop Position Adjust the original stop position for the fol lowing 1 Originaltraypickup 2 Manual feeder tray p...

Page 165: ... J13 J12 J4 FU2 FU1 SW1 LED2 IC1 SW4SW3SW2 SW2 D Original D 11 1mm 3 Place an A4 or LTR sheet of copy paper on theoriginaltray 4 Press the push switch SW2 on the ADF controller PCB once A single press on the push switch SW2 willcausethemachinetopickupanoriginal and place it on the copyboard glass 5 Open the ADF slowly and check to make sure that D indicated in Figure 5 148 is 11 1 mm Then close th...

Page 166: ...F controllerPCB A press on each switch will shift the original stop position by 0 5 mm When the stop po sition is correct press the push switch SW2 Theoriginalwillbedelivered andthenew settingwillbestored Table 5 103 Caution Holdingdownthepushswitchwillnotbring aboutmorethanasingleshift EX If the copy paper stops with a discrepancy of 12mm ClosetheADFleavingthecopypaperonthe copyboard glass Toshif...

Page 167: ... J13 J12 J4 FU2 FU1 SW1 LED2 IC1 SW4SW3SW2 SW2 b Manual Feed Tray Pickup 1 Remove the screw and detach the ADF controllercover 2 Set the DIP switch SW1 on the ADF con troller PCB as shown in Figure 5 152 3 Open the manual feed tray and place an A4 or LTR sheet of copy paper Be sure to butt the copy paper against the rear 4 Press the push switch SW2 on the ADF controller PCB once A single press wil...

Page 168: ...py paper To the right To the left 5 Open the ADF slowly and check to make sure that D indicated in Figure 5 155 is 11 1 mm Then close the ADF slowly 6 Adjust the original stop position using the push switches SW 3 and SW4 on the ADF controllerPCB A single press on each switch will shift the originalstoppositionby0 5mm When the stop position is correct press the push switch SW2 Theoriginalwillbedel...

Page 169: ...UBLESHOOTING EX Iftheoriginalstoppositionhasadiscrepancy of12mm ClosetheADFleavingthecopypaperonthe copyboard glass Toshiftthestoppositiontotheleftby1mm 1 0 5 adjustment increment 2 Hence press the push switch SW4 twice then press the push switch SW2 The copy paper will be delivered and the newsettingwillbestored ...

Page 170: ...n roller paper sensor S2 Post registration paper sensor S3 Separation paper sensor S4 Skew paper sensor S5 Original sensor S6 Original trailing edge sensor S7 Pre last original sensor S8 Manual feeder registration roller paper sensor S9 Delivery motor M5 Reference p 5 27 p 5 28 Description Replace the EEPROM Adjust sensors and delivery motor B Making Adjustments When Replacing Major Parts 1 Outlin...

Page 171: ...placing the ADF controller PCB 1 Remove the EEPROM IC2 from the faulty ADF controller PCB 2 Mount the EEPROM removed in step 1 to the new ADF controller PCB Reference The EEPROM of the new ADF controller PCB will not be used 3 Turn on the copier and check to make sure that it does not indicate E420 4 If the copier indicates E420 mount the EEPROM removed from the new ADF con troller back to the new...

Page 172: ...gistration roller paper sensor S2 Post registration roller paper sensor S3 Separation paper sensor S4 Skew paper sensor S5 Originalsensor S6 Originaltrailingedgesensor S7 Pre last page paper sensor S8 Manual feeder registration roller paper sensor S9 Deliverymotor M5 Reference The delivery motor is adjusted by sending referencesignalstoitandcheckingitsrota tion speed by the delivery motor clock se...

Page 173: ...sor S7 Screw ADF controller cover Figure 5 159 Figure 5 160 Figure 5 161 Making Adjustments 1 Open the ADF and make a solid black copy on A4 copy paper 2 Remove the screw and detach the ADF controllercover 3 Set the DIP switch SW1 on the ADF con troller PCB as shown in Figure 5 160 4 Placethecopymadeinstep1 ontheoriginal tray with its black side facing down Caution When placing the paper take care...

Page 174: ...he ADF controller PCB once again If the Result is Not Good Check the state of the sensors S1 through S9 and check and replace as necessary the faultysensor The state of the sensor is indicated in three levelsasfollows Table 5 107 1 IfLED2 indicatesNG pressthepushswitch SW3 or SW4 to select the sensor in ques tion Figure 5 162 J1 J2 J5 J3 J6 J7 J8 J9 J10 J11 J14 J13 J12 J4 FU2 FU1 SW1 LED2 IC1 SW4S...

Page 175: ...sensor and motor Origin sensor S6 Original trailing edge sensor S7 Separation sensor S4 Skew sensor S5 Pre registration roller paper sensor S2 Post registration roller paper sensor S3 Reversal sensor S1 Manual feeder registration roller paper sensor S9 Pre last original paper sensor S8 Delivery motor M5 Table 5 108 2 Press the push switch SW2 on the ADF controller PCB once again ...

Page 176: ...DF controllercover 2 Set the DIP switch SW1 on the ADF con troller PCB as shown in Table 5 110 to suit theadjustmenttomake Table 5 110 Screw ADF controller cover Adjustment Tray pickup Reversal Manual pickup Settings Figure 5 163 1 Adjusting Registration Roller Pickup Arching for Tray Pickup Adjusting Registration Roller Arching for Reversal Adjusting Registration Roller Pickup Arching for Manual ...

Page 177: ...esent value Table 5 111 LED2 indication A E2 A E3 A E4 A E5 A E6 A E7 A E8 A E9 A EA A Eb A EC A Ed A EE A EF A F0 A F1 A F2 A F3 A F4 A F5 A F6 Switch SW3 SW4 Adjustment value 30 29 28 27 26 25 24 23 22 21 20 19 18 17 16 15 14 13 12 11 10 LED2 indication A F7 A F8 A F9 A FA A Fb A FC A Fd A FE A FF A 00 A 01 A 02 A 03 A 04 A 05 A 06 A 07 A 08 A 09 A 0A A 0b Adjustment value 9 8 7 6 5 4 3 2 1 0 re...

Page 178: ...itch SW3 or SW4 on the ADF controller PCB and adjust the arching with reference to Table 5 112 6 After making adjustments press the push switch SW2 on the ADF controller PCB onceagain The paper will be discharged and the new settingwillbestored 2 Adjusting the Speed of the Belt Reference When the speed of the belt is adjusted the speed of reversal will automatically be ad justed 1 Remove the ADF c...

Page 179: ...Eb A EC A Ed A EE A EF A F0 A F1 A F2 A F3 A F4 A F5 A F6 Switch SW3 SW4 Adjustment value 30 29 28 27 26 25 24 23 22 21 20 19 18 17 16 15 14 13 12 11 10 LED2 indication A F7 A F8 A F9 A FA A Fb A FC A Fd A FE A FF A 00 A 01 A 02 A 03 A 04 A 05 A 06 A 07 A 08 A 09 A 0A A 0b Adjustment value 9 8 7 6 5 4 3 2 1 0 reference value 1 2 3 4 5 6 7 8 9 10 11 Switch SW3 SW4 LED2 indication A 0C A 0D A 0E A 0...

Page 180: ...gure 5 172 3 Operate the push switch SW3 or SW4 on the ADF controller PCB and adjust the speed of the belt with reference to Table 5 114 Table 5 114 4 After making adjustments press the push switch SW2 on the ADF controller PCB onceagain 3 Adjusting the Speed of Reversal 1 Remove the ADF cover and set the DIP switch SW1 ontheADFcontrollerPCBas shown in Figure 5 172 Switch SW3 SW4 Change Increases ...

Page 181: ... Ed A EE A EF A F0 A F1 A F2 A F3 A F4 A F5 A F6 Switch SW3 SW4 Adjustment value 30 29 28 27 26 25 24 23 22 21 20 19 18 17 16 15 14 13 12 11 10 LED2 indication A F7 A F8 A F9 A FA A Fb A FC A Fd A FE A FF A 00 A 01 A 02 A 03 A 04 A 05 A 06 A 07 A 08 A 09 A 0A A 0b Adjustment value 9 8 7 6 5 4 3 2 1 0 reference value 1 2 3 4 5 6 7 8 9 10 11 Switch SW3 SW4 LED2 indication A 0C A 0D A 0E A 0F A 10 A ...

Page 182: ...2 J4 FU2 FU1 SW1 LED2 IC1 SW4SW3SW2 SW4 SW3 Figure 5 174 Switch SW3 SW4 Change Increases the speed of rotation Decreases the speed of rotation 3 Operate the push switch SW3 or SW4 on the ADF controller PCB and adjust the speed of reversal with reference to Table 5 116 Table 5 116 4 After making adjustments press the push switch SW2 on the ADF controller PCB onceagain ...

Page 183: ...LED2 on the ADF controllerPCB LED2 indication 1 2 3 4 5 6 Corresponding sensor notation Original sensor S6 Original trailing edge sensor S7 Separation sensor S4 Skew sensor S5 Pre registration roller paper sensor S2 Post registration roller paper sensor S3 LED2 indication 7 8 9 A b C Corresponding sensor notation Reversal sensor S1 Manual feeder registration roller paper sensor S9 Pre last origina...

Page 184: ...3SW2 SW2 Figure 5 179 Figure 5 178 Figure 5 177 LED2 indication ON Flashing Copy paper Present Absent 2 Press the push switch SW2 once The 7 segment LED LED2 on the ADF controller PCB will start to flash for 1 in dicatingthatthesensoroperationdiagnosis functionhasturnedon 3 Operate the push switch SW3 or SW4 to change the indication of the 7 segment LED LED2 thereby checking the presence ab sence ...

Page 185: ...on Jam counter Tray pickup counter Manual feeder pickup counter Jam history Software version Description Indicates the number of jams Indicates the number of pickups made from the tray according to the sizes of originals small or large Indicates the number of pickups made from the manual feeder according to the sizes of originals small or large Indicates the most recent three jams Indicates the ve...

Page 186: ...5 000 5 After making adjustments press the push switch SW2 on the ADF controller PCB onceagain 2 Tray Pickup Counter Manual Feeder Pickup Counter 1 Remove the screw and detach the ADF controllercover 2 Set the DIP switch SW1 on the ADF con troller PCB as indicated in Table 5 120 3 Press the push switch SW2 on the ADF controllerPCB LED2willflashtoindicatethetotalnumber ofpickups J1 J2 J5 J3 J6 J7 J...

Page 187: ...e 5 121 Reference The total number may be up to 4 800 000 Thesmall sizeandlarge sizenumbermay be up to 2 400 000 In the case of tray pickup the 1 s place is rounded off at power off 5 After making adjustments press the push switch SW2 on the ADF controller PCB onceagain 3 Jam History 1 Remove the screw and detach the ADF controllercover 2 Set the DIP switch SW1 on the ADF con troller PCB as shown ...

Page 188: ...r making adjustments press the push switch SW2 on the ADF controller PCB 4 Software Version 1 Remove the screw and detach the ADF controllercover 2 Set the DIP switch SW1 on the ADF con troller as shown in Figure 5 188 3 Press the push switch SW2 on the ADF controllerPCB LED2 will flash four times to indicate the softwareversion EX In the case of version 3 01 4 Press the push switch SW2 on the ADF...

Page 189: ...leaning of the registration roller pickup from tray 2 If dirt is excessive Clean the registration roller using lint free paper and alcohol Reference p 5 45 p 5 47 p 5 47 E Cleaning 1 Cleaning the Separation Assembly 1 Remove the screw and detach the ADF controllercover 2 Set the DIP switch SW1 on the ADF con troller PCB as shown in Figure 5 190 3 Press the push switch SW2 on the ADF controllerPCB ...

Page 190: ...lcohol and feed it into the separation assembly while holding tightlyontoitstrailingedge Caution Besuretoholdthetrailingedgeofthecopy paper as shown 5 Press the push switch SW2 on the ADF controller PCB once again to end the opera tion Figure 5 192a Slide guide Rail For A4 Match the paper edge Figure 5 192b Rail For LTR Match the paper edge Slide guide ...

Page 191: ...1 on the ADF con troller PCB as shown in Figure 5 193 3 Place about ten sheets of copy paper on the tray 4 Press the push switch SW2 on the ADF controller PCB to end the operation If the dirt is excessive 1 Open the upper cover and open the feeding guide 2 Remove the two screws and detach the re versingguide Figure 5 193 Figure 5 194 J1 J2 J5 J3 J6 J7 J8 J9 J10 J11 J14 J13 J12 J4 FU2 FU1 SW1 LED2 ...

Page 192: ...Figure 5 197 J1 J2 J5 J3 J6 J7 J8 J9 J10 J11 J14 J13 J12 J4 FU2 FU1 SW1 LED2 IC1 SW4SW3SW2 SW2 3 Remove the ADF controller cover and set theDIPswitch SW1 ontheADFcontroller PCB as shown 4 Press the push switch SW2 on the ADF controllerPCB The reversing assembly starts to operate 5 Cleanwithlint freepapermoistenedwithal cohol Figure 5 198 ...

Page 193: ...ts mix size mode for originals of different configurations Reference p 5 49 p 5 50 p 5 51 F Others 1 Checking the Original Width Detecting Switch SW301 1 Remove the screw and detach the ADF controllercover 2 Set the DIP switch SW1 on the ADF con troller PCB as shown in Figure 5 199 3 Press the push switch SW2 on the ADF controllerPCB LED2 turns on or flashes to indicate the present original width ...

Page 194: ...g ON Flashing ON Flashing ON Flashing ON Flashing ON Flashing ON Flashing ON Flashing ON Flashing ON Flashing The original detecting switch SW301 may be faulty Table 5 125 4 Press the push switch SW2 on the ADF controller PCB once again to end the op eration 2 Initializing the Back Up RAM 1 Remove the screw and detach the ADF controller cover 2 Set the DIP switch SW1 on the ADF controller PCB as i...

Page 195: ...PRIME AU JAPON 5 51 CHAPTER 5 TROUBLESHOOTING 1 Hooks Figure 5 203 3 Setting Mix Size Mode Tousethismode thepickuprollerarrangement must be changed and the DIP switch must be set in advance a Changing the Pickup Roller Arrangement 1 Open the left cover and remove the inside cover ...

Page 196: ... guide B Original sensor mount Screw Screw Screw Figure 5 204 E rings Pickup rollers Pickup rollers E rings Figure 5 205 Shaft front Shaft rear Figure 5 206 2 Remove the screws and detach the pickup guide A pickup guide B and original sensor mount 3 Remove the E ring and remove the pickup roller rear front 4 Connect the shaft of the pickup roller ...

Page 197: ...ON 5 53 CHAPTER 5 TROUBLESHOOTING Rubber roller Separation rollers Move Timing belt Figure 5 209 Figure 5 208 Figure 5 207 5 Remove the rubber roller 1 pc from the pickuproller 6 Cutthefrontofthethreepickuprollerswitha cutter and remove them 7 Move the timing belt from the front to the center ...

Page 198: ...e 5 210 E ring E ring Timing belts Pickup roller Shaft Figure 5 211 8 Remove the two pickup roller arms at the front and mount the front arm to the rear No roller will be used at the rear 9 Attach the timing belt on the pickup roller arranging two rollers slide the shaft through them and secure them in place with E rings Caution Be sure that the shaft is centered ...

Page 199: ... Keepinmindthatthepositionofthepickup guideBisdifferentfromthatoftheoriginal machine 11 Mounttheinsidecover Reference Partsthatshouldremain Rubberroller 1 pc Feedingroller 3 pc E ring 2 pc Rollerarm 1 pc b Operating the DIP Switch 1 Remove the screw and detach the ADF controllercover 2 Set the DIP switch SW1 as shown in Fig ure 5 213 3 Press the push switch SW2 on the ADF controllerPCB J1 J2 J5 J3...

Page 200: ...itch SW2 on the ADF controller PCB to end the operation c Operation 1 Put the originals against the rear 2 Place the originals on the original tray and adjust the slide guide to the largest original 3 Select Extension Mode Mix Size on the copier s control panel 4 Press the Copy Start key J1 J2 J5 J3 J6 J7 J8 J9 J10 J11 J14 J13 J12 J4 FU2 FU1 SW1 LED2 IC1 SW4SW3SW2 SW4 SW3 Match the corners Slide g...

Page 201: ... push switch SW2 Does the belt motor M2 rotate To stop press the push switch SW2 once again Disconnect the connector J72 on the belt motor driver PCB Set the meter range to 1Ω and connect the meter probes as indicated Is the resistance about 1 1Ω for each Yes N o YES NO Cause Belt motor M2 1 3 1 4 2 5 2 6 1 black 2 white 3 red 4 yellow 5 blue 6 orange 1 black 2 white 3 red 4 yellow 5 blue 6 orange...

Page 202: ...he ADF controller PCB Checks Set the meter range to 10 VDC Turn the belt motor by hand Does the voltage between J12 3 and J12 2 on the ADF controller PCB change between 0V and 5 V Is the cable between the belt motor driver PCB and the ADF controller PCB connected properly Replace the belt motor driver PCB Is the problem corrected Yes N o NO NO YES NO Cause Belt motor clock sensor PI1 Cable Belt mo...

Page 203: ...SW2 Does the delivery motor M5 rotate To stop press the push switch SW2 once again Disconnect the connector J2 from the ADF controller PCB Set the meter range to 1Ω and connect the meter probes as indicated Is the resistance about 15Ω Set the meter range to 10 VDC Turn the delivery motor by hand Does the voltage between connectors J3 2 and J3 1 on the ADF controller PCB change between 0 V and 5 V ...

Page 204: ...B as follows Press the push switch SW2 Does the separation motor rotate Disconnect the connector J8 of the ADF controller PCB Set the meter range to 1Ω and connect the connector as indicated Is the resistance about 5 0Ω Set the meter range to 10 VDC Rotate the separation motor by hand Is the voltage between connectors J12 5 and J12 4 on the ADF controller PCB change between 0 V and 5 V Yes N o YES...

Page 205: ... switch SW3 SW4 Does the motor M3 rotate To stop press the push switch SW2 once again Disconnect the connector J11 of the ADF controller PCB Set the meter range to 1Ω and connect the meter probes as indicated Is the resistance about 74Ω for each Yes N o YES NO Cause Pickup motor M3 2 4 2 6 1 3 1 5 1 orange 2 brown 3 yellow 4 black 5 red 6 red 1 orange 2 brown 3 yellow 4 black 5 red 6 red 1 orange ...

Page 206: ...er PCB alternate between 0 and 5 V Set the meter range to 10 VDC Move the pickup roller unit front up and down by hand Is the voltage between J14 A5 and J14 A4 on the ADF controller PCB about 5 V Replace the ADF controller PCB Is the problem corrected Yes N o NO NO NO YES Cause Pickup roller height sensor 1 PI8 Pickup roller height sensor 2 PI9 Pickup roller home position sensor P7 ADF controller ...

Page 207: ... Left cover open closed detection rear Pre reversal paper detection Registration roller rotation detection Left cover open closed detection front Pickup roller home position detection Pickup roller height detection 1 Pickup roller height detection 2 ADF open closed detection Delivery motor clock detection Manual feeder set detection Original delivery detection Reversing assembly paper detection Pr...

Page 208: ...hes and Solenoids Symbol Name Motor Clutch Solenoid Notation M1 M2 M3 M4 M5 CL SL1 SL2 SL3 SL4 Function Reversal motor Belt motor Pickup motor Separation motor Delivery motor Separation clutch Reversing solenoid Stopper plate solenoid Pre reversal solenoid Delivery solenoid Table 5 302 M CL SL SL1 SL4 SL2 SL3 M3 M1 M2 M5 M4 CL Figure 5 302 ...

Page 209: ...00 REV 0 JAN 1999 PRINTED IN JAPAN IMPRIME AU JAPON 5 65 CHAPTER 5 TROUBLESHOOTING C PCBs 1 2 3 4 5 Ref 1 2 3 4 5 Name ADF controller PCB Reversal motor driver PCB Belt motor driver PCB Pickup tray PCB Indicator LED PCB Figure 5 303 Table 5 303 ...

Page 210: ...HECK PINS AND SWITCHES BY PCB Of the LEDs and check pins those needed in the field are discussed Caution Do not touch the check pins not found herein They are for the factory only and require special tools instruments andmustbeadjustedtohighaccuracy A ADF Conroller PCB Caution SomeLEDsemitdimlightwhentheyareoffbecauseofleakagecurrent Thisisanormalcondition and must be kept in mind 1 Arrangement of...

Page 211: ...M2 A press on the push switch SW2 on the ADF controller PCB will start the belt motor and another press will stop it automatically taking the next pattern clockwise rotation 700 520 260 130 mm sec counterclockwise rotation 700 520 260 130 mm sec Driving the Reversal Motor M1 A press on the push switch SW2 on the ADF controller PCB will start the motor and another press will stop it automatically t...

Page 212: ...ration With an original placed in the manual feeder a press on the push switch SW2 on the ADF controller PCB will start the operation which stops after delivering an original Adjusting the Arching for Tray Pickup A press on the push switch SW2 on the ADF controller PCB will start the operation Make adjustments using the push switch SW3 or SW4 After making adjustments press the push switch SW2 to s...

Page 213: ...itch SW3 or SW4 After making adjustments press the push switch SW2 to store the new setting For details see p 5 20 Adjusting the Manual Feed Original Stop Position A press on the push switch SW2 on the ADF controller PCB will start the operation Make adjustments using the push switch SW3 or SW4 After making adjustments press the push switch SW2 to store the new setting For details see p 5 23 Execu...

Page 214: ...cessive Press the push switch SW2 on the ADF controller PCB so that the registration roller will rotate Clean the roller with lint free paper moistened with alcohol To stop the operation press the push switch SW2 once again For details see p 5 47 Checking the Original Width Detecting Switch SW301 A press on the push switch SW2 on the ADF controller PCB will start the operation and another press wi...

Page 215: ... 1999 CANON INC CANON ADF FOR iR600 REV 0 JAN 1999 PRINTED IN JAPAN IMPRIME AU JAPON 5 71 CHAPTER 5 TROUBLESHOOTING B Reversal Motor Driver PCB J602 J601 J72 J71 Figure 5 402 C Belt Motor Driver PCB Figure 5 403 ...

Page 216: ... COPYRIGHT 1999 CANON INC CANON ADF FOR iR600 REV 0 JAN 1999 PRINTED IN JAPAN IMPRIME AU JAPON CHAPTER 5 TROUBLESHOOTING J51 J53 J52 SW301 D Pickup Tray PCB J55 Figure 5 404 E Indicator LED PCB Figure 5 405 ...

Page 217: ...als of 240 msec Flashing at intervals of 160 msec Flashing at intervals of 80 msec State of LED2 X X X X A Not used X X J X X E Display I O Adjust Option Test Counter Function OK JAM 1 25 READY AAA BBBB CCCC DDDD E FFff G HHHHHH IIIII AAA BBBB CCCC DDDD E FFff G HHHHHH IIIII AAA BBBB CCCC DDDD E FFff G HHHHHH IIIII AAA BBBB CCCC DDDD E FFff G HHHHHH IIIII AAA BBBB CCCC DDDD E FFff G HHHHHH IIIII A...

Page 218: ...arate the 1st page The last page is detected before completing the feeding of recovery pages during jam recovery operation Machine operation Stops the ongoing operation and flashes the Original Set indicator Stops the ongoing operation and flashes the Original Set indicator Copier operation Stops the ongoing operation Stops the ongoing operation Resetting Remove the originals and set them once aga...

Page 219: ...enerate signals within 2 sec after the pickup motor had been driven The back up data could not be read twice when the copier was turned on or the data which was read had an error Code E400 E402 E404 E405 E410 E420 Cause A fault exists in the communication cable between the machine and the copier An error exists in the ADF controller PCB An error exists in the belt motor M2 An error exists in the b...

Page 220: ... A 26 G Reversal Sensor Circuit Diagram A 27 H Pre Post Registration Roller Sensor Circuit Diagram A 28 I Separation Sensor Skew Sensor Circuit Diagram A 29 J Original Sensor light emitting Circuit Diagram A 30 K Original Sensor light receiving Circuit Diagram A 30 L Tray Circuit Diagram A 31 M Pre Last Original Paper Sensor Circuit Diagram A 33 N Original Set Indicator Circuit Diagram A 33 O Manu...

Page 221: ...nal Delivering 1st original Reading 2nd original Holding 3rd original Delivering 2nd original Reading 3rd original Delivering 3rd original yyyy yyyy yyyy Original sensor S6 Pickup roller home position sensor PI 7 Pickup roller height sensor 1 2 PI 8 9 Stopper plate solenoid SL2 Pickup motor M3 Separation motor M4 Separation clutch CL Reversal motor M1 Pre registration roller paper sensor S2 Pre re...

Page 222: ...nal Delivering 2nd original Feeding 1st original to wait position Separating 2nd original yyyy yyyy yyyy Original sensor S6 Pickup roller home position sensor PI 7 Pickup roller height sensor 1 2 PI 8 9 Stopper plate solenoid SL2 Pickup motor M3 Separation motor M4 Separation clutch CL Reversal motor M1 Pre registration roller paper sensor S2 Pre reversing solenoid SL3 Belt motor M2 Original deliv...

Page 223: ...ng it to wait position Reading 2nd original Delivering 2nd original Feeding 1st original to wait position Original sensor S6 Pickup roller home position sensor PI 7 Pickup roller height sensor 1 2 PI 8 9 Stopper plate solenoid SL2 Pickup motor M3 Separation motor M4 Separation clutch CL Reversal motor M1 Pre registration roller paper sensor S2 Pre reversing solenoid SL3 Belt motor M2 Original deli...

Page 224: ...ion Reading 3rd original Delivering 2nd original Feeding 3rd original to 3rd original delivery direction Delivering 3rd original Reading 1st original Separating 2nd original yyyy yyyy DOWN DOWN Original sensor S6 Pickup roller home position sensor PI 7 Pickup roller height sensor 1 2 PI 8 9 Stopper plate solenoid SL2 Pickup motor M3 Separation motor M4 Separation clutch CL Reversal motor M1 Pre re...

Page 225: ...ring 2nd original Reading 1st original Separating 2nd original UP DOWN yyyy yyyy Original sensor S6 Pickup roller home position sensor PI 7 Pickup roller height sensor 1 2 PI 8 9 Stopper plate solenoid SL2 Pickup motor M3 Separation motor M4 Separation clutch CL Reversal motor M1 Pre registration roller paper sensor S2 Pre reversing solenoid SL3 Belt motor M2 Original delivery sensor PI 13 Deliver...

Page 226: ...d original Reading face of 2nd original Pre reversing 3rd original Reading back of 3rd original Reversing 3rd original Reading face of 3rd original Feeding 3rd original to copyboard glass Delivering 2nd original Feeding 3rd original yyyy yyyy Original sensor S6 Pickup roller home position sensor PI 7 Pickup roller height sensor 1 2 PI 8 9 Stopper plate solenoid SL2 Pickup motor M3 Separation motor...

Page 227: ... Moving 2nd original to copyboard glass Reversing 2nd original Reversing 1st original Reversing 1st original Reversing 2nd original UP yyyy yyyy Feeding 1st original to copyboard glass Original sensor S6 Pickup roller home position sensor PI 7 Pickup roller height sensor 1 2 PI 8 9 Stopper plate solenoid SL2 Pickup motor M3 Separation motor M4 Separation clutch CL Reversal motor M1 Pre registratio...

Page 228: ...Delivery solenoid SL4 Manual feed set sensor PI 12 Pre reversing solenoid SL3 Manual feed registration roller paper sensor S9 Belt motor M2 Reversal sensor S1 Delivery motor M5 Original delivery sensor PI 13 yyyy yyyy yyyy Low speed Picking up original Feeding original Reading original Delivering original Determining original set position yyyyyyyyyy yyyyyyyyyy yyyyyyyyyy yyyy yyyy yyyy motor CCW r...

Page 229: ...ection signal Original Detection Reference signal Delivery Motor Clock Detection signal Original Delivery Detection signal Delivery Motor Drive command Pre Last Original Paper Detection signal Pre Last Original Paper Detection Reference signal Left Cover Front Open Closed Detection signal Left Cover Rear Open Closed Detection signal Reversal Motor Drive command Reversal Motor Drive command Reversa...

Page 230: ...e command Original Skew Detection signal Original Skew Detection Reference signal Reversing Solenoid Drive command Stopper Plate Solenoid Drive command position 1 Stopper Plate Solenoid Drive command position 2 Pre Reversal Solenoid Drive command Delivery Solenoid Drive signal position 1 Delivery Solenoid Drive signal position 2 Separation Motor Clock Detection signal Separation Detection signal S...

Page 231: ... 3 8 9 10 11 12 13 14 15 2 3 4 5 6 7 1 EJJAM GND 5V EJMD 24V MFST GND 5V MFRGSAJ MFRGS GND 5V SL4D2 SL4D1 24V 7 6 5 4 3 2 1 12 11 10 9 8 8 9 10 11 12 2 3 4 5 6 7 1 7 6 5 4 3 2 1 1 2 3 4 5 6 7 3 2 1 4 3 2 1 3 2 1 3 2 1 1 2 2 1 3 2 1 M5 3 2 1 4 4 3 2 1 1 2 3 4 5 6 7 GND 24V GND TXD RXD EDGO GND 6 5 4 3 2 1 7 S6 LED2 P S P S S2 S3 P S P S S4 P S S1 P S S7 P S S8 P S S9 S6 FG ADF controller PCB J132F ...

Page 232: ...ASAJ 8 A09 TNSAJ 9 A10 MFRGSAJ VDD 10 1 v99 20 19 A02 18 A01 17 D1 16 CLK 15 LD 14 Do 13 12 11 Vcc B Vref T Vref SERIAL_DO SERIAL_CLK DAC_LD S_Vref LASAJ 1 1 CS 8 Vdd 8 2 2 SCK 7 RDY 7 3 3 DI 6 RESET 6 4 4 DO 5 Vss 5 1 2 3 4 1 2 3 4 8 7 6 5 8 7 6 5 1 Vcc IN OUT IC2 Q8 GND Q9 A012 A011 LWR HWR XTAL EXTAL STBY RES SERIAL_DI SERIAL_DO SERIAL_CLK EEP_CS C9 R1 5V 5V 5V 5V 5V 24R 5V 24V 5V 5V 5V C2 5V R...

Page 233: ...ND GND 11 NC GND 10 FB NC 9 NC ON X2 C14 C13 R8 R9 C12 C16 5V Q 4 RD WR CSRAM C15 5V C11 IC1 CSROM RD LED2 RA1 RA2 5 4 3 2 1 6 7 8 9 10 RA6 SW2 SW3 SW4 1 2 5V DIPSW1 RA8 RA4 2 1 3 4 6 7 8 5 5V RA3 RA7 5V 11 SUBTRY_CONT 10 0 A502 A505 2 LCVR 1 0 A509 LCVF A509 8 CNTRL 7 0 A502 8 DBUS 7 0 A502 18 ABUS 17 0 A502 J1 4 TXD J1 5 GND J 1 3 R X D J1 2 EDGO 5R Q13 R16 R15 Q32 R14 R12 C17 R13 R11 R10 Q31 D2...

Page 234: ... K C E J M F V J 2 1 2 4 V J 2 S L 4 D 1 J 2 3 S L 4 D 2 J 2 4 5 V J 2 5 G N D J 2 6 M F R G S J 2 7 M F R G S A J J 2 8 5 V J 2 9 G N D J 2 1 0 M F S T J 2 2 4 V J 2 E J M D J 2 5 V J 2 G N D J 2 E J J A M 1 1 1 2 1 3 1 4 1 5 2 4 R F U 3 D 6 D 7 5 R Q 3 5 Q 3 6 R 3 1 R 3 2 R 3 5 R 3 6 R 3 9 Q 1 3 4 3 C 3 3 C 3 2 R 3 3 R 3 4 C 3 1 C 3 0 C 2 9 C 2 8 R 3 8 R 3 7 5 R 5 R D 8 D 9 R 4 0 Q 3 8 Q 3 7 R 4...

Page 235: ... A I L S J 5 1 1 G N D J 5 1 2 5 V J 5 1 3 2 4 V J 5 1 4 G N D J 5 1 5 D T L E D 5 R R 4 3 R 4 4 C 3 4 S S W 4 5 R Q 4 1 0 R 4 5 R 4 6 C 3 5 S S W 3 1 R 4 7 R 4 8 C 3 6 S S W 2 2 R 4 9 R 5 0 C 3 7 S S W 1 3 R 5 1 R 5 2 C 3 8 S S W 0 4 R 5 3 R 5 4 Q 3 9 R 5 6 R 5 7 Q 4 0 R 5 5 C 3 9 R 5 8 C 4 0 5 R 2 4 V L A S A J 5 L S T S 1 6 T A I L S A J 7 T A I L S 1 8 D T L E D 1 0 2 4 R F U 1 C 4 1 J 4 1 J 4...

Page 236: ...J 6 1 3 P G J 7 1 R E F _ C L K J7 2 M 0 1 J 7 3 M 0 2 J 7 4 C W C C W J 7 5 B V r e f J 7 6 5 V J 7 7 G N D J 7 8 G N D J 7 9 2 4 V J 7 1 0 2 4 V J 7 1 1 2 4 V J 7 1 2 P G J 7 1 3 P G J 7 1 4 P G 5 R R A 1 1 8 1 7 2 6 3 5 4 Q 1 3 1 1 1 0 Q 1 3 9 8 5 V R 6 1 R 6 0 5 V R 1 7 0 C P 7 T R N P C Q 1 4 8 7 6 5 4 2 4 R R A 1 2 8 1 7 2 6 3 5 4 5 R 1 2 3 4 8 7 6 5 R A 5 Q 1 4 8 1 2 3 4 5 V R 1 7 1 C P 8 B...

Page 237: ...C A F C C 1 0 3 C 5 4 5 V 8 7 6 5 4 3 2 1 1 6 1 5 1 4 1 3 1 2 1 1 1 0 9 G N D X t X t N 1 N 2 F G i n A P C A F C V d d C P o u t C P i n T E S T L D R S N W R V Q 2 3 S P M F V S P R E F S P L I M S P P W M C P 1 0 C P 9 C P 1 5 C P 1 2 5 V R 1 6 7 Q 5 8 L E D 3 Q 6 2 R 3 7 8 6 5 4 V d d S N C P H O U T P D O U T 2 1 A I N A O U T 9 G N D C 9 8 C 1 0 4 5 V C 5 5 R 1 0 3 R 1 0 2 A 1 1 1 0 9 8 Q C ...

Page 238: ...S L 2 O N 4 S T S L 1 O N 3 T R N F L S L O N 2 R E S O 1 S L T M R 0 6 Q C L R P R Q 5 Q 1 5 D C K 3 2 O S C A 5 0 3 4 3 Q 1 6 1 2 5 V R 1 8 6 1 3 1 2 Q 1 6 11 R 6 5 R 6 7 R 6 4 Q 4 3 R 6 3 Q 4 2 R 6 6 R 7 3 R 7 2 Q 4 7 R 6 8 Q 4 5 D 1 5 D 1 3 D 1 2 D 1 1 D 1 0 C 4 3 2 4 R F U 4 S L 1 D 2 1 2 4 V 3 2 4 V 4 S L 2 D 1 5 J 9 S L 2 D 2 1 2 4 V 2 S L 3 D 1 3 2 4 V 4 J 1 0 C L D J 1 0 J 1 0 J 1 0 J 9 J...

Page 239: ...R T R N 1 6 R F O P G N D G N D P R T R R 9 9 5 R 5 V J 1 2 1 3 L C V R C 5 1 0 G N D L C V R 5 V J 1 2 J 1 2 1 0 9 J 1 2 8 R 9 6 5 R R 9 4 5 R 5 V 7 J 1 2 R 9 3 5 R R 1 7 5 5 V 6 J 1 2 5 R R 1 7 6 Q 5 1 R 9 2 C 5 0 S P C L K J 1 2 4 R 9 1 5 R J 1 2 5 S E P C L K 1 2 S P C L K C P 1 1 3 J 1 2 2 J 1 2 R 8 9 5 R B L T C L K 1 R 9 0 C 4 9 Q 2 2 3 4 5 G N D B L T C L K G N D 5 V R 8 8 5 R 1 J 1 2 Q 1 ...

Page 240: ... 6 0 C 6 2 2 4 V 1 2 3 8 4 Q 2 5 R 1 1 8 C 6 1 R 1 7 9 D 2 1 2 4 V 7 6 5 8 4 Q 2 5 R 1 1 9 C 6 3 R 1 2 0 R 1 2 1 R 1 2 2 R 1 7 2 Z D 4 D T S 1 R 1 4 4 C 7 8 R 1 4 5 C 8 0 R 1 4 6 C 8 1 R 1 4 7 C 8 3 R 1 4 0 C 7 2 R 1 4 1 C 7 4 R 1 4 2 C 7 5 R 1 4 3 C 7 7 5 R 5 R A R _ U N I T 1 8 0 A 5 0 2 1 9 C 7 9 C 8 2 C 7 3 C 7 6 Q 2 6 1 1 1 0 C P 2 0 R G B S Q 2 6 1 3 1 2 C P 2 1 R G A S Q 2 2 1 3 1 2 Q 2 6 5...

Page 241: ...R R 1 2 5 5 R R 1 3 1 5 R R 1 3 6 R 1 2 8 5 R R 1 2 7 C 6 5 R 1 3 4 5 R R 1 3 3 C 6 7 R 1 3 9 5 R R 1 3 8 C 7 1 R 1 2 4 Q 2 6 2 1 5 R R 1 2 3 C 6 4 C 8 5 C P 1 6 S L P C L K R 1 3 7 Q 2 6 4 3 C 6 9 C 7 0 C P 1 7 T R N S 5 R R 1 3 5 C 6 8 5 R R 1 2 6 R 1 3 0 5 R R 1 2 9 C 6 6 R 1 7 7 5 R R 1 3 2 Q 5 4 S L P C L K 1 T N S A J T R N S 1 4 5 L C V F A 5 0 3 R 1 5 5 R 1 5 4 R 1 5 3 5 V Q D Q C L R 1 0 ...

Page 242: ... 1 1 0 Q 7 1 3 1 2 Q 1 9 1 2 Q 1 9 3 4 Q 2 2 5 6 Q 1 1 R 1 6 9 2 4 V 5 6 8 7 4 V C C G N D Q 6 5 V 7 1 4 C 8 6 V C C G N D Q 7 7 1 4 C 8 7 V C C G N D Q 1 0 8 1 6 C 8 8 V C C G N D Q 1 2 7 1 4 C 8 9 V C C G N D Q 1 3 5 V 7 1 4 C 9 0 V C C G N D Q 1 5 7 1 4 C 9 1 V C C G N D Q 1 6 7 1 4 C 9 2 V C C G N D Q 1 7 7 1 4 C 9 3 V C C G N D Q 1 9 5 V 7 1 4 C 9 4 V C C G N D Q 2 2 7 1 4 C 9 5 V C C G N D Q...

Page 243: ... 1 B O U T B O U T S G P G A O U T A O U T V c c 2 1 6 1 5 1 4 1 3 1 2 1 1 1 0 9 8 7 6 5 4 3 2 1 Q 6 5 1 5 U J 6 1 5 U 2 4 V 2 4 V 5 U 1 3 J 6 1 1 2 J 6 1 1 1 J 6 1 1 0 J 6 1 9 J 6 1 8 J 6 1 7 J 6 1 6 J 6 1 5 J 6 1 4 J 6 1 3 J 6 1 2 J 6 1 1 J 6 2 1 J 6 2 2 J 6 2 3 J 6 2 4 J 6 2 5 J 6 2 6 R 6 5 6 C 6 5 3 R 6 5 5 R 6 5 4 R 6 5 3 R A 6 5 1 C 6 5 1 R 6 5 1 R 6 5 2 C 6 5 2 C 6 5 4 C 6 5 5 C 6 5 6 E 1 2...

Page 244: ... 1 7 R E S E T 1 6 C W B 1 5 C L K 1 4 M 5 1 3 M 4 1 2 M 3 1 1 M 2 1 0 M 1 9 V r e f V d d A A P G P G B B 8 7 6 5 4 3 2 1 J 7 2 3 J 7 2 4 J 7 2 5 J 7 2 6 C 6 0 5 J 7 1 J 7 1 J 7 1 J 7 1 5 J 7 1 6 J 7 1 7 8 J 7 1 9 J 7 1 1 0 J 7 1 1 1 J 7 1 1 2 J 7 1 1 3 J 7 1 1 4 4 3 2 1 R 6 0 1 R 6 0 2 C 6 0 3 R 6 0 4 5 R R A 6 0 1 5 R 2 4 R 5 R D 6 0 1 Q 6 0 3 C 6 0 4 Q 6 0 2 R 6 0 3 Z D 6 0 1 C 6 0 1 2 4 R J 7...

Page 245: ...ED IN JAPAN IMPRIME AU JAPON A 27 G Reversal Sensor Circuit Diagram J 1 4 9 1 5 R D 5 0 3 R 5 0 1 Q 5 0 1 L E D 5 0 1 2 3 4 8 1 5 R 6 5 4 8 7 J 1 4 9 2 J 1 4 9 3 J 1 4 9 4 5 R 5 R R 5 0 2 Q 5 0 2 C 5 0 1 R 5 0 5 R 5 0 3 R 5 0 4 P T R 5 0 1 R 5 0 6 5 R D 5 0 2 R 5 0 7 Q 5 0 2 ...

Page 246: ...0 3 R 4 0 1 Q 4 0 1 L E D 4 0 1 R 4 0 6 5 R J 1 3 5 5 2 3 4 8 1 5 R Q 4 0 4 2 3 4 8 1 5 R Q 4 0 3 P T R 4 0 1 D 4 0 2 R 4 0 7 5 R J 1 3 5 4 5 R D 4 0 4 R 4 1 4 Q 4 0 2 L E D 4 0 2 R 4 1 3 5 R J 1 3 5 3 6 5 4 8 7 5 R Q 4 0 4 6 5 4 8 7 5 R Q 4 0 3 P T R 4 0 2 D 4 0 5 R 4 1 6 5 R R 4 0 4 R 4 0 2 C 4 0 2 R 4 1 5 R 4 1 1 J 1 3 5 2 J 1 3 5 1 5 R R 4 0 5 R 4 0 3 R 4 1 2 R 4 1 0 C 4 0 1 ...

Page 247: ... R 4 5 1 Q 4 5 1 L E D 4 5 1 R 4 5 6 5 R J 1 3 4 5 2 3 4 8 1 5 R Q 4 5 4 2 3 4 8 1 5 R Q 4 5 3 P T R 4 5 1 D 4 5 2 R 4 5 7 5 R J 1 3 4 4 5 R D 4 5 4 R 4 6 4 Q 4 5 2 L E D 4 5 2 R 4 6 3 5 R J 1 3 4 3 6 5 4 8 7 5 R Q 4 5 4 6 5 4 8 7 5 R Q 4 5 3 P T R 4 5 2 D 4 5 5 R 4 6 6 5 R R 4 5 4 R 4 5 2 C 4 5 2 R 4 6 5 R 4 6 1 J 1 3 4 2 J 1 3 4 1 5 R R 4 5 5 R 4 5 3 R 4 6 2 R 4 6 0 C 4 5 1 ...

Page 248: ...INC CANON ADF FOR iR600 REV 0 JAN 1999 PRINTED IN JAPAN IMPRIME AU JAPON J Original Sensor light emitting Circuit Diagram K Original Sensor light receiving Circuit Diagram J 1 4 5 1 L E D 7 5 1 J 1 4 5 2 J 1 3 6 1 T P S 6 1 6 C J 1 3 6 2 ...

Page 249: ...APPENDIX COPYRIGHT 1999 CANON INC CANON ADF FOR iR600 REV 0 JAN 1999 PRINTED IN JAPAN IMPRIME AU JAPON A 31 ...

Page 250: ...COPYRIGHT 1999 CANON INC CANON ADF FOR iR600 REV 0 JAN 1999 PRINTED IN JAPAN IMPRIME AU JAPON A 32 L Tray Circuit Diagram ...

Page 251: ...00 REV 0 JAN 1999 PRINTED IN JAPAN IMPRIME AU JAPON A 33 M Pre Last Original Paper Sensor Circuit Diagram N Original Set Indicator Circuit Diagram J 5 6 3 T P S 6 1 6 C J 5 6 2 J 5 6 1 L E D 8 5 1 J 5 5 1 L E D 9 0 2 J 5 5 2 R 9 0 2 L E D 9 0 1 R 9 0 1 ...

Page 252: ... JAPAN IMPRIME AU JAPON O Manual Feed Registration Roller Paper Sensor Circuit Diagram J 2 5 1 5 R D 5 5 1 R 5 5 7 Q 5 5 2 L E D 5 5 1 2 3 4 8 1 5 R 6 5 4 8 7 J 2 5 2 J 2 5 3 J 2 5 4 5 R 5 R R 5 5 2 Q 5 5 1 C 5 5 1 R 5 5 4 R 5 5 5 R 5 5 3 P T R 5 5 1 R 5 5 6 5 R D 5 5 2 R 5 5 8 Q 5 5 1 ...

Page 253: ...ected to carry one B Each group of five service persons is expected to carry one C Each workshop is expected to carry one Digital multifeeder 1 FY9 2002 000 A For making electrical checks Tool name No Tool No Rank Remarks Shape No Name Uses Composition Remarks 1 Alcohol Cleaning e g glass plastic rubber external covers Fluorine family hydrogen carbon alcohol surface activating agent Do not bring n...

Page 254: ...C CANON ADF FOR iR600 REV 0 JAN 1999 PRINTED IN JAPAN IMPRIME AU JAPON Preparedby OfficeImagingProductsTechnicalSupportDivision CANONINC PrintedinJapan REVISION0 JAN 1999 30359 5 1 Hakusan7 chome Toride Ibaraki 302 8501Japan ...

Page 255: ...COPYRIGHT 1999 CANON INC CANON ADF FOR iR600 REV 0 JAN 1999 PRINTED IN JAPAN IMPRIME AU JAPON PRINTED IN JAPAN IMPRIME AU JAPON 0199M1 71 1 The Publication is printed on 70 reprocessed paper ...

Reviews: