background image

10

TS4200D

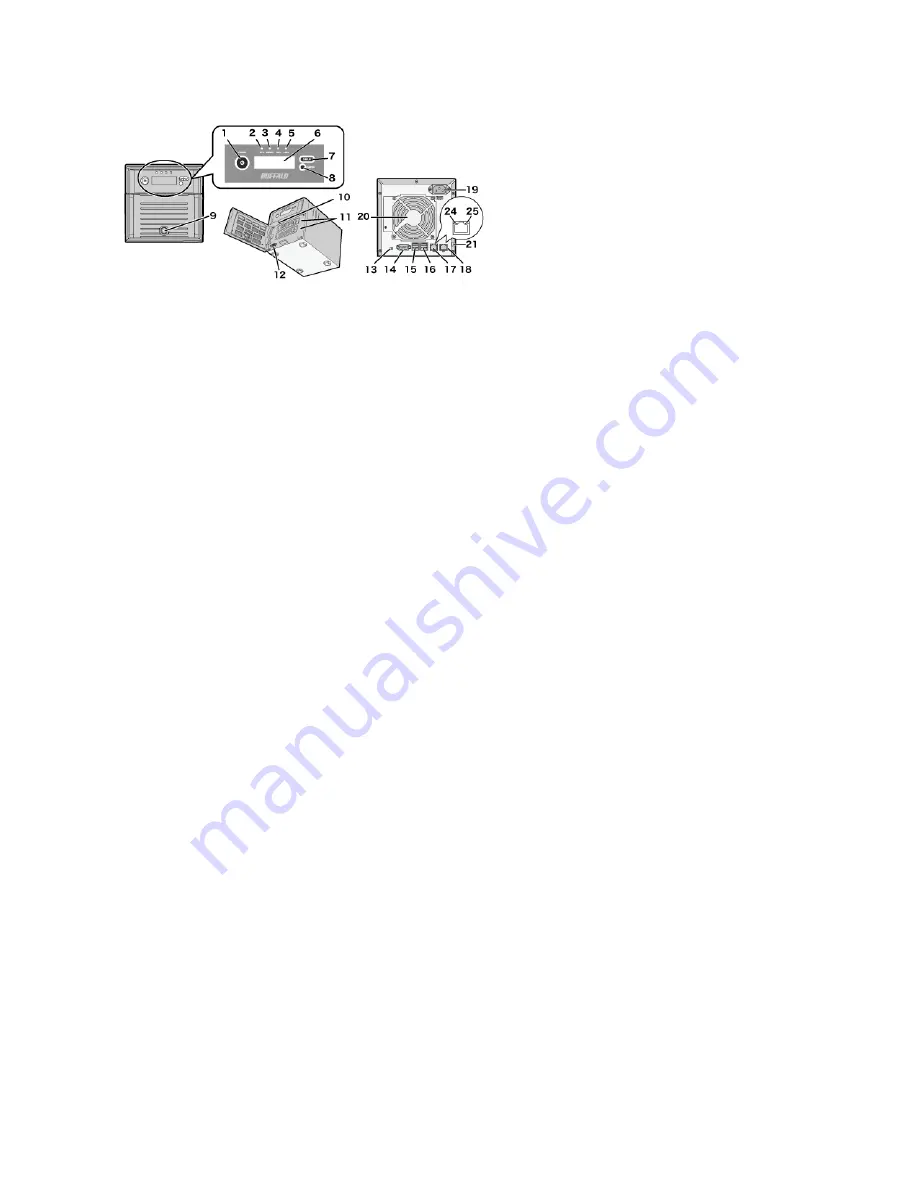
Power Button

To power on, connect the power cable and wait for 10 seconds, then press the power button. To power off, press 
the power button twice.

Info LED

If there is a status message, the amber info LEDwill light up. Check the LCD panel to see the status message.

Error LED

If there is an error, the red error LED will light up. Check the LCD panel to see the error message.

LAN1 LED

When LAN port 1 is connected, this LED glows green. It blinks when the connection is active.

LAN2 LED

When LAN port 2 is connected, this LED glows green. It blinks when the connection is active.

LCD Panel

Status of the TeraStation.

Display Button

Switches between the display modes.
This button stops beeping.

Function Button

Use this button for Direct Copy, dismounting USB devices, rebuilding RAID arrays, and configuring failover.

Drive Lock

Open the front panel with the key to replace hard drives or press the reset button.

10 

Reset Button

To shut down and reboot the TeraStation, hold down the reset button.

11 

Status LEDs

Normally, these LEDs blink green when hard drives are accessed. If a drive fails, its LED will turn red or amber.

12 

Factory Use Only

13 

Boot Mode Switch

Leave the switch in the HDD position during normal operation. To recover settings, insert the recovery USB drive 

Summary of Contents for TeraStation TS4200D

Page 1: ...TeraStation 4000 User Manual www buffalotech com 35020039 03 2013 11...

Page 2: ...lizing Settings 17 For Password Resetting 17 Chapter 2 Configuration 18 Opening Settings 18 Opening Easy Admin 19 Chapter 3 Access Restrictions 21 Configuring Access Restrictions on Users and Groups 2...

Page 3: ...ive 41 Dismounting Drives 41 Checking Drives 42 Formatting Drives 43 Encrypting Drives 44 Media Cartridges 45 Erase Data on the TeraStation Completely 45 Disk Quotas 46 Quotas for Users 47 Quotas for...

Page 4: ...Configuring a Backup Job 69 Replication 72 Failover 74 Ethernet Cable Connection Methods 74 Configuring Failover 75 Backing Up Your Mac with Time Machine 77 Copying from a USB Device 80 Amazon S3 81 C...

Page 5: ...x Server 97 Chapter 9 Advanced Features 100 Antivirus Software 100 Licenses 100 Activating Virus Scanning 101 Configuring Security Settings 101 Connecting through a Proxy Server 102 Updating 102 Exclu...

Page 6: ...crypting Settings Data 121 Encrypting FTP Transfer Data 121 SSL Keys 122 Web Server 122 MySQL Server 123 SNMP 124 Saving and Applying Settings 125 Saving Settings 125 Applying Settings 126 Restoring F...

Page 7: ...ter 10 Utilities 136 NAS Navigator2 for Windows 136 Mount as Network Drive 138 NAS Navigator2 for Mac 139 Mount as Network Drive 140 iSCSI Connection Tool 140 Menu 141 Chapter 11 Appendix 143 LCD Disp...

Page 8: ...8 Environmental Information 149 KC 149 BSMI 149 CCC 150 150 Models 150...

Page 9: ...9 Chapter 1 Installation Diagrams TS4800D TS4400D TS4400R...

Page 10: ...ws green It blinks when the connection is active 6 LCD Panel Status of the TeraStation 7 Display Button Switches between the display modes This button stops beeping 8 Function Button Use this button f...

Page 11: ...2 This second Ethernet port may be used for network redundancy or backup You may connect a second TeraStation directly to this port for backup 19Power Connector Use the included power cable to connect...

Page 12: ...u use LAN port 2 configure the IP address at Network IP Address in Settings 4 Follow the steps on the screen to install NAS Navigator2 5 Click Finish NAS Navigator2 will open 6 Right click on your Ter...

Page 13: ...the time settings on the TeraStation and other network devices Clocks for the network devices may run at slightly different speeds If these devices get out of sync it may cause network problems Buffal...

Page 14: ...g the TeraStation On and Off Press the power button on the TeraStation to turn it on To turn off the TeraStation press the power button twice Don t unplug the TeraStation without turning it off first...

Page 15: ...When all the LEDs on the front of the TeraStation turn off the shutdown process is complete Changing the Administrator Password After initial setup follow this procedure to change your password 1 Dou...

Page 16: ...ername and password 4 Click Change Password 5 Enter the new password twice 6 Click OK You have changed the admin password Recovery Drive To initialize all of the TeraStation s settings or just restore...

Page 17: ...dialog opens the USB initialization drive is ready to use Dismount the USB drive before unplugging it See Dismounting Drives in chapter 4 for the instructions on dismounting drives For Password Reset...

Page 18: ...re are a large number of registered users groups or shared folders use Firefox instead of Internet Explorer If you have a proxy server enabled in the browser settings disable the proxy server With Int...

Page 19: ...ncrypted connection 4 Settings will open Notes Click to open Easy Admin Click to play a tone from the TeraStation for easy location You can also use Bonjour to log in to Settings from OS X 10 4 or lat...

Page 20: ...ick Easy Admin 4 The Easy Admin screen will open Notes If you click any buttons you will need to enter a username and password You can open Easy Admin anytime by clicking the icon at the top left of S...

Page 21: ...gs Configuring access restrictions through Windows is not supported and may cause unexpected behavior You can also configure users groups and shared folders from Easy Admin by clicking Access Restrict...

Page 22: ...the client language to match the characters in Management Name Time Language Recycle Bin To protect your data from accidental deletion you may configure your TeraStation to use a recycle bin instead o...

Page 23: ...name is TS XX001 and the shared folder name is share then enter TS XX001 share to open it Note FTP SFTP and Mac AFP folders cannot be hidden Adding Users 1 In File Sharing select Users 2 Click Create...

Page 24: ...ill be overwritten Format for user data Username required password required and user description optional Examples username1 password1 comment1 username2 password2 comment2 username3 password3 comment...

Page 25: ...ed Use numbers between 1000 and 1999 to set a group ID manually Don t use duplicate group IDs You may register up to 300 groups with the TeraStation If you are logged in as a member of the general use...

Page 26: ...a Mac with any of the following characters it will not display correctly on a Windows computer With OS X 10 2 or later you may have to connect to the TeraStation via AFP in order to display or copy a...

Page 27: ...d other date information may be updated or changed Hard drive capacity is shown in Settings in actual gigabytes The Properties window in Windows may show GiB instead which will be a smaller number Dur...

Page 28: ...domain must be changed at least once or joining the Active Directory domain will fail The DNS name and NetBIOS name of Active Directory domains should be identical If both read only and read write per...

Page 29: ...f you do you will need to en able SMB again and reconfigure AD from scratch NT Domains In an NT domain environment the TeraStation uses account information from the NT domain server to set access rest...

Page 30: ...it to 20 bytes The TeraStation supports a domain environment with a maximum of 1000 users and 1000 groups 10 000 users and 10 000 groups can be downloaded from the domain controller but are not suppor...

Page 31: ...to external authentication users If external authentication is disabled all local user passwords will need to be recon figured Disable SMB2 before using external authorization with Windows 8 Using ext...

Page 32: ...ccess Restrictions 12Select the level of access Read and write access allowed Read access allowed Access prohibited 13Click OK Notes If access restrictions are set for users and groups from the authen...

Page 33: ...a server from another subnet enter its IP address AFP and FTP connections do not support delegating authority to an external SMB server Use AFP to access access limited shared folders from OS X 10 7 i...

Page 34: ...ity of all drives minus the capacity of two drives For example if 4 drives are combined into a RAID 6 array the usable space is the sum of the capacity of 2 drives If 2 drives in the array are damaged...

Page 35: ...damaged drive As long as one drive in the array remains undamaged all data in the array can be recovered RAID 0 Combines 2 or more hard drives into a single array The usable disk space is the total sp...

Page 36: ...ives in JBOD 1 Select RAID 2 Click the array to delete Note If the RAID Mode field is blank the array is already in JBOD Proceed to step 7 3 Click Delete RAID Array 4 The Confirm Operation screen will...

Page 37: ...cing process the resync will begin again from the beginning 8 Step through the wizard to create the array Notes You can also configure RAID settings from Easy Admin After changing the RAID mode create...

Page 38: ...to Drives Drives 2 Select the drive that was configured as a hot spare then click Dismount Disk 3 Click Rediscover Disk 4 Navigate to Drives RAID 5 Select the RAID array to repair 6 Select the drive...

Page 39: ...Enter the confirmation number then click OK Adding a drive to an existing RAID array You can add a drive to a RAID 1 RAID 5 or RAID 6 array Drives that can be added to the RAID array show Normal RMM a...

Page 40: ...any it automatically repairs them RAID 1 RAID 10 RAID 5 and RAID 6 arrays are supported For best results run RAID maintenance regularly 1 In Settings click Drives 2 Click the icon to the right of RAI...

Page 41: ...ion of a connected USB hard drive is mounted Additional partitions are not recognized Do not connect bus powered devices to the TS4200D Notes Hubs are not supported Connect a single USB drive to each...

Page 42: ...ive unplug it and then plug it back in Checking Drives A disk check tests the data on a drive in the TeraStation or connected via USB for integrity Errors are fixed automatically With large drives a d...

Page 43: ...circumstances data deleted when a drive is formatted can be recovered To ensure that data is gone forever a format might not be sufficient See Erase Data on the TeraStation Completely 1 In Settings cl...

Page 44: ...e format is complete Notes Do not turn off or disconnect power to the TeraStation while formatting a hard drive For drives of 2 2 TB or larger make sure that the GPT Partition checkbox is selected Enc...

Page 45: ...1 and 2 as media cartridges Configure media cartridges from the bottom drive up For example if your TeraStation has 4 drives make drive 4 as a media cartridge first then drive 3 next If the TeraStatio...

Page 46: ...tore Erase 3 Click Erase TeraStation 4 The Confirm Operation screen will open Enter the displayed number then click OK 5 All data on the TeraStation will be permanently erased Disk Quotas Notes When u...

Page 47: ...ble quotas choose the maximum space the user will be allowed to use and click OK Note If you change the primary group restart the TeraStation to apply the quota settings 4 Click Close Quotas for Group...

Page 48: ...olumes can be created with maximum size limits 1 In Settings click Drives 2 Select LVM 3 Select the drive or array where the volume will be located and click Enable LVM on Volume 4 The Confirm Operati...

Page 49: ...49 8 Configure the desired settings then click OK 9 Click OK 10Click Close 11Click Close 12Navigate to File Sharing Folder Setup 13Click Create Folder 14Configure the settings...

Page 50: ...s the folder if certain characters are used in the name so the use of letters and numbers only is recommended The names of shared folders used for both AFP and FTP should not use characters from diffe...

Page 51: ...Server 2003 Windows 2000 Server Before using iSCSI equipment with Windows XP Windows 2000 Windows Server 2003 or Windows 2000 Server download and install the Microsoft iSCSI Software Initiator 1 Go t...

Page 52: ...iSCSI switch to the position to enable iSCSI 8 Click to the right of iSCSI 9 Click Create Volume 10Enter a volume name volume description volume and size then click OK 11Click Close 12Connect the new...

Page 53: ...ndows Server 2008 1 Navigate to Control Panel Administrative Tools iSCSI Initiator 2 Enter the IP address of the TeraStation in the Target field Click Quick Connect 13The connected volume will be reco...

Page 54: ...ly check Connect on Startup before connecting 5 The connected volume will be recognized by the computer as an unallocated volume Assign and format the volume in Windows Checking Whether iSCSI Volume i...

Page 55: ...lient computers can access the volume on the TeraStation To configure mutual authentication see Registering the TeraStation and Connecting the Volumes Mutual Authentication Password Setup for the Tera...

Page 56: ...are set for the mutual authentication password of the TeraStation entire system and mutual authentication passwords for each volume after the volume is connected the volume name will no longer be dis...

Page 57: ...ted to different computers a single iSCSI volume cannot be connected to multiple computers Notes When an iSCSI volume is deleted all data contained in the iSCSI volume is erased Before changing settin...

Page 58: ...on iSCSI volume or for each volume When the access restrictions are set the system asks for entry of a username and password when the TeraStation is connected by the iSCSI Connection Tool Setting Acce...

Page 59: ...cation to connect Enter the mutual authentication password If using the iSCSI Initiator from Windows 8 Windows 7 Windows Vista or Windows Server 2008 configure the CHAP login information to allow sea...

Page 60: ...rd is displayed again Enter the password that was set If using the iSCSI Initiator included with Windows 8 Windows 7 Windows Vista or Windows Server 2008 set the CHAP login information performing sear...

Page 61: ...s about 30 minutes before normal file reading and writing are restored Settings may not be accessible during this period Do not change the order of the hard drives in the TeraStation For example pulli...

Page 62: ...62 Hard drives without red status LEDs lit are still on Do not unplug or remove them 3 Pull out the drive cartridge and remove it from the TeraStation...

Page 63: ...63 4 Insert the new drive in the empty slot Slide the drive in with the locking mechanism open 5 Swing the lock back down until it clicks into place...

Page 64: ...RAID in Settings Select the RAID array and check if Recover RAID Array button is displayed If so select the drives that were not included in the RAID array and click Recover RAID Array For JBOD The d...

Page 65: ...rives Drives 3 Select the hard drive with the flashing status LED and click Dismount Disk Note Once you reboot the TeraStation after the drive failed the status LED will be back to normal flash green...

Page 66: ...sh red and the message Press FuncSW I31 New Disk x ready will be displayed on the LCD panel 6 Hold down the function button on the front of the TeraStation for 3 seconds until it beeps The replacement...

Page 67: ...ion on the network Another TeraStation on the network You can also configure backup jobs from Easy Admin Preparing a Backup Destination First configure a folder as a backup destination 1 In Settings n...

Page 68: ...f the backup job by searching for the password Backing up to a LinkStation or TeraStation on another network when connected by a VPN You can back up to a LinkStation or TeraStation on another network...

Page 69: ...ubnet or connected by a VPN is used Notes To back up data between LinkStations or TeraStations on a network using jumbo frames make sure that both de vices are configured to use identical or similar E...

Page 70: ...in the backup folder Overwrite Backup Differential Backup The first backup job runs like a normal backup As each additional backup job runs files are added to and deleted from the backup folder The b...

Page 71: ...listed in the backup target folder list 8 Click Browse under Backup Target Folder Name 9 Select the backup target and click OK 10Click OK Tasks added to Backup List are displayed 11Click Close Notes I...

Page 72: ...plication connect an Ethernet cable to the LAN port of each TeraStation and follow the steps below 1 In Settings click Backup 2 Click to the right of Replication 3 Click Edit Notes Files that only exi...

Page 73: ...plication source will be overwritten Replication can also be used to copy all data from a share to a share on an attached external drive Format the drive with ext3 or XFS before using for replication...

Page 74: ...and backup TeraStation If the capacity of the main TeraStation is larger than that of the backup TeraStation a Replication I33 ReplicateFailure error will occur All drive bays of a TeraStation should...

Page 75: ...h UPS Once failover is configured you cannot set up a UPS for the backup TeraStation Configure your UPS before configuring failover UPS recovery can be configured for both the main TeraStation and the...

Page 76: ...on for both failover and replication or failover and Time Machine If Approve Deny window is displayed repeatedly or failover does not start shut down both the main and backup TeraStations Turn on the...

Page 77: ...ded with OS X 10 5 or later Configure your TeraStation as shown to use Time Machine 1 In Settings move the AFP switch to the position to enable AFP 2 Choose Folder Setup 3 Choose a shared folder as yo...

Page 78: ...chine 10Click Edit 11Click Browse 12Select the shared folder that you set in the previous step then click OK 13Click OK 14Click OK 15Move the Time Machine switch to the position to enable Time Machine...

Page 79: ...sword with the rights to access the shared folder of the TeraStation then click Connect Note If access restrictions are not configured on the target share log in with the administrator account The def...

Page 80: ...evices are not supported USB hubs Mice Keyboards 1 In Settings move the Direct Copy switch to the position to enable Direct Copy 2 Connect the USB device The function button will begin to flash Note D...

Page 81: ...afely Amazon S3 Amazon S3 Amazon Simple Storage Service is a fee based online storage service provided by Amazon Follow the steps below to configure your TeraStation for use with Amazon S3 1 Create an...

Page 82: ...r the path from the Target Folder field in a browser window to access the files saved to Amazon S3 To use after the network was temporarily disconnected click Remount If a file is added to the Amazon...

Page 83: ...rnet Notes Be careful when configuring WebAccess Certain settings can make the files in the shared folder available to any one on the Internet without any access restrictions You can also configure We...

Page 84: ...ore inactive users are logged out of WebAccess 4 Click OK 5 Move the WebAccess switch to the position to enable WebAccess 6 Go to Folder Setup 7 Select a shared folder to publish Notes For best result...

Page 85: ...ss a folder through WebAccess depends on a combination of WebAccess settings and the shared folder s settings Folder Setup WebAccess Public Mode Allow Anonymous Allow All Groups and Users Use Inherite...

Page 86: ...er To use WebAccess Remote the following conditions must be satisfied You have TeraStations or LinkStations in two different locations such as at home and at a remote location WebAccess is enabled for...

Page 87: ...ault the TeraStation s shares are only accessible by users connected to the same network or router as the TeraStation The optional FTP server allows users outside the local network to access the TeraS...

Page 88: ...he TeraStation s username Password The TeraStation s password Port 21 Shared folders connected by FTP are available from the mnt directory The default locations are For RAID 0 RAID 5 or RAID 1 mnt arr...

Page 89: ...s Hostname IP address of the TeraStation Username anonymous Password any character string Port 21 Notes If the TeraStation joins a domain anonymous users cannot access it If a file was created or copi...

Page 90: ...s chapter is for users who are familiar with BitTorrent Note Use compatibility mode to use Download Manager with Windows 8 Configuration 1 In Settings click Applications 2 Click the icon to the right...

Page 91: ...rent switch to the position to enable BitTorrent 8 Click the icon to the right of BitTorrent 9 Click Open Download Manager The default username is admin and the default password is blank no password 1...

Page 92: ...photos and music saved on this product can be played back on DLNA compliant TVs stereo equipment game consoles and other devices within the network Configuration 1 Navigate to File Sharing Folder Set...

Page 93: ...93 5 Click Services 6 Move the DLNA switch to the position to enable DLNA 7 Click the icon to the right of DLNA Server 8 Click Edit 9 Select an interval for DLNA server database updates and click OK...

Page 94: ...played back Connected DLNA compatible Devices Follow the procedure below to view the DLNA compatible devices connected to your TeraStation 1 In Settings click Services 2 Click the icon to the right of...

Page 95: ...n change this interval or update the database manually 1 In Settings click Services 2 Click the icon to the right of DLNA Server then click Edit 3 You may change the update interval or select Refresh...

Page 96: ...dvr ms xvid mp4 m4v Picture files jpg jpeg gif png tif tiff yuv bmp Music files mp3 mpa wma aac apl ac3 lpcm pcm wav m3u m4a mp4 3gp m4b aif aiff flac ogg mp2 mp1 mp4 iTunes Server If iTunes server is...

Page 97: ...en click OK 6 Click OK then OK again 7 Move the iTunes server switch to the position Squeezebox Server Squeezebox is a network music player by Logitech that can play back music stored on your network...

Page 98: ...server switch to the position to enable Squeezebox server 3 Click to the right of Squeezebox Server 4 Click Edit 5 Click Browse 6 Select the shared folder that you want to make available to Squeezebox...

Page 99: ...99 8 Click OK 9 Click Open Squeezebox The Squeezebox s settings will open...

Page 100: ...Micro NAS Security settings page Trend Micro is a registered trademark of Trend Micro Incorporated Licenses If the antivirus software on your TeraStation is not activated or has expired please purcha...

Page 101: ...folder Note This example shows an initial 1 year period for updates extended by an additional year It s not possible to register a serial number that would extend the total license period beyond 5 ye...

Page 102: ...ur network environment follow this procedure to set the IP address of the proxy server and other settings 1 From the left side menu click Administration Proxy Settings 2 Check Use a proxy server to ac...

Page 103: ...ime Updates will not be downloaded if the TeraStation is turned off in standby mode or disconnected from the Internet Excluding a Specific Folder from Antivirus Scanning By default all folders on the...

Page 104: ...he default type of scanning Your TeraStation may run slower if real time scanning is enabled Scheduled Scan A scheduled scan is executed at specific regular intervals such as every Tuesday at 3 am Man...

Page 105: ...I34 will not be displayed If email notification is enabled In Settings then the antivirus software notifies the user by email if a virus is found Setting email notification is recommended Depending on...

Page 106: ...elp Contents and Index 2 Online help will open Online help is now ready to use Email Notification Your TeraStation can send you email reports daily or when settings are changed or an error occurs Noti...

Page 107: ...hoose what events will trigger notification Click OK to send a test email Sleep Mode To save energy you can specify times to put the TeraStation into sleep standby mode where the hard drive and LEDs a...

Page 108: ...rent time of 10 00 Wednesday Timer 1 Every day 12 00 24 00 Timer 2 Not used Timer 3 Not used No operation is performed at 12 00 and operation changes to standby mode at 24 00 Example 2 When running at...

Page 109: ...the TeraStation After receiving the Wake on LAN packet the TeraStation may take approximately five minutes to be ready to use To use Wake on LAN you ll need Wake on LAN software such as AMD s Magic P...

Page 110: ...on that will be the sync source in Other TeraStation s IP Address When the TeraStation is rebooted after an automatic shut down due to a power outage or other power supply problem verify that the powe...

Page 111: ...s on the switch for port trunking first A separate intelligent switch that supports IEEE 802 3ad is required Configure LACP in the switch first Port Trunking If the TeraStation is being used as an iSC...

Page 112: ...able The print server does not support Mac OS Don t disable the SMB protocol support while the print server is enabled If you do you will need to enable SMB again and reconfigure the print server from...

Page 113: ...server 3 Refer to the manual supplied with the printer 4 Click Start Control Panel 5 Click Network and Internet Connections 6 Click My Network Places View workgroup computers Name of the TeraStation...

Page 114: ...contained in files text files Word files etc stored on the TeraStation Follow the steps below to enable it 1 Open Folder Setup 2 Click the shared folder to be indexed 3 Click Edit 4 Check Include this...

Page 115: ...then click Login 15Enter a keyword in the Search Text field Check Advanced Search to enable searches by specifying the filename owner date updated and file size 16Click Search The search results are d...

Page 116: ...ions of files that are not synchronized are automatically replaced by the latest versions Automatic Program and File Caching Opened files can be cached locally for usage offline Previous versions of f...

Page 117: ...nction can be used Offline files can be accessed by the original Universal Naming Convention UNC where the data was saved Note If offline files can be used an icon appears in the system tray Editing O...

Page 118: ...ystem Follow the steps below to enable DFS on the TeraStation Note Don t disable the SMB protocol while DFS is enabled If you do you will need to enable SMB again and reconfigure DFS from scratch 1 In...

Page 119: ...S links 7 Click OK 8 Move the DFS switch to the position to enable DFS Accessing from a NFS Client Note US purchasers only Buffalo s customer support will help configure the NFS settings on your TeraS...

Page 120: ...data from an NFS client 5 Click Close 6 Move the NFS switch to the position to enable NFS 7 Click the icon to the right of NFS 8 Click Client Settings 9 Click Add Client 10Enter the IP address and hos...

Page 121: ...de from User Mode default setting to Kernel Mode on the screen navigating to Services Edit If you configure Guest Permission to Forced on the screen navigating to Services Edit user ID and group ID sh...

Page 122: ...h server crt server certificate This is required for decrypting the data that was encrypted by the server certificate and this is normally not revealed Updating SSL Key To update a server certificate...

Page 123: ...shared folder for the web server then click OK 7 Choose an external port then click OK MySQL Server The TeraStation can be used as a MySQL server A MySQL database may be installed and linked with the...

Page 124: ...he MySQL server then click OK 7 Choose an external port then click OK SNMP If SNMP is enabled you can browse your TeraStation from SNMP compatible network management software The specific MIB manageme...

Page 125: ...settings are not saved or restored Category Settings File sharing USB drive and memory cartridge shared folder information All settings in Drives All settings in RAID Options RAID Array Settings All...

Page 126: ...fied operation cannot be executed Verify The device is connected to a USB 2 0 port not a USB 3 0 port The device has a capacity of 1 GB or larger The device is not write protected Applying Settings Th...

Page 127: ...ting an Initialization Drive A system initialization drive will restore the settings on your TeraStation to their factory defaults You can initialize them without logging in to Settings Follow the ste...

Page 128: ...bove 2 Insert the USB drive into a USB 2 0 port not a USB 3 0 port on the TeraStation 3 Set the boot mode switch to USB 4 Press the power button to turn on the TeraStation 5 When the message Recovery...

Page 129: ...e below 1 Create a USB password initialization drive as described above 2 Insert the USB drive into a USB 2 0 port not a USB 3 0 port on the TeraStation 3 Set the boot mode switch to USB 4 Press the p...

Page 130: ...a syslog server Logs are in UTF 8 format Your syslog server must support UTF 8 encoding To create a link to the logs in the shared folder 1 Click Edit 2 Enable Share the link to logs 3 Select the shar...

Page 131: ...ment 2 Open Name Time Language 3 Click Edit 4 Click the Name tab then configure the TeraStation s name and description 5 Click the Time tab Click Use Local Date Time to use your computer s time settin...

Page 132: ...ame time by adjusting them regularly or use an NTP server to correct them all automatically 6 Click the Language tab Select the language to be used and click OK Note This tab changes the language used...

Page 133: ...n click OK LCD and LEDs You may configure the LEDs and LCD on the front of the TeraStation 1 In Settings click Management 2 Click to the right of Notifications 3 Click Edit 4 Click Front Panel Display...

Page 134: ...ttings click Network 2 Click to the right of IP Address 3 Click the LAN port where the jumbo frames will be used 4 Click Edit 5 Select Ethernet Frame Size then click OK Note Make sure the TeraStation...

Page 135: ...start 2 Right click on your TeraStation s icon then choose Properties IP Address For Mac OS click the TeraStation icon while holding down the control key then click Configure IP Address 3 Enter the d...

Page 136: ...bnet mask Default gateway MAC address Firmware version Name Description Menu Map Share Assigns the TeraStation s shared folder as a network drive Disconnect Share Unmaps the network drive Map All Remo...

Page 137: ...Share Unmaps the network drive Create Shortcut Creates a shortcut icon to the shared folder share on the desktop I m here Causes your TeraStation to beep Click on the TeraStation s icon to display the...

Page 138: ...obtain an IP address from the DHCP server You can manually enter an IP address subnet mask and default gateway Mount as Network Drive You can easily map a shared folder as a network drive using NAS N...

Page 139: ...re on the TeraStation Name Description Open Opens the default shared folder for a selected TeraStation Refresh Searches for NAS devices on the network again I m here Causes your TeraStation to beep Se...

Page 140: ...using NAS Navigator2 on Mac OS 1 Click the icon in the Dock NAS Navigator2 will start 2 Click the TeraStation icon while holding down the control key then select Open Folder 3 Select the shared folder...

Page 141: ...ed Volume Select individual volumes from a registered TeraStation Select a volume and click Connect then the selected volume will be recognized as a local drive in My Computer on your computer If a vo...

Page 142: ...n your computer and searches will take longer For better performance unregister disconnected TeraStations with this command Set mutual CHAP secret Set the CHAP password on the computer side Persistent...

Page 143: ...lex LINK SPEED 1000 Mbps Connected at 1000 Mbps full duplex Hostname IP Address TS xx xxx 192 168 11 150 Displays the hostname and IP address At the end of the IP address F fixed IP address or D IP ad...

Page 144: ...ll the hard drive HDx Error E22 HDx Can t Mount Mounting of hard drive X failed Format the hard drive After formatting if the error still appears after rebooting replace the hard drive If the error is...

Page 145: ...ess the Function button to rebuild the RAID array Set From Web I32 New Diskx ready Displayed after replacing hard drive X when the RAID needs to be rebuilt in Settings or formatting is necessary In Se...

Page 146: ...serted in its slot Recovery I45 Recovery Failed Recovery failed RAID ARRAY I46 RMM Processing Data migration or conversion RAID migration is in progress Do not turn off the TeraStation power SYSTEM I4...

Page 147: ...ation will get its IP address automatically from a DHCP server on the network If no DHCP server is available then an IP address will be assigned as follows IP Address 169 254 xxx xxx xxx is assigned r...

Page 148: ...raStation malfunctions replace it with a Buffalo OP HDS series drive of the same capacity available from www buffalotech com Power Supply AC 100 240 V 50 60 Hz Power Consumption TS4800D max 170 W TS44...

Page 149: ...s equipment in a residential area is likely to cause harmful interference in which case the user will be required to correct the interference at his own expense CE Mark Warning CE Mark Warning This is...

Page 150: ...150 CCC A 35 C 2000M 1 2 Models TS4200D TS4400D TS4800D TS4400R...

Reviews: