


3 - 33
Feed unit
Main unit
Assembly
9
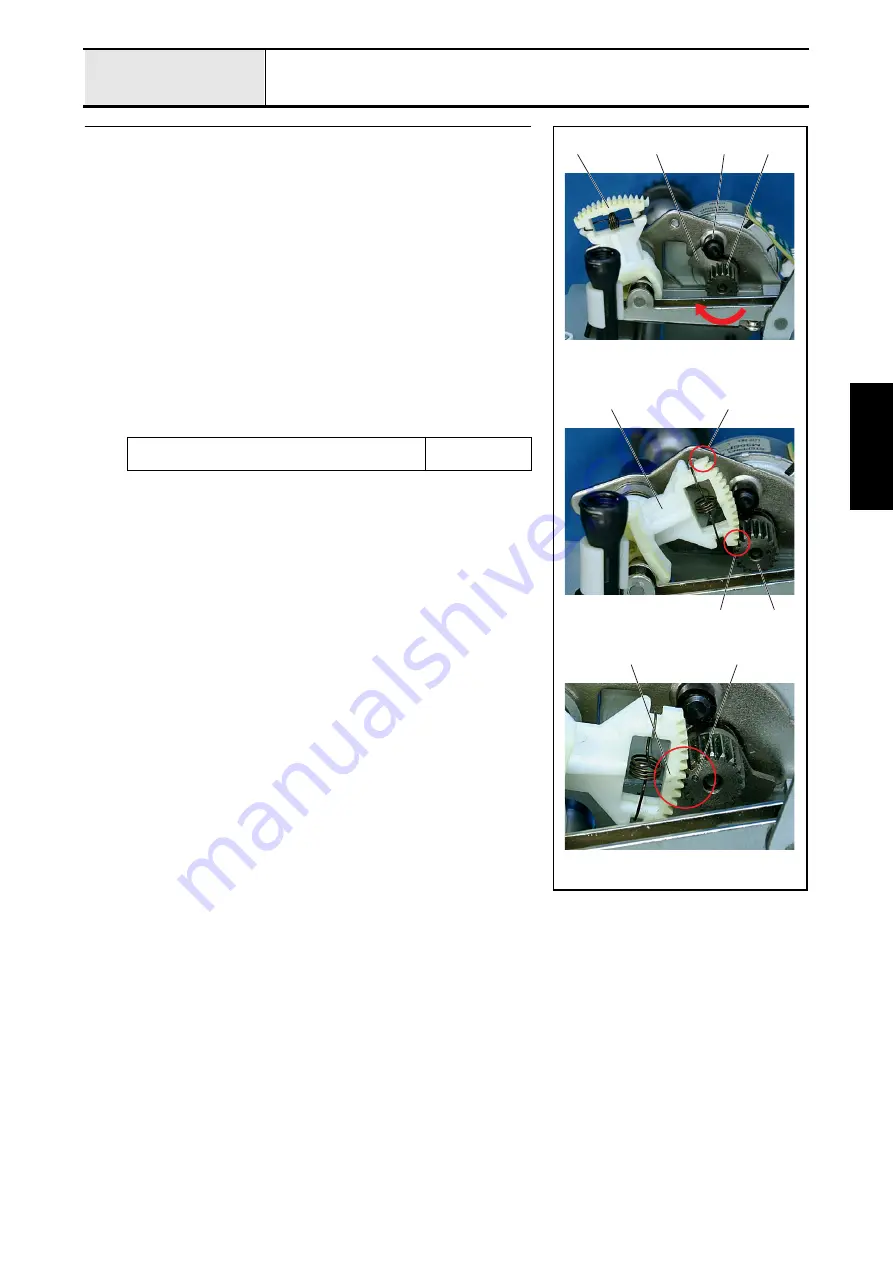
FPM gear engagement
1. Rotate the FPM gear
1
clockwise until the stopper
2
of the FPM gear
1
contacts the shaft
3
of the bushing B assy..
2. Rotate the feed adjuster assy.
4
to the point
5
it contacts the FPM gear
1
.
*Key point
• Hold the F pulse motor gear with your finger to prevent it from
rotating when the feed adjuster assy.
4
contacts the F pulse
motor gear.
3. Align the feed adjuster assy.
4
with the F gear teeth
6
, and engage them
with the FPM gear
1
.
*Key point
• Check that the mark
7
on the feed adjuster assy.
4
is aligned
with the mark
8
on the FPM gear.
4. Apply a bead of EPNOC AP (N) 0 to the circumference of the F gear
6
.
Apply EPNOC AP (N) 0 to the entire circumference of
the F gear.
Bead
XC8387***
4
2
3
1
4
6
5
1
7
8
Summary of Contents for HS-3000
Page 1: ......
Page 2: ......
Page 3: ......
Page 9: ...vi ...
Page 16: ...2 1 2 Disassembly Main parts 2 2 Feed unit 2 22 Needle presser unit 2 30 ...
Page 17: ...2 2 Main parts Main parts location diagram Main unit ...
Page 37: ...2 22 Feed unit location diagram Main unit ...
Page 45: ...2 30 Needle presser unit location diagram Main unit ...
Page 55: ...3 2 Main parts Main parts location diagram Main unit ...
Page 77: ...3 24 Main unit Main parts 36 Accessory table attachment 1 Attach the accessory table 1 1 ...
Page 78: ...3 25 Assembly Feed unit Feed unit location diagram Main unit ...
Page 90: ...3 37 Assembly Needle presser unit Needle presser unit location diagram Main unit ...
Page 163: ...7 12 ...
Page 164: ......