


6 - 3
Repa
ir
Manual
Repair Manual
5
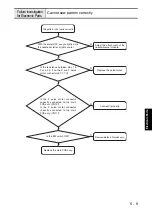
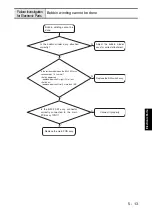
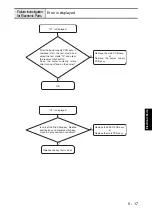
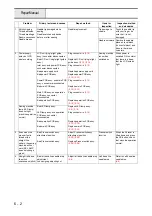
Stitch skipping
Thread abrasion
Thread breakage
Bad needle interference
adjustment
Loose needle interference
adjustment screw
Adjust needle interference
Needle and tip
gap
Refer to Clearance
between needle and
rotary hook point.
Bad front-back needle drop
adjustment
Adjust back-front needle drop
Back-front needle
drop position
Refer to Needle and
presser foot front/back
position.
Bad needle plate A attachment
position
Reattach needle plate A
Bad needle bar rise adjustment
Adjust needle bar rise
Needle
interference
Loose timing adjustment screws
Needle and
needle tip
coincide
Bad needle bar height
adjustment
Adjust needle bar height
Needle bar
height
Loose timing adjustment screws
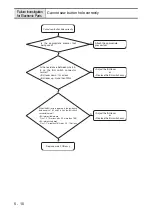
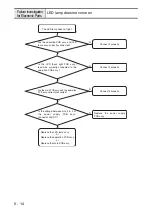
6
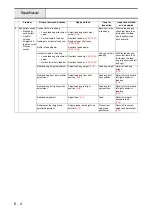
Does not start
sewing (When
press SS-button,
electronic sounds)
main motor assy. and power
PCB assy. connector
disconnected
Plug connector in
Sewing machine
runs when SS-
button is pushed
Check that the sewing
machine starts and
stops when SS-button
is pushed.
Bad main motor assy.
Replace main motor assy.
Bad power PCB assy.
Replace power PCB assy.
Does not start
sewing (When
press SS-button,
no electronic
sounds)
SSVR PCB assy. and main PCB
assy. connector disconnected
Plug connector in
Bad SSVR PCB assy.
Replace SSVR PCB assy.
Bad main PCB assy.
Replace main PCB assy.
Bad FC jack assy.
Replace FC jack assy.
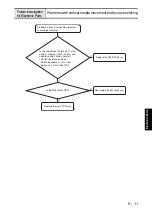
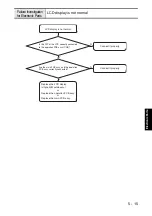
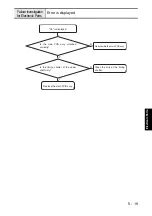
7
Irregular rotation
(rotation slow / fast
/ unstable)
Grease or dust adhering to
speed shutter
Remove grease or dust
Machine
operation while
rotating
Check that it switches
to fast, middle and slow
speed when the speed
control lever is
operated and that at
high speed there is no
rotational variation.
Grease or dust adhering to NP
sensor of main PCB assy.
Remove grease or dust
Interference between speed
shutter and NP sensor of main
PCB assy.
Eliminate cause of interference
• Damage to speed shutter
Replace upper shaft assy.
• Damage to NP sensor of
main PCB assy.
Replace main PCB assy.
Bad main PCB assy.
Replace main PCB assy.
Problem
Primary factors and causes
Repair method
Items for
Inspection
Inspection method
and standards
Summary of Contents for HS-3000
Page 1: ......
Page 2: ......
Page 3: ......
Page 9: ...vi ...
Page 16: ...2 1 2 Disassembly Main parts 2 2 Feed unit 2 22 Needle presser unit 2 30 ...
Page 17: ...2 2 Main parts Main parts location diagram Main unit ...
Page 37: ...2 22 Feed unit location diagram Main unit ...
Page 45: ...2 30 Needle presser unit location diagram Main unit ...
Page 55: ...3 2 Main parts Main parts location diagram Main unit ...
Page 77: ...3 24 Main unit Main parts 36 Accessory table attachment 1 Attach the accessory table 1 1 ...
Page 78: ...3 25 Assembly Feed unit Feed unit location diagram Main unit ...
Page 90: ...3 37 Assembly Needle presser unit Needle presser unit location diagram Main unit ...
Page 163: ...7 12 ...
Page 164: ......