


DT3-B291
66
10. STANDARD ADJUSTMENTS
10. STANDARDEINSTELLUNGEN
10. REGLAGES STANDARD
10. AJUSTES ESTANDARES
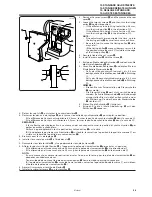
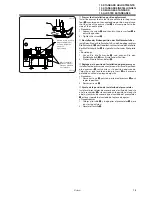
(Reference)
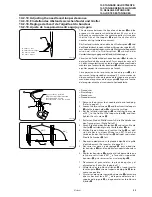
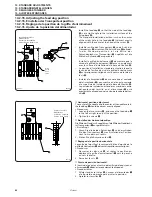
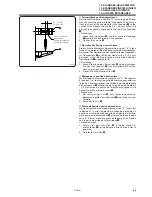
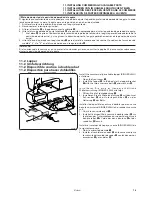
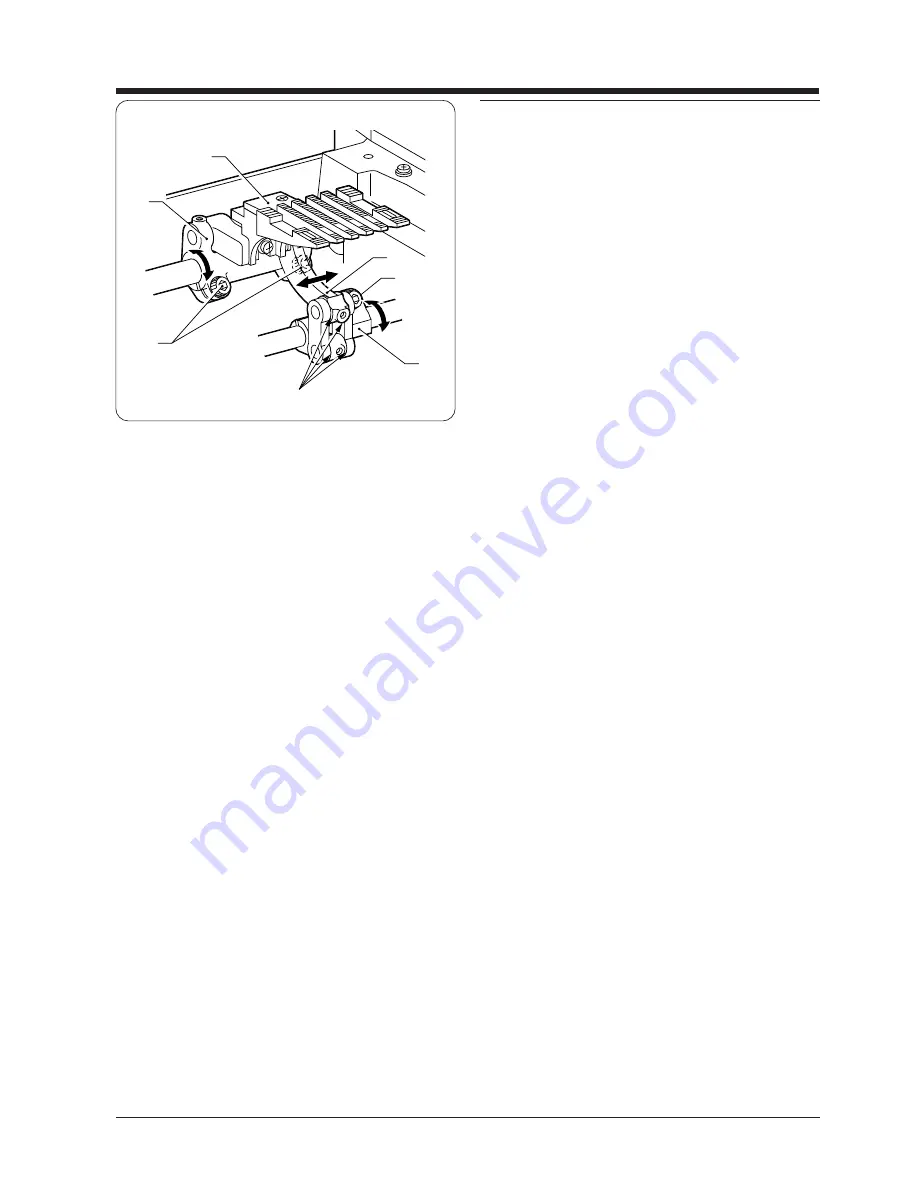
If the horizontal and forward/back positions or the height of the
feed dog
q
cannot be successfully adjusted by the procedures
described previously, adjust by the following method.
*
This adjustment should not normally be carried out.
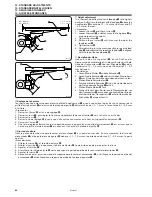
<Procedure>
It is difficult to carry out each adjustment separately, so check
each distance at the same time while adjusting.
■
Forward/back position
Loosen the two bolts
o
, and then turn the feed bracket arm
!0
to
adjust the position of the feed dog
q
.
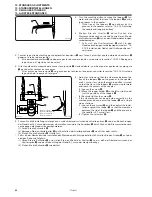
■
Horizontal position
Loosen the two bolts
o
and the bolt
!1
, and then move the feed
bracket
i
to the left or right to adjust the position of the feed
dog
q
.
*
Be careful not to move section
A
out of alignment at this
time.
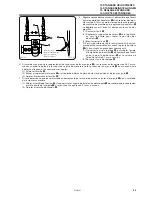
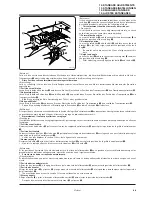
■
Height and angle
Loosen the bolt
!1
and turn the vertical feeding arm
!2
to adjust
the position of the feed dog
q
.
*
After adjusting, securely tighten the bolts
o
and the bolt
!1
.
(Referenz)
Falls mit den vorstehend beschriebenen Methoden die Horizontalposition, die Vorwärts/Rückwärtsposition oder die Höhe des
Transporteurs
q
nicht richtig eingestellt werden kann, führen Sie die Einstellung wie folgt aus.
*
Diese Position sollte normalerweise nicht eingestellt werden.
<Einstellung>
Falls es schwierig ist die einzelnen Einstellungen separat auszuführen, können Sie die betreffenden Abstände beim Einstellen
kontrollieren.
■
Position vorne/hinten
Lösen Sie die beiden Schrauben
o
und drehen Sie zum Einstellen der Position des Transporteurs
q
den Transporteurhalterarm
!0
.
■
Horizontalposition
Lösen Sie die beiden Schrauben
o
und die Schraube
!1
und verschieben Sie zum Einstellen der Position des Transporteurs
q
den
Transporteurhalter
i
.
*
Sind Sie vorsichtig, daß die Ausrichtung des Teils
A
nicht geändert wird.
■
Höhe und Winkel
Lösen Sie die Schraube
!1
und drehen Sie zum Einstellen der Position des Transporteurs
q
den vertikalen Transporteurarm
!2
.
*
Ziehen Sie nach abgeschlossener Einstellung die Schrauben
o
und die Schraube
!1
wieder fest.
(Référence)
Si les positions horizontale et avant/arrière ou la hauteur de la griffe d’entraînement
q
ne peuvent pas être réglées de façon satisfaisante
en procédant comme indiqué ci-avant, effectuer le réglage en procédant comme suit.
*
Normalement, il ne faut pas effectuer ce réglage.
<Procédure>
Il est difficile d’effectuer chaque réglage séparément; par conséquent, vérifier simultanément chaque distance pendant qu’on effectue
le réglage.
■
Position avant/arrière
Desserrer les deux boulons
o
, puis tourner le bras du support d’entraînement
!0
pour régler la position de la griffe d’entraînement
q
.
■
Position horizontale
Desserrer les deux boulons
o
et le boulon
!1
, puis déplacer le support d’entraînement
i
vers la gauche ou vers la droite pour régler
la position de la griffe d’entraînement
q
.
*
Veiller à ne pas déplacer la section
A
hors de l’alignement à ce moment.
■
Hauteur et angle
Desserrer le boulon
!1
et tourner le bras d’alimentation vertical
!2
pour régler la position de la griffe d’entraînement
q
.
*
Une fois le réglage effectué, bien resserrer les boulons
o
et le boulon
!1
.
(Referencia)
Si las posiciones horizontal y hacia adelante/atrás o la altura del alimentador
q
no se pueden ajustar satisfactoriamente por los
procedimientos indicados anteriormente, ajustar de acuerdo con el siguiente método.
*
Este ajuste no debe ser realizado normalmente.
<Procedimiento>
Es difícil realizar cada uno de los ajustes separadamente, por lo tanto se debe verificar cada distancia a la misma vez que se hace el
ajuste.
■
Posición hacia adelante/atrás
Aflojar los dos pernos
o
, y luego girar el brazo de la ménsula del alimentador
!0
para ajustar la posición del alimentador
q
.
■
Posición horizontal
Aflojar los dos pernos
o
y el perno
!1
, y luego mover la ménsula del alimentador
i
a la izquierda o derecha para ajustar la posición
del alimentador
q
.
*
Tener cuidado de no mover la sección
A
fuera de alineación en este momento.
■
Altura y ángulo
Aflojar el perno
!1
y girar el brazo de alimentación vertical
!2
para ajustar la posición del alimentador
q
.
*
Después de ajustar, apretar firmemente los pernos
o
y el perno
!1
.
i
o
q
!1
!0
!2
A
0455M