


DT3-B291
18
5. INSTALLATION
5. MONTAGE
5. INSTALLATION
5. INSTALACION
t
y
e
r
■
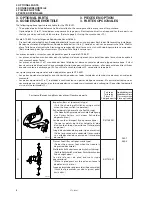
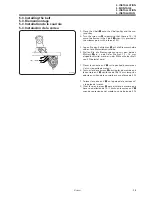
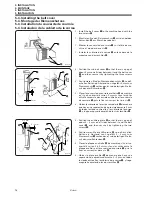
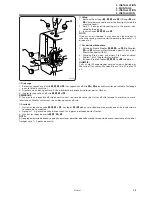
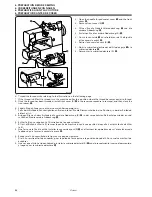
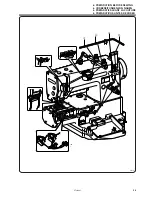
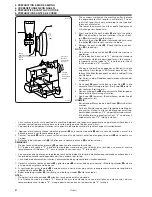
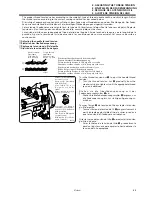
Oiling
1. Remove the oil caps
e
,
r
,
t
and
y
. (Oil caps
r
and
y
should be removed in order to allow light inside the
machine head.)
2. Add 1 – 2 drops of lubricating oil in the places indi-
cated by the arrows.
3. Insert oil caps
e
,
r
,
t
and
y
.
NOTE:
If too much oil is added, it may cause oil leaks to occur
when the sewing machine starts operating. Add only 1 – 2
drops of oil.
■
Vor der Inbetriebnahme
1. Entfernen Sie die Stopfen
e
,
r
,
t
und
y
. (Die Stopfen
r
und
y
müssen entfernt werden, damit Licht in das
Maschinenoberteil fällt.)
2. Wenden Sie an den mit einem Pfeil bezeichneten
Stellen 1 bis 2 Tropfen Schmieröl an.
3. Bringen Sie die Stopfen
e
,
r
,
t
und
y
wieder an.
HINWEIS:
Falls zu viel Öl angewendet wird, kann beim Betrieb der
Maschine Öl austreten. Wenden Sie nur 1 bis 2 Tropfen Öl
an.
■
Graissage
1. Retirer les capuchons d’huile
e
,
r
,
t
et
y
. (Les capuchons d’huile
r
et
y
doivent être retirés pour établir l’éclairage
dans la tête de machine.)
2. Ajouter une ou deux gouttes d’huile lubrifiante aux endroits indiqués par les flèches.
3. Insérer les capuchons d’huile
e
,
r
,
t
et
y
.
REMARQUE:
Si l’on ajoute une quantité d’huile excessive, ceci risquera de causer des fuites d’huile lorsque la machine se met à
fonctionner. Ajouter seulement une ou deux gouttes d’huile.
■
Aceitado
1. Quitar las tapas de aceite
e
,
r
,
t
y
y
. (Las tapas
r
y
y
deben ser quitadas para permitir que entre luz dentro de
la cabeza de la máquina.)
2. Agregar 1 – 2 gotas de aceite lubricante en los lugares indicados por las flechas.
3. Insertar las tapas de aceite
e
,
r
,
t
y
y
.
NOTA:
Si se agrega demasiado aceite, se podrían ocasionar pérdidas de aceite cuando la máquina de coser comienza a funcionar.
Agregar sólo 1 – 2 gotas de aceite.
0389M