


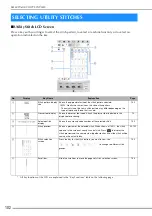


SEWING THE STITCHES
U
tili
ty
S
tit
ch
es
111
3
■
Using the Straight Stitch Needle
Plate and the Straight Stitch Foot
The straight stitch needle plate and the straight stitch
foot can only be used for straight stitches (middle
needle position stitches). Use the straight stitch
needle plate and the straight stitch foot when sewing
thin fabrics or when sewing small pieces which tend
to sink into the hole of the regular needle plate
during sewing. The straight stitch foot is perfect to
reduce puckering on lightweight fabrics. The small
opening on the foot provides support for the fabric
as the needle travels through the fabric.
a
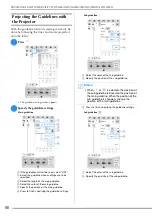
Press the “Needle Position” button to raise
the needle and turn the main power to OFF
or press
to lock all keys and buttons.
b
Remove the needle and the presser foot
holder (refer to page 69, 73).
c
Remove the flat bed attachment or the
embroidery unit if either are attached.
d
Slide the needle plate lever toward you.
a
Slide toward you.
The needle plate opens.
e
Slide out the regular needle plate with your
right hand to remove it.
f
Insert the tabs on the straight stitch needle
plate into the notches in the machine.
a
Tabs
b
Notches
c
Round hole
g
Press down on the right side of the straight
stitch needle plate to secure it.
h
Select any of the straight stitches.
a
2.25 mm (1/8 inch)
b
4.25 mm (3/16 inch)
c
6.25 mm (1/4 inch)
d
8.5 mm (5/16 inch)
CAUTION
• Always use the straight stitch foot in
combination with the straight stitch needle
plate.
a
Note
• Selecting other stitches will cause an error
message to be displayed.
• After installing straight stitch needle plate,
you must turn the machine OFF, then back
to ON to reset the straight stitch settings.
a
c
b
Summary of Contents for 882-W30
Page 2: ......
Page 12: ...CONTENTS 10 ...
Page 13: ...Chapter 1 Getting Ready ...
Page 53: ...Chapter 2 Sewing Basics ...
Page 102: ...PROJECTOR FUNCTIONS UTILITY STITCHES AND CHARACTER DECORATIVE STITCHES 100 ...
Page 103: ...Chapter 3 Utility Stitches ...
Page 158: ...SEWING THE STITCHES 156 ...
Page 159: ...Chapter 4 Character Decorative Stitches ...
Page 179: ...COMBINING STITCH PATTERNS Character Decorative Stitches 177 4 Press Press Press ...
Page 186: ...USING THE MEMORY FUNCTION 184 ...
Page 187: ...Chapter 5 MY CUSTOM STITCH ...
Page 198: ...USING STORED CUSTOM STITCHES 196 d Select the stitch pattern you want to retrieve and press ...
Page 199: ...Chapter 6 Appendix ...
Page 232: ......
Page 233: ......
Page 234: ......
Page 235: ......


