


DATA CENTER
CONFIGURATION GUIDE
Configuring an iSCSI SAN Using Brocade FCX Switches
19
defined by IEEE 802.3x to signal the sender (iSCSI initiator or target) to stop sending data for a brief period
of time. During this time, the Brocade FCX switch quickly takes care of the congestion, allowing the iSCSI
traffic to resume to full performance quickly. Since iSCSI datagram is encapsulated on TCP, this mechanism
helps avoid the slow start problem of TCP, where loss of packets causes the flow to slow down.
To enable symmetric flow control, enter the following commands:
1.
Enable symmetric flow control globally or on a concerned unit (disabled by default).
Do not enter dynamic
buffer allocation, buffer profiles, or DHCP QOS commands enabling symmetric flow control.
FCX648S Switch
(config)#
symmetric-flow-control enable
FCX648S Switch (config)#
write mem
2.
Enter the following commands to enable symmetric flow control in a stack:
FCX648S Switch
(config)#
symmetric-flow-control enable unit 1
FCX648S Switch
(config)#
symmetric-flow-control enable unit 2
FCX648S Switch (config)#
write mem
Syntax: [no] symmetric-flow-control enable [unit <
unit_ID
>]
NOTE:
Refer to the section on stack configuration in this document to identify the unit ID.
3.
Enter the following commands to optimize buffer allocations on all ports of the switch or stack of switches.
FCX648S Switch (config)#
buffer-sharing-full
FCX648S Switch (config)#
write mem
Syntax: [no] buffer-sharing-full
To enable flow control on the initiators, perform the steps in the following Windows or Linux section (as
required):
Windows
Ensure you have a compatible network interface card and appropriate driver. You may need to enable flow
control on the NIC.
To verify flow control support is enabled on the NIC:
1.
Open Network and Sharing Center from the Control Panel.
2.
Locate the network connection and click
View Status
. The
Local Area Connection X Status
displays.
3.
Click
Properties
.
4.
Click
Configure
.
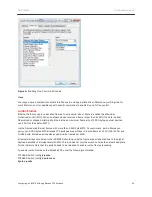
5.
Click the
Advanced
tab.
6.
From the Property list, select
Flow Control
.
7.
From the Value menu, select
Rx & Tx Enabled
.
8.
Click
OK
to apply and close all open boxes. You may need to reboot the server for the change to take effect.


