


DATA CENTER
CONFIGURATION GUIDE
Configuring an iSCSI SAN Using Brocade FCX Switches
12
2.
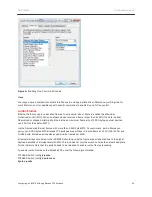
Launch the terminal emulation program and set the following session parameters:
Baud: 9600 bps
Data bits: 8
Parity: None
Stop bits: 1
Flow control: None
The EIA or TIA 232 serial communication port serves as a connection point for management by a PC or
SNMP workstation. Brocade devices come with a standard male DB-9 connector, shown in Figure 5.
Using the CLI
CLI commands are organized into the following levels:
•
User EXEC. Lets you display information and perform basic tasks such as pings and traceroutes.
•
Privileged EXEC. Lets you use the User EXEC commands plus configuration commands that do not
require saving the changes to the system-config file.
•
CONFIG . Lets you make configuration changes to the device. To save the changes across reboots,
save them to the system-config file. The CONFIG level contains sub-levels for individual ports, for
VLANs, for routing protocols, and other configuration areas.
NOTE:
The CLI supports command completion, so you do not need to enter the entire name of a command
or option. As long as you enter enough characters of the command or option name to avoid ambiguity with
other commands or options, the CLI understands what you are typing.
Configuring IP Addresses
At least one IP address must be configured using the serial connection to the CLI before you can manage
each switch using the other management interfaces. Brocade devices support both classical IP network
masks (Class A, B, and C subnet masks, and so on) and Classless Interdomain Routing (CIDR) network
prefix masks.
•
To enter a classical network mask, enter the mask in IP address format. For example, enter
“209.157.22.99 255.255.255.0” for an IP address with a Class-C subnet mask.
•
To enter a prefix number for a network mask, enter a forward slash ( / ) and the number of bits in the
mask immediately after the IP address. For example, enter “209.157.22.99/24” for an IP address that
has a network mask with 24 significant (“mask”) bits.
By default, the CLI displays network masks in classical IP address format (example: 255.255.255.0). You
can change the display to the prefix format. For details, see the
Brocade FCX Configuration Guide
.
NOTE:
Ensure that you configure IP addresses for each initiator and target.
To configure an IP address on a device running Layer 2 software:
1.
At the opening CLI prompt, enter
enable
.
FCX648S Switch>
enable
Syntax: enable
2.
Enter the following command at the Privileged EXEC level prompt (for example, FCX648S Switch#), then
press Enter. This command erases the factory test configuration if still present:


