background image

Service & Troubleshooting Guide - Home Generator System - Model 040234 (15kW)

Section 1 - General Information

Page 22

1

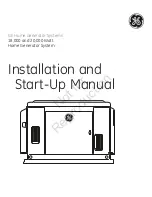
Fig. 12 - (FC_1) Dead Unit/Low Battery Voltage Troubleshooting Flowchart

Test 3

Check AC voltage
input at CMA 2-Pin
connector.

240VAC?

Yes

No

Test 2

Measure DC
Amperage on
Wire #13 at
battery.

(+) Amp

Check and repair fuses,
wiring and connections
in the ATS.

Yes

Flow?

No

END

Test 4
Measure DC
Voltage at
CMA on Pin #1,
Wire #13

12VDC?

Yes

No

Repair wiring/
connections between 
CMA and battery.

Replace CMA

(FC_1)

Test 1

Check Battery

OK?

Yes

No

Charge/Replace Battery

DEAD UNIT/LOW BATTERY VOLTAGE

Summary of Contents for 40213

Page 1: ...Page 1 15000 WATT HOME GENERATOR SYSTEM SERVICE TROUBLESHOOTING MANUAL MODELS 040213 040234 Part 276351GS June 2006...

Page 2: ...possibly know of and advise the service trade of all conceivable procedures or methods by which a service might be performed nor of any possible hazards and or results of each procedure or method We...

Page 3: ...Page 3...

Page 4: ...Page 4...

Page 5: ...4 Changing the Oil and Oil Filter 14 Replacing the Spark Plugs 15 Service Air Cleaner 15 Valve Lash 15 Cooling Fins 15 FUEL SUPPLY 15 Reconfigure The Fuel System 16 GENERATOR AC CONNECTION SYSTEM 16 S...

Page 6: ...OIL PRESSURE 27 Test 1 Measure for Short To Ground 27 Test 2 Check Engine Oil Pressure 28 Test 3 Check Oil Pressure Switch 28 FC_3 LOW OUTPUT VOLTAGE 31 Test 1 Measure Circuit Breaker Load Side Volta...

Page 7: ...rter 40 FC_5 UNDER FREQUENCY 43 Test 1 Check No Load Full Load Frequency 43 Test 2 Measure Frequency at E1 E2 44 FC_6 OVER FREQUENCY 45 FC_7 HIGH OIL TEMPERATURE 47 Test 1 Check Over Temperature Switc...

Page 8: ...DOORS 53 REMOVE THE ROOF ASSEMBLY 53 REMOVE THE EXHAUST BULKHEAD 53 REMOVE THE CONTROL PANEL BULKHEAD 54 Remove Battery 54 Remove Control Panel 54 Disconnect Fuel Solenoid 55 REMOVE THE MUFFLER ASSEMB...

Page 9: ...ity And Fuel Consumption 62 SPECIFICATIONS 64 WIRING DIAGRAM MODEL 071013 LOAD CONTROL CENTER 65 SCHEMATIC MODELS 040213 040234 GENERATOR 66 WIRING DIAGRAM MODELS 040213 040234 GENERATOR 67 SCHEMATIC...

Page 10: ...Service Troubleshooting Guide Home Generator System Models 040213 040234 15kW Table Of Contents Page 10 1...

Page 11: ...oors To remove an access door Insert a key into the lock of the access door you wish to remove and turn one quarter turn counterclockwise Open the latch with a quarter turn counterclockwise Open the d...

Page 12: ...e generator is not running and when utility is present Control Panel Used for various tests operation and maintenance functions See SYSTEM CONTROLS on page 13 Engine Label Identifies engine model and...

Page 13: ...ions See FAULT CODE INDICATIONS on page 20 MANUAL OVER RIDE Used to start the engine manually Push and hold to start and shut unit down SYSTEM switch must be in AUTO for MANUAL OVERIDE to operate Serv...

Page 14: ...commended oil to bring level to Full mark on dipstick Fig 3 Fig 3 Oil Dipstick Markings A reusable oil spout that fits most oil bottles is supplied to make it easier to pour oil into the engine Changi...

Page 15: ...The use of replacement parts which are not UL approved may damage the engine Clean the foam pre cleaner every 25 hours and the cartridge every 100 hours of operation Clean or replace more often in du...

Page 16: ...se 5 Remove the cap from the fitting marked LPG above the fuel regulator Fig 5 6 Remove the fuel supply hose from the NG fitting 7 Pull hose through hole in sheet metal bulkhead towards engine 8 Remov...

Page 17: ...ase of a fault Contacts reverse state upon a fault condition Remote LED Output Use this to hook up the remote LED supplied with the generator The remote LED will turn on and off in a series of blinks...

Page 18: ...or if you remove the 15 AMP fuse If you want to change the day and time the unit exercises simply perform the set exercise procedure on the exact day and time you want it to take place CONTROL MODULE...

Page 19: ...s two pins and the other has 10 pins Fig 9 All receptacles have matching halves The 2 pin plug supplies 240VAC from UTILITY power The 10 pin plug is used for optional generator features In addition th...

Page 20: ...ault Code Index 1 FC_1 Low Battery Voltage 2 FC_2 Low Oil Pressure 3 FC_3 Low Output Voltage 4 FC_4 Engine Fails To Start 5 FC_5 Low Frequency 6 FC_6 Engine Over speed 7 FC_7 High Oil Temperature 8 FC...

Page 21: ...Service Troubleshooting Guide Home Generator System Models 040213 and 040234 15kW Section 1 General Information Page 21 1...

Page 22: ...C voltage input at CMA 2 Pin connector 240VAC Yes No Test 2 Measure DC Amperage on Wire 13 at battery Amp Check and repair fuses wiring and connections in the ATS Yes Flow No END Test 4 Measure DC Vol...

Page 23: ...transfer switch to the 2 pin connector mounted directly to the CMA board The CMA uses internal circuits to rectify this UTILITY voltage to 12VDC This is then delivered to the battery post through the...

Page 24: ...and or fuses in transfer switch circuit and recheck for 240VAC at 2 pin connector Test 4 Measure DC Output Voltage at the CMA 1 Disconnect the negative battery cable 2 Insert the test lead at Pin 1 W...

Page 25: ...Service Troubleshooting Guide Home Generator System Models 040213 and 040234 15kW Section 2 Troubleshooting Information Page 25 2...

Page 26: ...ting Flowchart Test 1 Measure for short to ground on Wire 85 Shorted Yes No Repair replace Wire 85 Reset FC Start Unit Fault Detected No END Yes Test 2 Measure engine oil pressure Within Spec No Repai...

Page 27: ...After CMA senses engine is running it looks for a ground on Wire 85 If Wire 85 is grounded CMA shuts engine down and displays FC_2 at the control panel To remedy a low oil pressure condition fix any o...

Page 28: ...44 If oil pressure is normal Proceed to test 3 Test 3 Check Oil Pressure Switch 1 With the switch installed Start the engine See Manual Operation Test No Load on page 61 2 Check switch operation with...

Page 29: ...Service Troubleshooting Guide Home Generator System Models 040213 and 040234 15kW Section 2 Troubleshooting Information Page 29 2...

Page 30: ...circuit breaker load side voltage 240VAC No Yes Test 2 Measure voltage at E1 E2 at CMA 240VAC Repair replace open wires E1 E2 between CB output and CMA No Yes Replace CMA Test 3 Measure circuit breake...

Page 31: ...2 Diminished engine power A failed alternator winding An open control panel circuit breaker Open wiring Test 1 Measure Circuit Breaker Load Side Voltage Remove cover from generator circuit breaker See...

Page 32: ...ide of circuit breaker If there is no voltage on the line side of the breaker See CHECKING THE ROTOR WINDING on page 51 Make sure the breaker is CLOSED If there is voltage on the line side of breaker...

Page 33: ...Service Troubleshooting Guide Home Generator System Models 040213 and 040234 15kW Section 2 Troubleshooting Information Page 33 2...

Page 34: ...No Start OK No Repair Correct Start Yes No Yes END Test 4 Check Fuel Solenoid OK Yes No Repair Correct Start Yes No Test 5 Check Fuel Regulator END OK Yes No Repair Correct Yes Start No FC_4 Engine C...

Page 35: ...Supply Discrepancies Failed Starter Motor Failed Starter Motor Connections Engine Component Failures Clogged Engine Air Filter Loose Spark Plugs Failed and or Damaged Wiring Clogged atmospheric vent T...

Page 36: ...ions 7 Reset fault code detection system See Resetting The Fault Code Detection System on page 20 8 Attempt MANUAL start and observe system operation If there are no obvious electrical faults and the...

Page 37: ...rifice This allows fuel to flow as long as the demand persists When the vacuum ceases a spring pushes on the lever and forces the valve seat back against the orifice shutting off the fuel flow NOTE Fu...

Page 38: ...e VANGUARD V Twin OHV Repair Manual 272144 to determine the condition of the gaseous fuel carburetor Test 6 Check Ignition Spark Turn off the manual fuel valve to the standby generator With the spark...

Page 39: ...res and connectors are attached to the back of the CMA board See Fig 28 Fig 28 Checking CMA Board Connections 4 Check the unit grounding cable Fig 29 Fig 29 Check Grounding Cable If electrical compone...

Page 40: ...in 3 Wire 56 At The CMA If no voltage is measured at the CMA board Replace the CMA Control Panel If voltage is present at the CMA board Measure the voltage at the starter Fig 32 Fig 32 Measure Startin...

Page 41: ...Service Troubleshooting Guide Home Generator System Models 040213 and 040234 15kW Section 2 Troubleshooting Information Page 41 2...

Page 42: ...art Test 1 Measure no load and full load output frequency at circuit breaker Within Specs Set engine RPM to 62 62 5Hz at no load Retest Yes No Test 2 Measure frequency on E1 E2 at CMA Within Specs Yes...

Page 43: ...sive loads A failure in the CMA An engine that is not producing sufficient power Test 1 Check No Load Full Load Frequency No Load RPM 3750 100 RPM 62 0 62 5 Hz Full Load RPM 3420 100 RPM 57 0 62 5 Hz...

Page 44: ...st 2 If frequency is not correct Slowly rotate adjustment screw until frequency is above 57 Hz Re apply utility power NOTE If full load frequency adjustment was necessary recheck the frequency at no l...

Page 45: ...rs generator output frequency at Wire s E1 and E2 If the generator output frequency directly proportional to engine RPM increases to 65Hz 70Hz the CMA waits three seconds before shutting the unit down...

Page 46: ...on Page 46 2 Fig 38 FC_7 High Oil Temperature Troubleshooting Flowchart Test 1 Check OTS Shorted Replace OTS Reset Fault Detection Start Unit OK END Test 2 Shorted OK Reset Fault Detection Start Unit...

Page 47: ...doors removed Obstructed air inlet or exhaust port Debris in the engine cylinder cooling fins Inspect for and correct any of these conditions before proceeding to check the OTS When the problem is cor...

Page 48: ...contactor coils The limit switches The fuse s The FC_8 failure code will not be displayed while the generator is running EXERCISE Mode MANUAL Mode UTILITY Failure It will not shut down the generator...

Page 49: ...erator enclosure This section is organized for the 15kW generator by ease of access to the various components The easiest operations are presented first and the more complex operations following In or...

Page 50: ...bination that is serviceable To isolate the stator winding See CHECKING THE STATOR POWER WINDING on page 51 CHECKING THE EXCITATION WINDING IN THE GENERATOR Access Requirements Roof Removal Page 53 Re...

Page 51: ...e assemble the standby generator enclosure CHECKING THE ROTOR WINDING Access Requirements Unit Disassembly Page 53 Related Fault Indications Low Voltage FC_3 or three remote blinks Gain access to the...

Page 52: ...Service Troubleshooting Guide Home Generator System Models 040213 and 040234 15kW Section 2 Troubleshooting Information Page 52 2...

Page 53: ...1 Unlock door Fig 46 Fig 46 Access Door Removal 2 Open door and lift from hinges 3 Repeat for the remaining two doors REMOVE THE ROOF ASSEMBLY The roof assembly is attached to the bulkheads on both si...

Page 54: ...nel 1 Remove the four screws that secure the control panel Fig 51 and the four screws that hold the circuit breaker cover Fig 51 Remove Control Panel 2 Remove the 8 pin connector from the control pane...

Page 55: ...rommet Fig 55 Fig 55 Battery Harness Grommet 3 Disconnect the fuel supply hose Fig 56 Disconnect Fuel Hose NOTE Cover openings in hose and regulator to prevent foreign material from entering equipment...

Page 56: ...ler Mounting 2 Remove the bolt that secures the muffler support bracket 3 Slide the muffler over the engine oil dipstick and remove 4 Remove the mounting hardware on the right side 5 Set muffler aside...

Page 57: ...nding Wire 4 Remove the engine spark plugs 5 Using a 11 2 socket with a 1 2 breaker bar rotate the engine crankshaft with the flywheel retention nut Fig 65 Fig 65 Rotating The Crankshaft NOTE Rotate t...

Page 58: ...he stator can will separate from the rear bearing carrier while the rotor bearing has not yet come free When this occurs begin tapping the lifting lug on the stator can as well as the corners of the c...

Page 59: ...soft face dead blow hammer hit the rotor on the flat surface of the laminations until the rotor comes free of the shaft Fig 72 Fig 72 Removing The Rotor Assembly INSPECTING THE ROTOR ASSEMBLY It is no...

Page 60: ...on Page 60 3 REMOVING THE ENGINE ADAPTOR 1 Remove the four bolts Fig 74 that secure the engine adaptor to the engine Fig 74 Engine Adaptor Mount Bolts 2 Remove the two bolts Fig 75 that hold the engin...

Page 61: ...rapped in the fuel lines It may take a few minutes to purge the air from the lines before the unit will start If the unit failed to start Reset fault code detection system See Resetting The Fault Code...

Page 62: ...will continue to run for approximately 5 to 6 minutes to warm up the engine and then transfer the load back to UTILITY POWER About one minute after re transfer the engine will shut down This completes...

Page 63: ...l leaks evidence of overheating etc 10 Set the main line disconnect UTILITY POWER to ON NOTE If the unit has run for 5 minutes or more it will transfer the load back within 10 seconds If the unit has...

Page 64: ...ESSURE 5 7 IN W C 127 178MM LPG FUEL SUPPLY PRESSURE 11 14 IN W C 279 356MM NORMAL OPERATING RANGE 20 F 28 8 C 104 F 40 C NATURAL GAS RATING WILL DEPEND ON SPECIFIC FUEL BUT TYPICAL DE RATES ARE BETWE...

Page 65: ...Service Troubleshooting Guide Home Generator System Models 040213 040234 15kW Section 4 Final Adjustments and Specifications Page 65 4 WIRING DIAGRAM MODEL 071013 LOAD CONTROL CENTER...

Page 66: ...Service Troubleshooting Guide Home Generator System Models 040213 040234 15kW Section 4 Final Adjustments and Specifications Page 66 4 SCHEMATIC MODELS 040213 040234 GENERATOR...

Page 67: ...Service Troubleshooting Guide Home Generator System Models 040213 040234 15kW Section 4 Final Adjustments and Specifications Page 67 4 WIRING DIAGRAM MODELS 040213 040234 GENERATOR...

Page 68: ...Service Troubleshooting Guide Home Generator System Models 040213 040234 15kW Section 4 Final Adjustments and Specifications Page 68 4 SCHEMATIC MODELS 1813 1814 TRANSFER SWITCH...

Page 69: ...Service Troubleshooting Guide Home Generator System Models 040213 040234 15kW Section 4 Final Adjustments and Specifications Page 69 4 WIRING DIAGRAM MODELS 1813 1814 TRANSFER SWITCH...

Page 70: ...Service Troubleshooting Guide Home Generator System Models 040213 040234 15kW Section 4 Final Adjustments and Specifications Page 70 4 SCHEMATIC MODELS 071008 071009 TRANSFER SWITCH...

Page 71: ...Service Troubleshooting Guide Home Generator System Models 040213 040234 15kW Section 4 Final Adjustments and Specifications Page 71 4 WIRING DIAGRAM MODELS 071008 071009 TRANSFER SWITCH...

Page 72: ...Service Troubleshooting Guide Home Generator System Models 040213 040234 15kW Section 4 Final Adjustments and Specifications Page 72 4 SCHEMATIC MODELS 071010 071011 TRANSFER SWITCH...

Page 73: ...Service Troubleshooting Guide Home Generator System Models 040213 040234 15kW Section 4 Final Adjustments and Specifications Page 73 4 WIRING DIAGRAM MODELS 071010 071011 TRANSFER SWITCH...

Page 74: ...Service Troubleshooting Guide Home Generator System Models 040213 040234 15kW Section 4 Final Adjustments and Specifications Page 74 4...

Page 75: ...Service Troubleshooting Guide Home Generator System Models 040213 040234 15kW Section 4 Final Adjustments and Specifications Page 75 4...

Page 76: ...Service Troubleshooting Guide Home Generator System Models 040213 040234 15kW Section 4 Final Adjustments and Specifications Page 76 4...

Reviews: