Editing
Mastering
Using USB
Con
venient
Functions
Appendix
es
Quic
k Star
t
Getting Read
y
to Recor
d
Recor
ding/
Pla
ybac
k
Using
Eff
ects
Using
Rh
ythm
97
Creating an Original Arrangement
7
Use the CURSOR [
] [
] buttons to move the
cursor to the parameter that you want to edit, and use
the dial to edit the value.
By pressing the [PLAY] button you can audition the
pattern of the currently selected step (the current
pattern).
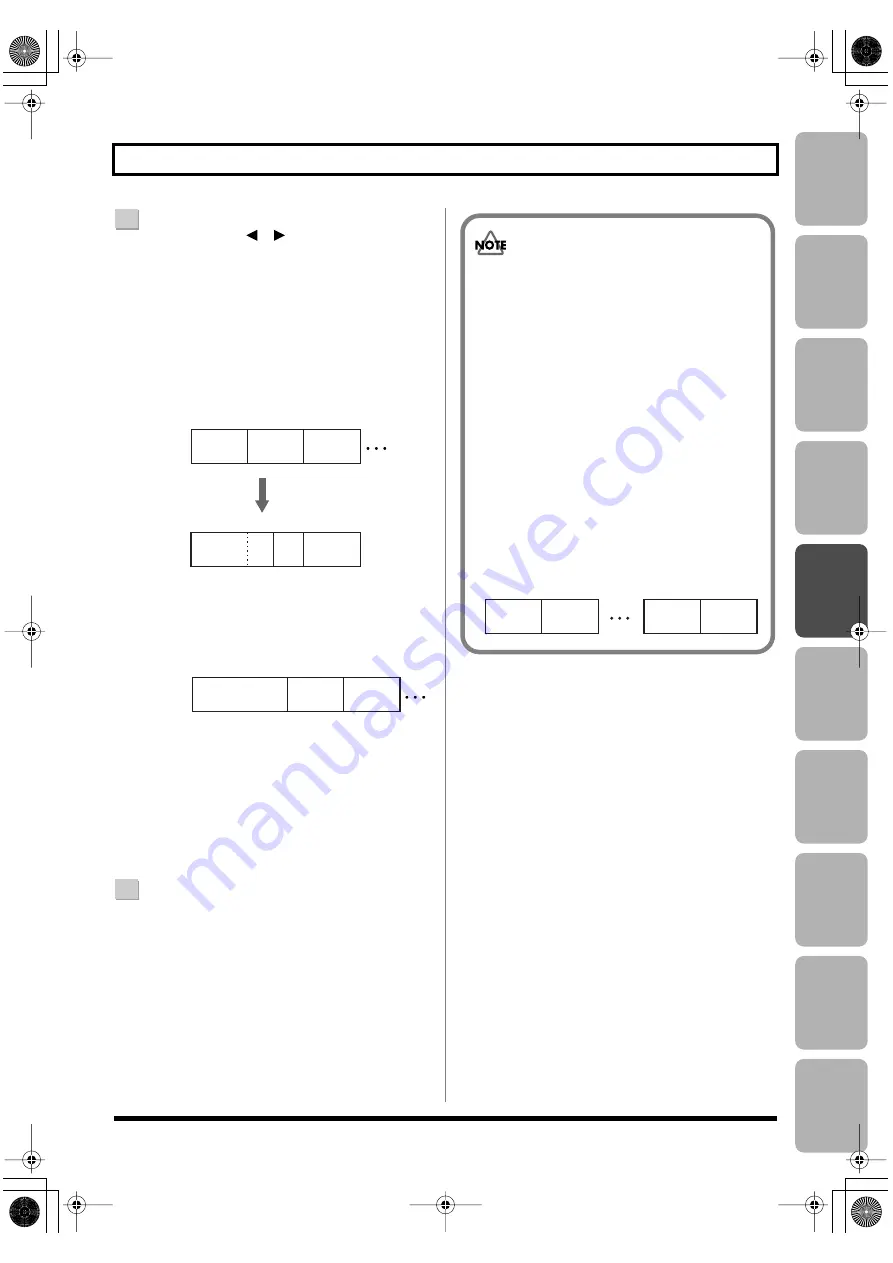
Starting measure
This specifies the measure at which the current pattern
will begin playing.
fig.04-520.eps
Pattern number
This selects the pattern. As shown in the illustration
below, it specifies the pattern for each step.
fig.04-530.eps
Time signature
This indicates the time signature of the current pattern.
Tempo
This specifies the tempo at which the current pattern
will play.
Range:
25.0–250.0
8
When you’re finished creating the arrangement, press
the [EXIT] button a number of times.
You will return to the play screen, and the
arrangement you created will be saved.
* The display will indicate “Keep power on!” while the data is
being updated. Do not turn off the power while this message
is shown.
001
005
005
009
013
009
013
Intro
(6 measures)
Verse
(2 measures)
001
007
Set the starting measure
to “007” in step 2
Intro
(4 measures)
Verse
(4 measures)
Step 1
Step 2
Starting
Measure
Starting
Measure
Step 1
Step 2
Fill
(4 measures)
Step 3
Fill
(4 measures)
Step 3
Intro
(2 measures)
Tempo: 120.0
Verse
(1 measure)
Tempo: 110.0
Fill
(1 measure)
Tempo: 110.0
Step 1
Step 2
Step 3
Starting
Measure
001
003
004
• The starting measure of step 1 will always be
“001.” You can’t change this.
• The starting measure cannot be the same as the
previous step or any earlier measure.
• You can’t make a setting that would extend
beyond the starting measure of the next step.
• When you play back an arrangement in the play
screen, and it has played all the way to the end of
the arrangement, the pattern assigned to the last
step will continue repeating.
If you want the arrangement to stop playing at the
last step, assign preset pattern “P327 BREAK
(rest)” to the last step. This will cause rests to be
played repeatedly, which is essentially the same
as stopping arrangement playback.
fig.04-540.eps
Intro
Verse
Step 1
Step 2
Ending
P327
BREAK
Step 20
Last step
(Ex.)
BR800_e.book 97 ページ 2010年11月2日 火曜日 午前8時28分
Summary of Contents for BR-800
Page 1: ......
Page 20: ...MEMO 20 BR800_e book 20...
Page 21: ...21 Quick Start BR800_e book 21...
Page 31: ...31 Getting Ready to Record BR800_e book 31...
Page 35: ...35 Recording Playback BR800_e book 35...
Page 53: ...53 Using Effects BR800_e book 53...
Page 87: ...87 Using Rhythm BR800_e book 87...
Page 103: ...103 Editing BR800_e book 103...
Page 110: ...MEMO 110 BR800_e book 110...
Page 111: ...111 Mastering BR800_e book 111...
Page 117: ...117 Using USB BR800_e book 117...
Page 128: ...MEMO 128 BR800_e book 128...
Page 129: ...129 Convenient Functions BR800_e book 129...
Page 144: ...MEMO 144 BR800_e book 144...
Page 145: ...145 Appendixes BR800_e book 145...
Page 161: ...161 fig 15_WEEE_Small eps fig 16_ChineseRoHS eps For EU Countries For China BR800_e book 161...
Page 164: ......


