


ACS 561 Service Manual
Robert Bosch GmbH
SP00D00517
2018-07-11
66
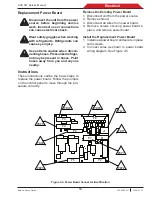
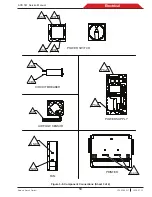
Plumbing and Mechanical
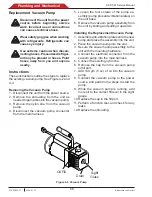
Replacement Vacuum Pump
Disconnect the unit from the power
source before beginning service
work. Incorrect use or connections
can cause electrical shock.
Wear safety goggles when working
with refrigerants. Refrigerants can
cause eye injury.
Use extreme caution when discon-
necting hoses. Pressurized refriger-
ant may be present in hoses. Point
hoses away from you and anyone
nearby.
Instructions
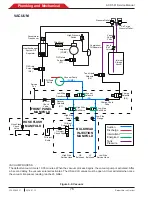
These instructions outline the steps to replace
the existing vacuum pump. See Figure 4-2 and
4-3.
Removing the Vacuum Pump
1. Disconnect the unit from the power source.
2. Remove the shrouding from the unit as
needed to gain access to the vacuum pump.
3. Remove the nylon line from the vacuum
pump.
4. Disconnect the vacuum pump connector
from the main harness.
5. Loosen the four screws of the pump as-
sembly (pump plus anti-vibration plates) on
the unit base.
6. Remove the vacuum pump assembly from
the unit by sliding and pulling it upwards.
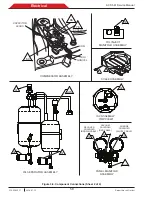
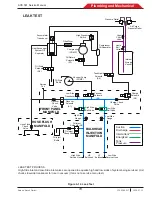
Installing the Replacement Vacuum Pump
1. Assemble anti-vibration plates onto the new
pump and place the assembly into the unit.
2. Place the vacuum pump into the unit.
3. Secure the vacuum pump assembly to the
unit with the mounting hardware.
4. Connect the electrical connector from the
vacuum pump into the main harness.
5. Connect the existing nylon line.
6. Remove the cap from the vacuum pump
oil fill port.
7. Add 140 gm (5 oz) of oil into the vacuum
pump.
8. Connect the vacuum pump to the power
source, and perform the steps to start the
pump.
9. While the vacuum pump is running, add
more oil to the correct fill level in the sight
gauge.
10. Replace the cap in the fill port.
11. Perform a function test, and check for any
leaks.
12. Replace the shrouding.
Figure 4-3. Vacuum Pump
Drain
Sight
Glass
Oil Fill
Summary of Contents for ACS 561
Page 1: ...ACS 561 en Repair instruction A C Service Unit ...
Page 95: ......