


ACS 561 Service Manual
Robert Bosch GmbH
SP00D00517
2018-07-11
56
Electrical
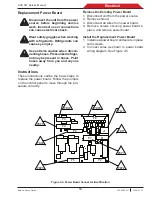
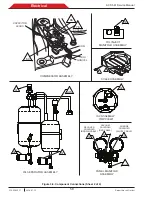
Replacement Scale Assembly/Mag-
net
Disconnect the unit from the power
source before beginning service
work. Incorrect use or connections
can cause electrical shock.
Wear safety goggles when working
with refrigerants. Refrigerants can
cause eye injury.
Use extreme caution when discon-
necting hoses. Pressurized refriger-
ant may be present in hoses. Point
hoses away from you and anyone
nearby.
If scale assembly is not calibrated,
the tank can overfill, causing pos-
sible explosion and/or vehicle over-
charge.
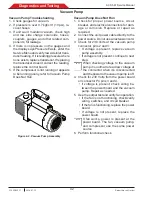
Instructions
These instructions outline the steps to replace
the scale assembly. See Figure 3.8.
Removing the Scale Assembly
1. Disconnect the unit from the power source.
2. Remove the shroud.
3. Close the tank valve.
4. Depressurize the unit.
5. Disconnect the liquid hose and vapor hose
from the tank.
6. Disconnect the wires from the air purge
solenoid, liquid solenoid, tank temperature
sensor, and pressure transducer.
7. Remove the two (2) bolts securing the tank
to the scale.
8. Remove the tank from the scale.
9. Remove the four (4) bolts holding the scale
in place.
10. Remove the ground wire connected to the
center divider of the unit and the harness
connected to the control board.
11. Remove the scale.
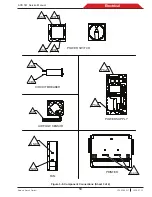
Installing the Replacement Scale
Assembly
1. Slide the rear flange of the scale under the
retaining lip of the chassis.
2. Connect the ground wire from the scale to
the center divider.
3. Install the scale into the unit fastening se-
curely with four (4) bolts.
4. Connect the scale assembly wire to the
control board.
5. Connect the unit to the power source.
Scale Calibration
Refer to Calilbrate Load Cells in the Service
Center Menu Options section of chapter 2,
Diagnostics and Testing.
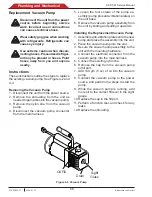
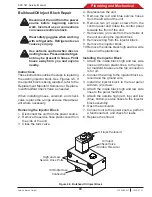
Figure 3-8. Scale Assembly
CBP8
GND2
Summary of Contents for ACS 561
Page 1: ...ACS 561 en Repair instruction A C Service Unit ...
Page 95: ......