background image

 3

ENGLISH

The Waste of Electrical and Electronic Equipment (WEEE) Directive (2002/96/EC) has been 

put in place to recycle products using best available recovery and recycling techniques to 

minimise the impact on the environment, treat any hazardous substances and avoid the 

increasing landfill.
The product is classed as Electrical or Electronic equipment so please ensure that at the end 

of the life of this product it is disposed of in the correct manner in accordance with local 

authority requirements. It must NOT be disposed of with household waste.

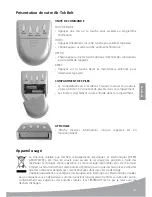
BatterY coMPartMent

•  Sliding  down  the  cover  reveals  the  compartment.  2  x  1.5V  AAA 

batteries should be placed in this compartment

•  Insert correctly as shown in the compartment

DisPLaY

• Shows various information when the unit is in use

controL unit

MODE KEY
•  Pressing the key once takes you to the Toning program

ON/HI

•  Pressing it down briefly will turn the unit ON
•  Single presses increase intensity

OFF/LO
•  Single presses decrease intensity of the contractions until it turns off

RESET
•  Holding the reset key down, restarts the unit

Welcome to your ab-tek Belt

Disposal

Summary of Contents for Ab-Tek Belt

Page 1: ...2 fitness fitness Ab Tek Belt TM 2 User Guide fitness DEUTSCH NEDERLANDS fRANÇIAS ENGLISH ...

Page 2: ...y or mental capabilities or lack of experience and knowledge unless they have been given supervision or instruction concerning use of the appliance by a person responsible for their safety Please do not place the electrodes Over the carotid sinus located on the front of the neck Across the head or trans cranially Across the chest or anywhere near the heart Over an open wound infected areas or part...

Page 3: ... accordance with local authority requirements It must NOT be disposed of with household waste BATTERY COMPARTMENT Sliding down the cover reveals the compartment 2 x 1 5V AAA batteries should be placed in this compartment Insert correctly as shown in the compartment DISPLAY Shows various information when the unit is in use CONTROL UNIT MODE KEY Pressing the key once takes you to the Toning program ...

Page 4: ...at are delivered onto your skin through the special electrodes placed on the inside of the belt These electrical pulses activate the nerves which control the muscles The pulses then contract and relax the muscle in a way similar to an exercise routine The pulses generated have been designed to imitate natural muscular contractions which are effective and comfortable The programs send out the pulse...

Page 5: ...al material ensures the belt sits comfortably and discreetly around your waist 1 Make sure the unit is switched off If you have switched on the unit accidentally then switch it off by pressing the OFF LO button 2 Lay the belt flat with the black electrodes on the inside of the belt facing you Moisten the black electrodes and your skin over the stomach area with Conductive Gel Make sure that a gene...

Page 6: ...fore use If your skin turns red or there is irritation stop using the belt for a little while until the irritation goes away Sometimes this is caused by moist electrodes drying up Occasionally the body develops excessive oils on the skin and this could inhibit pulse conduction Cleaning the skin area with a warm damp cloth before using the belt is a good solution Always have a resting period of at ...

Page 7: ...cise If you change the exercise mode within the 12 minutes the timer will count down from the original leftover time What to do if you do not feel the contraction Should no contraction be felt move the belt slowly around the area you want to work on Make sure you have enough Conductive Gel placed on the inside of the electrode Gradually increase the PULSE INTENSITY by pushing the ON HI button seve...

Page 8: ... you should adjust your exercise routine to your personal fitness level and you should feel comfortable As a beginner you should always use the mode and intensity that feels most comfortable to you The intensity has 10 steps With every push of the button ON HI you increase the intensity by one step with every push of the button OFF LO you decrease the intensity by one step until the unit powers of...

Page 9: ...d OUTPUT FREQUENCY 4 37Hz PULSE WIDTH 50 µs POWER SUPPLY 2 x 1 5V AAA batteries Type LR033 Your Guarantee On receipt of the completed guarantee registration slip The Dezac Group Ltd will guarantee your Ab Tek Belt for one year against failure due to faulty workmanship or components This Guarantee does not affect your statutory rights To ensure your guarantee is registered complete the form on the ...

Page 10: ...ate of Purchase Purchased from Title Mr Mrs Miss Ms Initials Surname E mail address Postal Address Town City County State Country Post Zone Code Please tick this box if you do not wish to be sent information on other Bodi Tek products Guarantee Registration U ...

Page 11: ...moving batteries for 1 minute Re insert batteries Batteries are low Change batteries LCD Display function normal but nothing occurs Intensity set too low Push ON HI button several times to increase Not enough Conductive Gel on the belt Put more Conductive Gel between belt and skin Used gel is not water based Read label of the gel used Make sure you find water or The belt is positioned incorrectly ...

Page 12: ...elles ou mentales réduites ou manquent d expérience et de connaissances sauf si elles ont reçu une supervision ou des instructions concernant son utilisation de la part d une personne responsable de leur sécurité Veuillez ne pas placer les électrodes Sur le sinus carotidien situé sur le devant du cou Sur la tête ou de manière transcrânienne Sur la poitrine ou à tout endroit situé à proximité du cœ...

Page 13: ...igences des autorités locales Il est IMPÉRATIF de ne pas le jeter avec les déchets ménagers COMPARTIMENT DES PILES Le compartiment est accessible en faisant coulisser le couvercle 2 piles AAA de 1 5 V doivent être placées dans ce compartiment Les insérer correctement comme illustré dans le compartiment AFFICHAGE Affiche diverses informations lorsque l appareil est en fonctionnement UNITÉ DE COMMAN...

Page 14: ... votre peau au moyen des électrodes spéciales placées sur l intérieur de la ceinture Ces impulsions électriques activent les nerfs qui contrôlent les muscles Ensuite les impulsions contractent et détendent le muscle de façon similaire à une routine d entraînement Les impulsions générées ont été conçues pour imiter les contractions musculaires naturelles qui sont efficaces et confortables Les progr...

Page 15: ...discrètement autour de votre taille 1 Veillez à ce que l appareil soit éteint Si vous avez allumé l appareil par inadvertance éteignez le en appuyant sur le bouton OFF LO 2 Disposez la ceinture à plat en positionnant les électrodes noires sur l intérieur de la ceinture tournées vers vous Humidifiez les électrodes noires et votre peau sur la zone du ventre avec le gel conducteur Veillez à étendre u...

Page 16: ...irritée cessez d utiliser la ceinture pendant un certain temps jusqu à ce que l irritation disparaisse Quelquefois cela est dû à l assèchement des électrodes Le corps développe parfois des huiles excessives sur la peau ce qui peut entraver la conduction des impulsions Il est judicieux dans ce cas de nettoyer la zone de la peau à l aide d un chiffon chaud et humide avant d utiliser la ceinture Prév...

Page 17: ...e mode d entraînement au cours des 12 minutes le minuteur fera le décompte à partir du temps restant d origine Que faire si vous ne ressentez pas la contraction Si vous ne ressentez aucune contraction déplacez lentement la ceinture dans la zone sur laquelle vous voulez travailler Assurez vous de placer suffisamment de gel conducteur sur l intérieur de l électrode Augmentez progressivement l INTENS...

Page 18: ...outine d entraînement à votre état de forme personnel et vous devez vous sentir bien En tant que débutant vous devez toujours utiliser le mode et l intensité qui vous semblent agréables L intensité comporte 10 crans différents Chaque fois que vous appuyez sur le bouton ON HI vous augmentez l intensité d un cran et chaque fois que vous appuyez sur le bouton OFF LO vous diminuez l intensité d un cra...

Page 19: ...e 500 ohms FRÉQUENCE DE SORTIE 4 37 Hz LARGEUR D IMPULSION 50 µs ALIMENTATION ÉLECTRIQUE 2 piles AAA de 1 5 V Type LR033 Votre garantie Dès réception du bordereau d enregistrement de la garantie dûment rempli The Dezac Group Ltd garantira votre Ab Tek Belt pendant un an contre tout défaut dû à une main d œuvre ou des composants défectueux Cette garantie n a aucune incidence sur vos droits légaux P...

Page 20: ...B TEK BELT Date d achat Achetée à Civilité M Mme Melle Initiales Nom Adresse e mail Adresse postale Ville Région État Pays Code postal Veuillez cocher cette case si vous ne souhaitez pas recevoir d informations sur les autres produits Bodi Tek Enregistrement de la garantie ...

Page 21: ...es Les piles sont faibles Changez les piles L affichage LCD fonctionne normalement mais rien ne se passe L intensité est réglée trop bas Appuyez plusieurs fois sur le bouton ON HI pour l augmenter Pas assez de gel conducteur sur la ceinture Mettez davantage de gel conducteur entre la ceinture et la peau Le gel utilisé n est pas à base d eau Lisez l étiquette du gel utilisé Vérifiez que le mot eau ...

Page 22: ...s nur unter Beaufsichtigung bzw Anleitung hinsichtlich des Gebrauchs des Geräts durch eine für ihre Sicherheit verantwortliche Person verwendet werden Bringen Sie die Elektroden nicht wie folgt an über der vorne am Hals befindlichen Kopfschlagader Karotissinus den Kopf umspannend oder schädelübergreifend transkranial um den Brustkorb oder im Bereich des Herzens über einer offenen Wunde infizierten...

Page 23: ...ß entsorgt wird Das Gerät darf NICHT im Hausmüll entsorgt werden DAS BATTERIEFACH Öffnen Sie das Batteriefach indem Sie die Abdeckung nach unten schieben 2 x 1 5 V AAA Batterien sind in dieses Fach einzulegen Legen Sie die Batterien wie angezeigt korrekt in das Fach ein ANZEIGE Zeigt bei Gebrauch des Produktes verschiedene Informationen an STEUEREINHEIT MODE Taste Durch einmaliges Drücken der Tast...

Page 24: ...en Elektroden auf der Innenseite des Gürtels auf Ihre Haut übertragen werden Diese elektrischen Impulse aktivieren die Nerven die ihrerseits die Muskeln steuern und kontrollieren Diese Impulse kontrahieren und entspannen die Muskeln auf eine Weise die einem Trainingsprogramm ähnlich ist Die generierten Impulse sollen die natürlichen Muskelkontraktionen imitieren die effektiv und angenehm sind Dazu...

Page 25: ...as spezielle Material gewährleistet dass der Gürtel bequem und dezent sitzt 1 Stellen Sie sicher dass die Steuereinheit ausgeschaltet ist Sollten Sie sie versehentlich eingeschaltet haben drücken Sie auf die Taste OFF LO um sie auszuschalten 2 Legen Sie den Gürtel mit den schwarzen Elektroden auf der Innenseite des Gürtels Ihnen zugewandt flach hin Befeuchten Sie die schwarzen Elektroden und Ihre ...

Page 26: ...ungen kommen hören Sie für kurze Zeit mit der Nutzung des Gürtels auf bis die Reizung verschwunden ist Dies tritt gelegentlich auf wenn die ansonsten feuchten Elektroden austrocknen Gelegentlich produziert der Körper eine exzessive Menge an Ölen auf der Haut was für die Leitung der Impulse hinderlich sein kann Ein Reinigen der entsprechenden Bereiche der Haut mit einem warmen feuchten Tuch vor Geb...

Page 27: ...Minuten einer Übungseinheit aus Wenn Sie den Übungsmodus innerhalb dieser 12 Minuten wechseln zählt der Timer von der ursprünglichen Restzeit herunter Was ist zu tun wenn Sie die Kontraktion nicht spüren Spüren Sie keine Kontraktion verschieben Sie den Gürtel behutsam in dem Bereich den Sie bearbeiten möchten Vergewissern Sie sich dass Sie ausreichend Leitgel auf der Innenseite der Elektrode angeb...

Page 28: ...bungen Ihrem persönlichen Fitnessniveau anpassen und sich dabei wohl fühlen Als Anfänger sollten Sie den Modus und die Intensität wählen die Ihnen am angenehmsten erscheint Die Intensitätsskala weist 10 Schritte auf Mit jedem Drücken der Taste ON HI erhöhen Sie die Intensität schrittweise mit jedem Drücken der Taste OFF LO verringern Sie sie um jeweils einen Schritt bis das Gerät ausgeschaltet ist...

Page 29: ...MZUFUHR 2 x 1 5 V AAA Batterien Typ LR033 Ihre Garantie Mit Eingang des ausgefüllten Garantiebelegs übernimmt The Dezac Group Ltd die einjährige Garantie für Ihr Ab Tek Belt sollte das Produkt aufgrund mangelhafter Verarbeitung oder fehlerhafter Komponenten versagen Diese Garantie beeinträchtigt Ihre Rechte gemäß der gesetzlichen Gewährleistungsbestimmungen in keiner Weise Um die Registrierung Ihr...

Page 30: ...us Produkt AB TEK BELT Kaufdatum Gekauft von Anrede Herr Frau Vornamen Nachname E Mail Adresse Anschrift Ort Bundesland Land PLZ Machen Sie ein Häkchen in diesem Kästchen wenn Sie Informationen zu anderen Bodi Tek Produkten wünschen Garantieregistrierung ...

Page 31: ...edriger Batteriestand Batterien auswechseln LC Anzeige normal aber es passiert nichts Intensität zu niedrig eingestellt Mehrmals auf ON HI drücken um Intensität zu erhöhen Nicht genug Leitgel auf dem Gürtel Mehr Leitgel zwischen Gürtel und Haut auftragen Verwendetes Gel ist nicht auf Wasserbasis Zusammensetzung des verwendeten Gels durchlesen Vergewissern Sie sich dass Wasser oder Aqua als Bestand...

Page 32: ... onvoldoende ervaring en kennis tenzij ze onder toezicht staan of aanwijzingen hebben gekregen over het gebruik ervan door iemand die verantwoordelijk is voor hun veiligheid Plaats de elektroden niet over de sinus caroticus aan de voorzijde van de nek over het hoofd of over meerdere delen van de schedel Over de borstkas of ergens in de buurt van het hart Over een open wonde geïnfecteerd gebied of ...

Page 33: ...gedaan volgens de plaatselijk geldende regels Gooi dit product NIET met het gewone huishoudafval weg BATTERIJCOMPARTIMENT Door de klep naar beneden te schuiven wordt het compartiment zichtbaar 2 x 1 5 V AAA batterijen moeten in dit compartiment worden geplaatst Plaats ze op correcte wijze zoals aangegeven in het compartiment SCHERM Toont verschillende informatie wanneer in gebruik BESTURINGSEENHEI...

Page 34: ...n met speciale elektroden die aan de binnenkant van de gordel zijn bevestigd Deze elektrische pulsen activeren de zenuwen die de spieren sturen De pulsen spannen de spieren aan en ontspannen ze net zoals dit het geval is bij een trainingsprogramma De veroorzaakte pulsen werden ontworpen om natuurlijke spiersamentrekking na te bootsen die effectief en comfortabel zijn Het programma veroorzaakt puls...

Page 35: ...61 cm tot 47 119 cm Het speciale materiaal zorgt ervoor de gordel comfortabel aanvoelt en discreet om de taille sluit 1 Zorg ervoor dat de eenheid is uitgeschakeld Indien u de eenheid per ongeluk hebt ingeschakeld schakelt u deze weer uit door op de knop OFF LO te drukken 2 Leg de gordel plat neer met de zwarte elektrodes aan de binnenzijde naar u toe gericht Maak de zwarte elektrodes en uw huid v...

Page 36: ...of er irritatie optreedt mag u de gordel niet langer gebruiken tot de irritatie weer is verdwenen Soms wordt dit veroorzaakt omdat de vochtige elektrodes opdrogen Soms produceert het lichaam te veel olie op de huid waardoor de pulsgeleiding wordt onderdrukt De huid schoonmaken met een warme vochtige doek voor u de gordel gebruikt is een goede oplossing Zorg steeds voor een rustperiode van ten mins...

Page 37: ...ng uitvalt Als u de trainingsmodus in deze periode van 12 minuten verandert zal de timer vanaf de oorspronkelijke begintijd verder aftellen Wat moet u doen als u de samentrekkingen niet voelt Indien u geen samentrekking voelt beweegt u de gordel langzaam over het zone waaraan u wenst te werken Zorg ervoor dat u voldoende geleidende gel aan de binnenkant van de elektrode hebt geplaatst Verhoog geli...

Page 38: ...conditie en zou u zich comfortabeler moeten voelen Als beginner moet u steeds de modus en intensiteit gebruiken die het meest comfortabel voor u aanvoelt De intensiteit kan in 10 stappen worden ingesteld Met elke druk op de knop ON HI verhoogt u de intensiteit met één stap met elke druk van de knop OFF LO verlaagt u de intensiteit met één stap tot de eenheid uiteindelijk wordt uitgeschakeld Traini...

Page 39: ...ng GOLFLENGTE UITGANGSVERMOGEN 4 37 Hz PULS BREEDTE 50 µs VOEDING 2 x 1 5 V AAA batterijen type LR033 Uw garantie Bij ontvangst van het volledig ingevulde garantie registratiestrookje zal The Dezac Group Ltd garantie verlenen over uw Ab Tek Belt voor een periode van één jaar op onderdelen en fabricagefouten Deze garantie doet geen afbreuk op uw wettelijk rechten Om uw garantie te registreren vult ...

Page 40: ...TEK BELT Aankoopdatum Aangekocht bij Titel dhr mevr mej Initialen Familienaam E mailadres Postadres Gemeente Stad Provincie Land Postcode Vink dit vakje aan indien u geen informatie wenst te ontvangen over andere Bodi Tek producten Registratie garantie ...

Page 41: ... te verwijderen Plaats de batterijen terug Batterijen zijn bijna leeg Vervang de batterijen Normale werking lcd scherm maar er gebeurt niets Intensiteit staat op laag Druk verschillende keren op de knop ON HI om te verhogen Niet genoeg geleidende gel op de gordel Breng meer geleidende gel aan tussen de gordel en de huid Gebruikte gel is niet gemaakt op waterbasis Lees het etiket van de gebruikte g...

Page 42: ...ogy for Life Dezac and Ab Tek Belt are trademarks of The Dezac Group Ltd 2011 The Dezac Group Ltd 2011 Manufactured by The Dezac Group Ltd Dezac House Montpellier St Cheltenham GL50 1SS UK www bodi tek co uk 1 IN ABTK EFGD 1 0 ...

Reviews: