background image


안내


설치


안내서는


제품


설치에


필요한


간단한


정보만


기록하고


있습니다

자세한


설치


안내는


첨부된

 CD


사용


설명서를


참고하십시오

. CD


포함되어있는


내용은


아래와


같습니다


1. 

매뉴얼

사용자

코드페이지

제어


명령어

블루투스

 & 

무선랜

소프트웨어


2. 

드라이버

 : Windows, OPOS, JPOS, CUPS(Linux, Mac)  

3. SDK: UPOS SDK(android, iOS), Windows SDK 
4. 

유틸리티

 : Unified Mobile Utility(PC/PDA), Net Configuration Tool, Android Utility,  

iOS Utility 


저희

 (

)

빅솔론은


제품의


기능과


품질


향상을


위하여


지속적인


개선을


하고


있습니다

이로


인하여


제품의


사양과


매뉴얼의


내용은


사전


통보


없이


변경될


있습니다


배터리


안전


주의사항


1. 

제품


구매


처음


사용


이상한


냄새


또는


과열과


같은


이상


증상을


발견하면


즉시


구입


판매점에


문의하십시오

.  

2. 

배터리를


충전할


㈜빅솔론이


지정하는

(

옵션으로


제공

전용


충전기만


사용해서


충전하십시오

잘못된


충전기를


사용할


경우


배터리


과열

연소


폭발이


발생할


있습니다

.  

3. 

차량


내부와


같이


고온


또는


강력한


직사광선에


노출되는


장소에서


배터리를


사용하거나


보관하지


마십시오


경우


배터리


과열


연소가


일어날


있습니다

또한


배터리


성능


수명이


감소할


있습니다

.  

4. 

배터리에


바닷물


또는


수분이


들어가거나


새어


들어가지


않도록


하십시오

배터리


구동회로


보호장치가


산화되면


배터리가


비정상적인


전류


전압으로


인해


과충전


되어


배터리가


과열되거나


배터리에


불이


붙거나


폭발할


있습니다

.  

5. 

배터리를


던지거나


강한


충격이


가해지지


않도록


하십시오

배터리


보호장치가


손상되면


배터리가


과열되고


그에


따라


유해한


화학


반응이


배터리


내에서


생성될


있습니다

.  

배터리


과열

연소


폭발이


일어날


가능성이


있습니다

.  

6. 

배터리가


손상되었거나


외부


충격으로


인해


외관이


변형된


경우


또는


부풀어


오른


경우


사용하지


마십시오

.  


구성품


확인


SPP-R220 


배터리


배터리


충전기


용지


전원


코드


벨트


클립


CD 


설치


안내서


제품의


주요


명칭


용지커버

전원 버튼

열림 버튼

용지 이송 버튼


전원 커넥터

배터리

벨트 스트랩 /벨트 클립 고정 홀

케이블 커넥터

인터페이스 캡


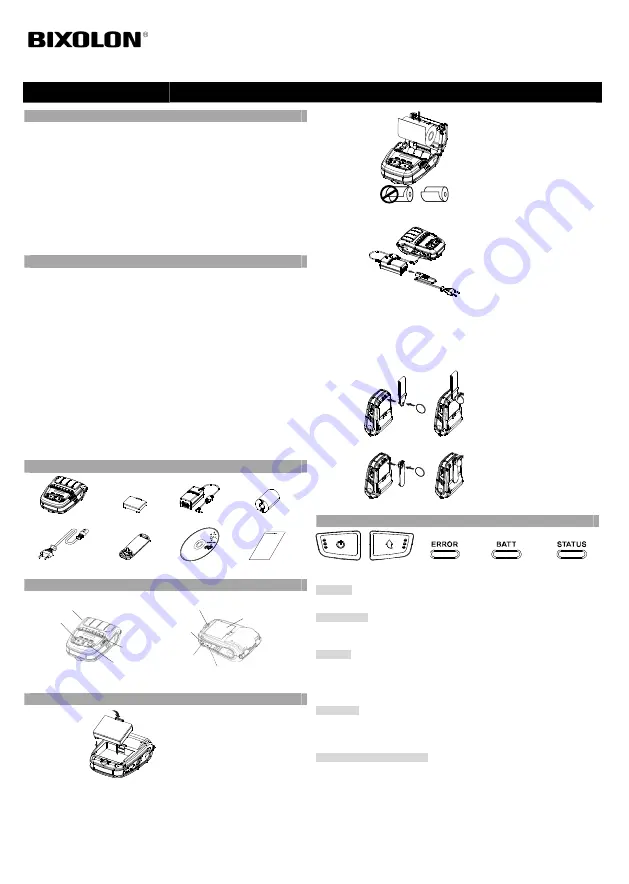
설치


충전


배터리


설치


1. 

프린터


밑면에


배터리를


삽입하고


배터리


(hook)


결합하십시오

2. 

딸깍하는


소리가


때까지


프린터에


배터리를


밀어


넣으십시오


※참고


배터리는


구입


완전히


충전된


상태가


아니기


때문에


제품


사용


배터리를


충전해야


합니다

. (

배터리


충전기


용지


설치


1. 

열림


버튼을


눌러


용지커버를


여십시오

2. 

그림과


같이


용지를


넣으십시오

.  

(


용지의


지관이


있을


경우


제거하십시오

.) 

3. 

용지


방향에


주의하십시오

4. 

용지를


앞으로


당긴


다음


용지커버를


닫으십시오

5. 

여분의


용지는


프린터


앞면으로


잡아


당겨


찢어내십시오

배터리


충전


1. 

프린터


전원을


주십시오

2. 

전원


코드를


배터리


충전기에


연결한


다음

 AC 

전원에


연결하십시오

3. 

화살표


방향으로


외부


인터페이스


캡을


여십시오

4. 

배터리


충전기를


전원


커넥터에


연결하십시오


참고


㈜빅솔론에서


제공한


배터리


충전기를


사용하지


않을


경우


프린터에


심각한


손상이


발생할


있습니다

㈜빅솔론은


그러한


손상에


대해


어떠한


법적


책임을


지지


않습니다

. (

프린터와


배터리


충전기의


전압


전류


사양이


일치해야


합니다

). 


벨트


스트랩


설치


1. 

벨트


스트랩


고정홀에


벨트


스트랩


스크류를


삽입하십시오

2. 

그림과


같이


동전


등으로


벨트


스트랩


스크류를


체결하십시오

벨트


클립


설치


1. 

벨트


클립


고정홀에


벨트


클립의


스크류를


삽입하십시오

2. 

그림과


같이


동전


등으로


벨트


클립의


스크류를


체결하십시오

(

조립되는


방향에


주의하여


조립하십시오

.) 


조작부


사용법


전원


버튼


용지


이송


버튼


오류

 LED 


배터리

 LED 


상태

 LED 


전원


버튼


버튼은


프린터


전원을


켜거나


사용됩니다

.  


용지


이송


버튼


버튼은


용지를


인위적으로


이송


시키거나


셀프


테스트를


 16

진수를


출력할


사용됩니다

.  


오류

 LED   

빨간색

 LED


켜지면


용지


커버가


열린


상태입니다

.   

빨간색

 LED


깜박이면


용지가


없거나


헤드가


가열된


상태입니다

.  

빨간색

 LED


계속


깜박이면


제품에


이상이


발생한


경우일


있으므로


서비스


대리점에


문의하십시오

.  


배터리

 LED  

파란색

LED


켜지면


배터리가


완전


충전


상태입니다

.  

파란색

 LED


깜빡이면


배터리는


절반


충전


상태입니다

.  

빨간색

 LED


깜박이면


배터리


충전


또는


교체가


필요한


상태입니다

.  


상태

LED (

블루투스


또는


무선랜

1) 

블루투스


사용시


녹색

LED


배터리


상태

 LED


켜지면


프린터는


블루투스


무선통신이


가능한


상태입니다

.  

2) 

무선랜


사용시


무선랜의


신호세기를


나타냅니다

신호세기가


양호하면


녹색

 LED


켜지고

신호세기가


약하면


녹색

 LED


깜빡입니다

.  


※참고


파워


세이브


모드는


상태

 LED


켜집니다

.


프린터


설치


안내서


모바일


영수증


프린터

   SPP-R220 

All manuals and user guides at all-guides.com

Summary of Contents for SPP-R220

Page 1: ...into the slot until a snapping sound is heard Note As the battery is not charged at the time of purchase charge the battery prior to product use Use the battery charger Paper Installation 1 Press the...

Page 2: ...Use the Bluetooth connection function supported by the device to connect to the printer The NFC tag built into the printer enables automatic pairing with devices Note The device must support NFC Auto...

Page 3: ...uckers ein Achten Sie darauf dass der Akkuhaken richtig ausgerichtet ist 2 Dr cken Sie den Akku in das Fach bis dieser h rbar einrastet Hinweis Da der Akku werkseitig nicht geladen ist muss dieser vor...

Page 4: ...ie die Vom Ger t unterst tzte Bluetooth Funktion ueine Verbindung mit dem Drucker herzustellen Der integrierte NFC Tag erm glicht eine automatische Kopplung mit anderen Ger ten Hinweis Das Ger t muss...

Page 5: ...rimante en veillant bien aligner le crochet de la batterie 2 Poussez la batterie dans la fente jusqu au clic Note La batterie n tant pas charg e au moment de l achat chargez la avant de l utiliser Uti...

Page 6: ...fil 1 L imprimante peut tre connect e aux dispositifs quip s de la technologie Bluetooth PDA PC etc 2 Utilisez la fonction de connexion Bluetooth support e par le dispositif pour connecter l impriman...

Page 7: ...a el lado lateral de la impresora Carga de la bater a 1 Apague la impresora 2 Conecte el cable de energ a al cargador de la bater a y luego conecte la energ a CA 3 Abra la cubierta de interfaz externa...

Page 8: ...las computadoras port tiles que admitan la comunicaci n inal mbrica LAN en el modo Ad hoc y AP en el modo Infraestructura Nota Consulte el Manual de Bluetooth y de red inal mbrica LAN para obtener m...

Page 9: ...que a bateria n o vem carregada altura da compra carregue a bateria antes da utiliza o do produto Utilizar o carregador da bateria Instala o de Papel 1 Prima o bot o abrir para abrir a tampa de papel...

Page 10: ...ooth 1 A impressora pode conectar se a dispositivos equipados com comunica o Bluetooth PDAs PCs etc 2 Utilize a fun o de conex o Bluetooth suportada pelo dispositivo para se conectar impressora O marc...

Page 11: ...SDK 4 Unified Mobile Utility PC PDA Net Configuration Tool Android Utility iOS Utility 1 2 3 4 5 6 SPP R220 CD 1 hook 2 1 2 3 4 5 1 2 AC 3 4 1 2 1 2 LED LED LED 16 LED LED LED LED LED LED LED LED LED...

Page 12: ...ter Tear Bar Max 40 mm 1 57 Max 39 mm 1 54 57 5 0 5 mm 2 26 0 2 57 5 0 5 mm 2 26 0 2 0 07 0 003 mm 0 08 0 008mm 1 1 2 2 3 4 1 2 Auto calibration Auto calibration Auto calibration 1 2 3 Auto calibratio...

Page 13: ...DA Net Configuration Tool Android Utility iOS Utility BIXOLON 1 2 BIXOLON 3 4 5 6 SPP R220 1 hook 2 1 2 3 4 1 2 AC 3 4 BIXOLON BIXOLON 1 2 1 2 LED LED LED 16 LED LED LED LED LED LED LED LED LED LAN 1...

Page 14: ...4 1 2 Auto calibration Auto calibration Auto calibration 1 2 3 Auto calibration Select the mode Autocalibration Power button Self test Feed button 4 Auto calibration 1 1 LAN 1 PDA PC 2 NFC tag Pairin...

Page 15: ...d iOS Windows SDK 4 Android iOS BIXOLON 1 2 BIXOLON 3 4 5 6 SPP R220 Power Paper Feed 1 2 1 2 3 4 5 1 2 3 4 BIXOLON BIXOLON 1 2 1 2 POWER FEED Bluetooth Wireless LAN 1 Bluetooth Bluetooth 2 WLAN WLAN...

Page 16: ...0 2 0 07 0 003 0 08 0 008 1 2 1 1 2 FEED 2 3 4 1 2 1 2 3 Power Feed 4 1 Bluetooth 1 Bluetooth 2 Bluetooth NFC NFC NFC Bluetooth 3 WLAN Ad Hoc AP Bluetooth Wireless LAN Bluetooth wireless LAN IP SSID 2...

Page 17: ...PDA Net Configuration Tool Android Utility iOS Utility BIXOLON 1 2 BIXOLON 3 4 5 6 SPP R220 CD 1 hook 2 1 2 3 4 5 1 2 AC 3 4 BIXOLON BIXOLO N 1 2 1 2 LED LED LED 16 LED LED LED LED LED LED LED LED LED...

Page 18: ...1 2 2 3 4 1 2 Auto calibration Auto calibration Auto calibration 1 2 3 Auto calibration Select the mode Autocalibration Power button Self test Feed button 4 Auto calibration 1 1 Bluetooth LAN 1 Bluet...

Page 19: ...e battery into the slot until a snapping sound is heard Note As the battery is not charged at the time of purchase charge the battery prior to product use Use the battery charger Paper Installation 1...

Page 20: ...Use the Bluetooth connection function supported by the device to connect to the printer The NFC tag built into the printer enables automatic pairing with devices Note The device must support NFC Auto...

Reviews: