NAVIGATION
30
Recording a trace record: Use the
button to start the recording process. When
active this button will then change to show
. In this way the key will always show
the option which is currently not selected. It is recommended that you start recording after
your route has been planned or when you are in Free Navigation and you have a valid
GPS signal, and you should stop recording once you have reached your destination. This
will prevent the unit from continually recording while you are not driving and it will also
divide each journey into a separate trace record. Once you have started a trace recording
you will need to return back to the map screen.
Note: if you switch the unit off without stopping the trace record function then your trace
record for that journey will be lost.
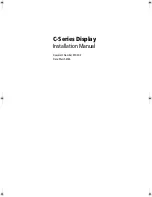
Each recording will be logged with the following information.
Viewing a trace record: Select the trace record you want to view. The currently selected
trace record will be highlighted orange. Then use the
button to view the trace
record on the map. When active the button will then change to show
. The trace
record will be shown as a slightly opaque orange line with green arrows indicating the
direction of travel.
Note: it is only possible to show one trace at a time. A trace record which is been shown
will be shown with a blue highlight on the list. If you select a second Trace and tap
,
this will cancel the first trace and begin to show this trace instead.
To delete a trace record, highlight it so that it is orange and tap
.
8.4 Address Book
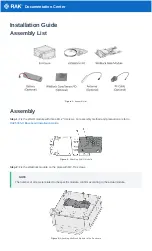
Opens the address book screen, from here you can
add, edit, delete and view your address book
locations on the map. You can add address book
entries to the address book so that they can quickly
be used for navigation purposes.
Any previously entered address book entries will be
shown as a list.


