


22
Multifunction Control Panel
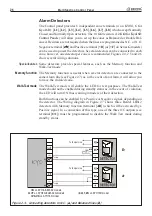
Setting up the BPI Level
The BPI Level of the system peripherals (Keypads Readers, etc.) must match
the BPI Level of the Control panel (set by means of the Jumper [
49
]).
To program the BPI Level at 5 Volt, insert Jumper [
54
] in the ‘
BPI LEV 5V
’
position, and insert Jumper [
49
].
To program the BPI Level at 12 Volt, insert Jumper [
54
] in the ‘
BPI LEV 12V
’
position, and remove Jumper [
49
].
NOTE:
NC2/TAST, ICON/KP LED Keypads
and ECLIPSE Readers with 4 DIP
switches operate at +5V. Therefore, if one of these devices is included in the system,
the BPI Level of the Control panel and BPI peripherals must be set at +5V .
KYO16D - Kyo16D Control Panel work only with 12V level BPI: all BPI
devices connected to the Kyo16D must have 12V BPI level. If you want con-
nect an OMNIA/TAST-R keypad, make sure the [49] and [54] jumpers are
present (refer to chapter 1).
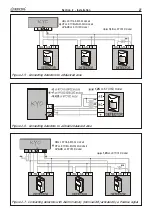
5 volt BPI Level
12 volt BPI Level
Note - On first power-up the display will show: “
ALISON/DVP
ALISON/DVP
ALISON/DVP
ALISON/DVP
ALISON/DVP
”.
5.
The display will show “
ALISON/DVP:01
ALISON/DVP:01
ALISON/DVP:01
ALISON/DVP:01
ALISON/DVP:01
” or “
ALISON/S:01
ALISON/S:01
ALISON/S:01
ALISON/S:01
ALISON/S:01
”.
Using
C
C
C
C
C
or
D
D
D
D
D
, select the Address (1 to 8) for the Keypad.
6.
Alison/S
- Press
E
to confirm and continue or press
e
to delete the
setting — in both cases the Keypad will emit an audible signal.
Re-insert the
jumper
54
and replace the case, the Keypad will exit the programming
session automatically.
Alison/DVP
- Press
E
to confirm and continue or press
e
to delete the
setting — in both cases the Keypad will emit an audible signal.
7.
Using
C
C
C
C
C
or
D
D
D
D
D
, select an address for the Proximity Reader, the display will
show the current Address of the Proximity Reader: “
PROXI: 01
” (preset at
factory).
If you DO NOT INTEND using the Proximity Reader
—
press
o
o
o
o
o
,
the
display will show the “
PROXI: OFF
PROXI: OFF
PROXI: OFF
PROXI: OFF
PROXI: OFF
” message.
If you INTEND using the Proximity Reader —
press
O
O
O
O
O
,
the display will
show the “
PROXI: 01
PROXI: 01
PROXI: 01
PROXI: 01
PROXI: 01
” message.
8.
Press
E
E
E
E
E
to confirm, or press
e
e
e
e
e
to delete the setting — in both cases the
Keypad will emit an audible signal and the display will show the “
CALL
CALL
CALL
CALL
CALL
SERVICE
SERVICE
SERVICE
SERVICE
SERVICE
” message. Re-insert the jumper
54
and replace the case, the
Keypad will exit the programming session automatically.
NOTE - KYO16D Control Panels has no vocal functions.
Summary of Contents for KYO 32 M
Page 1: ...0 1 7 167 7 21 0 18 ...
Page 10: ...10 Multifunction Control Panel The NC2 TAST LED Keypad Figure 1 3 The NC2 TAST LED Keypad D D ...
Page 71: ...71 Section 3 Programming from PC 5 11 6 0 1 2 3 1 4 3 3 5 2 3 0 1 2 3 ...
Page 88: ...ISTISBLEUNKYO 2 6 160108 P70 17 6 85 7 6 U O 01 02 5HF FOLQ LQ RU WLRQ ...


