


20
Multifunction Control Panel
ALISON/8L Keypad
1.
Remove the frontplate to generate ‘Tamper’ status.
2.
Connect the Keypad to the Control panel BPI BUS (ter, C, R, -).
3.
Remove the jumper [
54
]:
after several seconds the Keypad will emit an audible signal and the 4 LEDs
on the left (“
A
” in Figure 2.1) will turn ON;
the four pairs (up/down) of LEDs (“
B
” in Figure 2.1) will simulate 4 DIP
microswitches;
one of the first pair of LEDs (“
B
” in Figure 2.1) will blink to signal access to
the
Keypad Addressing
phase.
4
. Assign an Address to the Keypad (“
B
” in Figure 2.1 shows Address 4).
Use
A
or
B
to select the LED/DIP switch position.
Use
C
or
D
respectively, to turn the RED LED ON or OFF as required,
in accordance with the following logic:
Upper RED LED ON
= DIP switch
ON
Lower RED LED ON
= DIP switch
OFF
If you wish to delete the setting and assign a different Address, press
e
(the Alison/8L will step back after several seconds).
5.
Press
E
to confirm the selected Address. The Keypad will emit an audible
signal and will go back to step
4.
, this will not affect the setting, but is simply
due to the circular organization of the programming process.
6.
Re-insert the Jumper
[54]
, in accordance with the BPI Level (refer to “
Set-
ting up the BPI Level
”), then replace the frontplate.
ALISON/32L Keypad
NOTE - This keypad cannot be connected to the KYO16D Control Panels.
1.
Remove the frontplate to generate a ‘Tamper’ status.
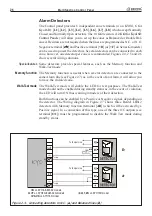
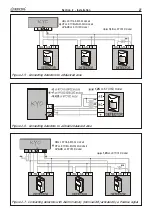
Fig. 2.1 - ALISON/8L and ALISON/32LP addressing
$/,621/
$/,621/3
Summary of Contents for KYO 32 M
Page 1: ...0 1 7 167 7 21 0 18 ...
Page 10: ...10 Multifunction Control Panel The NC2 TAST LED Keypad Figure 1 3 The NC2 TAST LED Keypad D D ...
Page 71: ...71 Section 3 Programming from PC 5 11 6 0 1 2 3 1 4 3 3 5 2 3 0 1 2 3 ...
Page 88: ...ISTISBLEUNKYO 2 6 160108 P70 17 6 85 7 6 U O 01 02 5HF FOLQ LQ RU WLRQ ...


