40 10.
Troubleshooting
Machine Functions
Æ
Dispose of the empty cartridges according to
the regulations of your country. Handle the
ink cartridges carefully to prevent getting ink
on clothing or other objects. Avoid skin and eye
contact (see chapter
Safety Instructions
/ Ink
Cartridges).
4
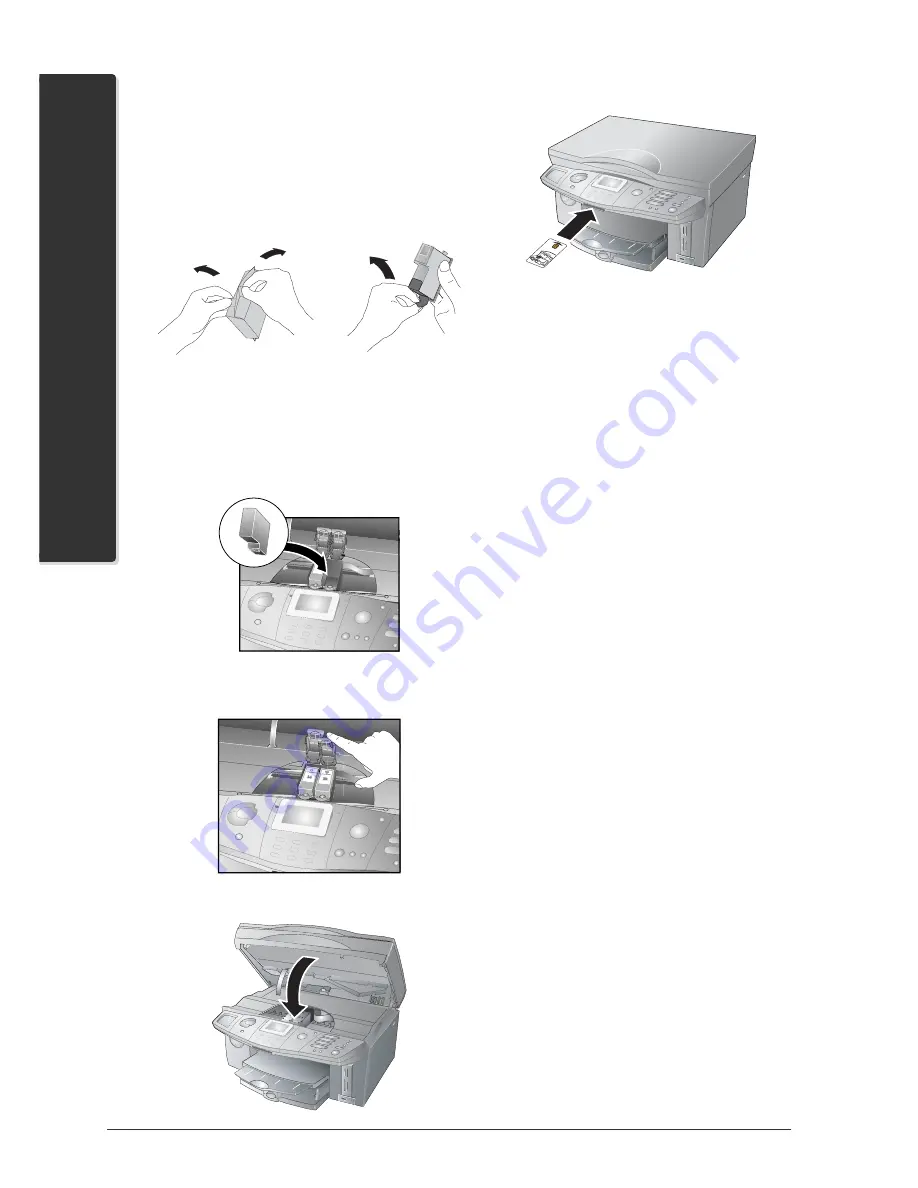
Take the ink cartridge out of the packaging, dispose
of any packaging material and carefully pull off the
protective strip.
Æ
Please make certain that the protective strip
has been completely removed. Be careful not
to touch the nozzles or contacts.
5
Insert the cartridge with the “nose” pointing down
and tilted back at an angle; the
black cartridge
on the
left,
the
colour cartridge
on the
right
.
6
Close the cartridge holder. You will hear a click
when the cover of the holder snaps into place.
7
Close the housing.
8
Insert the enclosed Plug’n’Print card into the slot
below the panel with the contacts facing up.
9
It may take a moment to update the cartridge.
When the process is completed, the following ap-
pears on the display:
ACTION
COMPLETED
/
Remove
Card
.
10
Pull the Plug’n’Print card out of the machine. The
newly inserted cartridge is activated.
²
A cartridge that has once been activated with
the enclosed Plug’n’Print card will be recog-
nised by your machine, even if you remove the
cartridge temporarily. You do not need to update
the cartridge again when you reinsert it!
11
For optimal printing quality, we recommend rea-
ligning the cartridges after each cartridge switch.
Confirm the display query
ALIGN.
NEW
with
OK
. Press the
X
button if you do not want to
realign the cartridges (see also Cleaning and Care /
Cleaning and Aligning Cartridges).
Inserting Photo
Cartridge
For the special requirements of high-quality photo
printing, we recommend using a photo cartridge.
1
Open the machine and the catch of the cartridge
holder as described under Changing Cartridges.
2
Take out the
black cartridge
and insert the
photo cartridge in its place
. Update this with
the enclosed Plug’n’Print card (see also Changing
Cartridges). The photo cartridge is activated.
3
For optimal printing quality, we recommend rea-
ligning the cartridges after each cartridge switch.
Confirm the display query
ALIGN.
NEW
with
OK
. Press the
X
button if you do not want to
realign the cartridges (see also Cleaning and Care /
Cleaning and Aligning Cartridges).
²
After printing your photos, replace the pho-
to cartridge with the black cartridge to save
money!
Store temporarily removed cartridges in the cor-
responding storage box (suitable for black, col-
Summary of Contents for Belgafax 710
Page 2: ......
Page 68: ...68 Appendix...
Page 69: ...Appendix 69 Appendix...
Page 70: ...70 Appendix...
Page 71: ......


