Chapter 8: Probe and Probe Tubing/Body Assembly Replacement
43
3
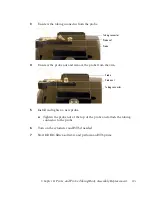
Unscrew the tubing connector from the probe.
4
Unscrew the probe nut and remove the probe from the arm.
5
Install and tighten a new probe.
a
Tighten the probe nut at the top of the probe and attach the tubing
connector to the probe.
6
Turn on the cytometer and HTS if needed.
7
Start BD FACSDiva software and perform an HTS prime.
Tubing connector
Probe
Probe nut
Tubing connector
Probe
Probe nut
Summary of Contents for 644787
Page 3: ...History Revision Date Change Made 23 11165 00 Rev A 1 2010 Initial release ...
Page 4: ......
Page 14: ...THIS PAGE INTENTIONALLY LEFT BLANK ...
Page 28: ...THIS PAGE INTENTIONALLY LEFT BLANK ...
Page 32: ...THIS PAGE INTENTIONALLY LEFT BLANK ...
Page 42: ...THIS PAGE INTENTIONALLY LEFT BLANK ...
Page 46: ...THIS PAGE INTENTIONALLY LEFT BLANK ...


