background image

4

HTS Customer Care Kits User’s Guide


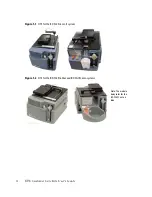
Figure 1-1  

HTS for the BD FACSCanto II system

Figure 1-2  

HTS for the BD FACSCalibur and BD FACSCanto systems

Note: The module 
body color for the 
BD FACSCanto is 
blue

Summary of Contents for 644787

Page 1: ...5 6 860 1593 Europe Tel 32 2 400 98 95 Fax 32 2 401 70 94 help biosciences europe bd com Brazil Tel 55 11 5185 9995 Fax 55 11 5185 9895 bdbiosciences brasil bd com Japan Nippon Becton Dickinson Company Ltd Toll Free 0120 8555 90 Tel 81 24 593 5405 Fax 81 24 593 5761 Canada Toll Free 888 259 0187 Tel 905 288 6000 Fax 888 229 9918 canada bd com Mexico Toll Free 01 800 236 2543 Tel 52 55 5999 8296 Fa...

Page 2: ...equipment NOTICE This equipment has been tested and found to comply with the limits for a Class A digital device pursuant to Part 15 of the FCC Rules These limits are designed to provide reasonable protection against harmful interference when the equipment is operated in a commercial environment This equipment generates uses and can radiate radio frequency energy and if not installed and used in a...

Page 3: ...History Revision Date Change Made 23 11165 00 Rev A 1 2010 Initial release ...

Page 4: ......

Page 5: ... 7 Biological Safety 7 Electrical Safety 7 Precautions 7 Chapter 2 HTS Removal and Reinstallation 9 BD FACSCanto II System 9 Removing the HTS 9 Reinstalling the HTS 11 BD FACSCanto BD LSR II BD FACSCalibur and BD LSRFortessa Systems 12 Removing the HTS 12 Reinstalling the HTS 15 Chapter 3 Wash Station Assembly Replacement 17 Required Kit Components 17 Replacing Wash Station Components 18 Assemblin...

Page 6: ...lacement 31 Required Kit Components 32 Pump Syringe Replacement Procedures 32 Removing Liquid from the Syringe For Primary Pump Syringe 32 Replacing the Syringe 33 Chapter 7 Fluidic Connection and In line Fluidic Filter Replacement 37 Required Kit Components 38 Replacing the Filters 39 Chapter 8 Probe and Probe Tubing Body Assembly Replacement 41 Required Kit Components 41 Replacing the Probe and ...

Page 7: ...on occurs in the connectors tubing and syringes Replacing these components every six months or annually along with daily cleaning and fluidics cleaning and shutdown can prevent clogs and optimize system performance The HTS Customer Care Kit offers a convenient way to replace clogged connectors tubing and syringes on site The kit which contains customer replaceable components and instructions reduc...

Page 8: ...HTS Kit Parts Replacement BD FACSCanto BD FACSCanto II 644788 HTS Kit Parts Replacement BD FACSCalibur BD LSR II including special order BD LSR II Special order BD LSRFortessa Symptom Possible Causes Solution See High carryover Wash station connections are worn Replace wash station components Chapter 3 Secondary pump Pump 2 error Clog in sample coupler tubing or in pump syringe or syringe needs re...

Page 9: ...lows Wash station clog Replace the wash station assembly Chapter 3 No events detected Clog in sample coupler tubing or tubing assembly Replace tubing assembly components or sample coupler tubing Chapter 5 Leak in sample coupler Loose coupler or clog in coupler tubing Tighten coupler see precautions or replace sample coupler tubing when necessary Chapter 5 Reduced sheath flow Sheath fluid filter is...

Page 10: ...4 HTS Customer Care Kits User s Guide Figure 1 1 HTS for the BD FACSCanto II system Figure 1 2 HTS for the BD FACSCalibur and BD FACSCanto systems Note The module body color for the BD FACSCanto is blue ...

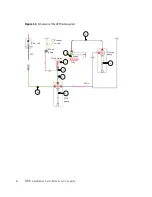
Page 11: ...alyzer has an extra protective cover that mounts to the original BD LSR II HTS cover Location of Commonly Clogged Components The clogs that occur and need repair are in the fluidics system The following schematic identifies the most commonly clogged components The numbers refer to component parts in the Required Kit Components tables throughout this guide Note The module body color might be unique...

Page 12: ...6 HTS Customer Care Kits User s Guide Figure 1 4 Schematic of the HTS fluidics system HTS pump Flow cell SIT Pressure switch Waste pump Wash station Probe Primary pump Tray Valve 12 3 2 1 4 5a 6 6 ...

Page 13: ...compressed and will eventually block the port To avoid compression tighten fittings until they make contact with the sealing washer and then turn the fitting an additional 1 6 to 1 4 turn If there is a leak tighten the fitting no more than an additional 1 8 turn All instrument surfaces that come in contact with biological specimens can transmit potentially fatal disease Use universal safety precau...

Page 14: ...THIS PAGE INTENTIONALLY LEFT BLANK ...

Page 15: ...T The waste and sheath fittings on the back side of the HTS can easily be broken when moving the HTS away from the cytometer while these fittings are connected Move the HTS just enough approximately 2 inches to provide the room necessary to disconnect the waste and sheath fittings from the HTS BD FACSCanto II System Removing the HTS 1 Turn off the cytometer and HTS 2 Remove or open the BD High Thr...

Page 16: ...racket 6 Remove the probe and the overflow reservoir 7 Disconnect interlock and interface cables 8 Disconnect the sheath and waste connectors from the HTS 9 Disconnect the sampler coupler from the cytometer SIT 10 Disconnect the door sensor cable a Lift the front feet of the HTS just over the front edge of the enclosure and tilt the unit at a 45 angle toward you for access to the door sensor cable...

Page 17: ...ock cable to the HTS 3 Connect the interface cable to the HTS 4 Connect the waste tubing to the waste connector on the HTS 5 Connect the sheath tubing to the sheath connector on the HTS 6 Connect the sampler coupler to the SIT on the cytometer Waste tubing connection Interlock cable connection Sampler coupler Sheath tubing connection Interface cable connection ...

Page 18: ...w in BD LSRFortessa because the HTS is placed on a sliding drawer 4 Pull the HTS out about 2 inches from the support bracket 5 Remove the probe and the overflow reservoir 6 Disconnect the power cable and the serial communications cable 7 Disconnect the sampler coupler from the cytometer SIT 8 Disconnect the sheath and waste connectors from the cytometer 9 Remove the HTS from the support bracket a ...

Page 19: ...Chapter 2 HTS Removal and Reinstallation 13 Captive screw HTS positioned on its support bracket ...

Page 20: ...14 HTS Customer Care Kits User s Guide Figure 2 1 Electrical connection to the HTS Power plug Serial cable ...

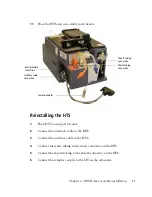
Page 21: ...to HTS Reinstalling the HTS 1 Place the HTS on the support bracket 2 Reconnect the power cable and the serial communications cable 3 Reconnect the sheath and waste connectors to the HTS Routing of power and communication cables Sheath fluid connection Waste fluidic connection ...

Page 22: ... 5 Secure the mounting screw to the bottom on the HTS 6 Place the cover back on the HTS and turn it on 7 Attach the sample coupler to the SIT 8 Turn on the cytometer 9 Start BD FACSDiva software or Plate manager software if connected to the BD FACS Calibur and perform an HTS prime ...

Page 23: ...HTS exhibits higher than normal carryover between samples The wash station overflows Required Kit Components The sample injection tubing 3 connects the injection port wash station 1 to the secondary pump valve not shown Item number Part Number Description Qty 1 336947 Injection port wash station 1 2 335526 Tubing injection port 1 3 335451 Tubing assembly sample injection tubing to HTS pump 1 ...

Page 24: ...nstructions see your BD High Throughput Sampler User s Guide 2 Turn off the cytometer and HTS if needed 3 Remove the HTS according to procedure in Chapter 2 4 Move the probe arm up and toward the front of the HTS 5 Unscrew and remove the sample injection tubing from the top of the secondary pump Injection port wash station Injection port tubing Sampler coupler Sealing washer ...

Page 25: ...wrench to loosen it 6 Turn the sample injection port see figure slightly to disengage the magnets and lift the port approximately 1 inch 7 Disconnect the silicon tubing from the sample injection port Do not disconnect the silicon tubing at the lower end because this could damage the lower connector Tubing assembly Secondary pump Silicon tubing ...

Page 26: ...Connect the injection port tubing assembly to the sample injection tubing assembly 3 Lower the sample injection port tubing assembly into the port hole and connect the silicon tubing to the sample injection port base as shown in the following figure The magnets will secure the sample injection port in place To prevent the cross threading of fittings ensure that mating fittings are aligned to one a...

Page 27: ...Chapter 3 Wash Station Assembly Replacement 21 4 Install and tighten the sample injection tubing assembly to the top of the secondary pump and install the HTS on the cytometer see Chapter 2 ...

Page 28: ...THIS PAGE INTENTIONALLY LEFT BLANK ...

Page 29: ...y from probe to the primary pump maintenance tasks when the following symptoms occur Tubing is clogged The systems displays a primary pump Pump 1 error No events are detected Required Kit Components Item number Part Number Description Qty 4 335454 Tubing assembly sample probe to the primary pump 1 ...

Page 30: ...placing Tubing Assembly Components 1 Turn off the cytometer and HTS and move the sample probe into the sample injection port 2 Remove the sample probe tubing assembly 3 Unscrew the sample injection tubing from the probe and the top of primary pump The sample injection tubing connectors are indicated in the following figure Clamp Primary pump Tubing assembly ...

Page 31: ...ing NOTE Valves contain sealing washers in each port If you over tighten the fitting the sealing washers can be compressed resulting in a blocked port Tighten the fitting until it contacts the sealing washer and then turn the fitting an additional 1 6 to 1 4 turn If leaking is observed tighten the fitting no more than an additional 1 8 turn 6 Install the sample probe tubing in the clamp on the arm...

Page 32: ...THIS PAGE INTENTIONALLY LEFT BLANK ...
Page 33: ...the SIT to run the cytometer in tube acquisition mode The sample coupler tubing is attached to the HTS secondary pump Replace the sample coupler tubing annually or when the following symptoms occur The system displays a secondary pump Pump 2 error The sample coupler continues to leak after being tightened A rare symptom can be no events are detected ...

Page 34: ...tometer and remove the HTS from the cytometer see Chapter 2 2 Unscrew the sample coupler tubing from the left port of secondary pump valve indicated in the figure and discard the sample coupler with tubing into a biohazardous waste container Item number Part number Description Qty 5 339340 Sample coupler secondary pump to SIT 1 Sample coupler secondary pump to SIT Secondary pump ...

Page 35: ... fitting is finger tight NOTE Valves contain sealing washers in each port If you over tighten the fitting the sealing washers can be compressed resulting in a blocked port Tighten the fitting until it contacts the sealing washer and then turn the fitting an additional 1 6 to 1 4 turn If leaking is observed tighten the fitting no more than an additional 1 8 turn 5 Install the HTS on the cytometer s...

Page 36: ... small clean container with approximately 300 mL of DI water 2 Remove the sheath line from the HTS 3 Connect the purge tubing to HTS sheath port see Chapter 9 Item number Part number Description Qty 5a 335452 Sample coupler secondary pump to SIT 1 Secondary pump Sample coupler secondary pump to SIT ...

Page 37: ... the pump syringe maintenance tasks annually or when the following symptoms occur Primary or secondary pump Pump 1 or Pump 2 errors occur A Pump syringe has a clog NOTE It is not necessary to remove the HTS when replacing the primary pump syringe located on the front of the HTS However it is necessary to remove the HTS when replacing the secondary pump syringe located on the rear of the HTS Syring...

Page 38: ...imary Pump Syringe 1 Verify that the cytometer and BD FACSDiva software are running 2 From the Acquisition Dashboard select RUN PLATE 3 Remove the liquid from the syringe a Disconnect the sheath connector from the back of the HTS b Disconnect one end of the sheath filter c Select HTS Prime d Repeat until the syringe barrel is empty e Exit BD FACSDiva software 4 Turn off the cytometer Item number P...

Page 39: ... of the valve Grasp the metal ring at the top of the syringe and turn counterclockwise 4 Discard the used syringe into a biohazard sharps container 5 Install the new syringe a Screw the syringe barrel onto the valve until it contacts the seal washer then turn the syringe an additional 1 6 to 1 4 turn If you observe a leak tighten a maximum of an additional 1 8 turn b Pull the syringe plunger down ...

Page 40: ...icant to the plunger lock screw to prevent seizing in the future You can apply the lubricant in the lock lever hole before placing the plunger in it This will help keep the saline out of the whole assembly Do not lubricate the syringe barrel 7 For the secondary syringe reinstall the HTS on the cytometer see Chapter 2 Lubricant Plunger Plunger holder ...

Page 41: ...Chapter 6 Pump Syringe Replacement 35 8 Turn on the cytometer and using the BD FACSDiva software perform a Prime Secondary pump Syringe ...

Page 42: ...THIS PAGE INTENTIONALLY LEFT BLANK ...

Page 43: ...ter Replacement This chapter covers the replacement of the two fluidic connections between the cytometer and the HTS These two fluidic connections are sheath and waste connections Perform the fluidic connections maintenance and replace the sheath filter Every six months When the sheath flow is reduced or inadequate ...

Page 44: ...Canto II connectors Item number Part number Description Qty 8 335710 Filter 25 mm 17 µm screen 1 9 343527 Coupling insert hose barb blue 1 10 59 10090 05 Coupling insert hose barb orange waste 1 11 343529 Coupling insert hose barb white 1 Filter Blue hose barb Orange hose barb Filter White hose barb ...

Page 45: ... the HTS orange quick connector end in Canto II c Disconnect the quick connector at the cytometer interface panel and at the white quick connector on the back of the HTS unit blue quick connector end in Canto II d Remove the tubing from the filter by twisting the Luer connections e Install the sheath line with the lock ring end toward the cytometer panel This will prevent foreign material that acc...

Page 46: ...THIS PAGE INTENTIONALLY LEFT BLANK ...

Page 47: ... of the probe assembly arm Replace the probe along with the probe tubing or body assembly annually or when the following occurs Probe is bent or is not taking up sample Probe is clogged Required Kit Components NOTE A spare probe is included in the HTS accessory kit Item number Part number Description Qty 12 34389017 Probe tubing body assembly 1 ...

Page 48: ...n the BD FACSCanto BD LSR II and BD FACS Calibur systems you will need to turn off the power on the cytometer and the HTS separately 2 Pull the HTS arm up slowly and move it toward the front of the instrument The sample injection port is fragile and can be easily damaged Use care when handling the sample injection port Probe tubing body assembly ...

Page 49: ...e nut and remove the probe from the arm 5 Install and tighten a new probe a Tighten the probe nut at the top of the probe and attach the tubing connector to the probe 6 Turn on the cytometer and HTS if needed 7 Start BD FACSDiva software and perform an HTS prime Tubing connector Probe Probe nut Tubing connector Probe Probe nut ...

Page 50: ...THIS PAGE INTENTIONALLY LEFT BLANK ...

Page 51: ... II Special Order BD LSR II and Special Order BD LSRFortessa systems as they do not have a fluidic shutdown cycle built into the software We recommend daily cleaning and maintenance of the sample coupler and tubing to avoid clogs Required Kit Components Cleaning Procedures 1 Fill a clean container with approximately 300 mL of deionized DI water 2 Remove the sheath line from the HTS 3 Connect the p...

Page 52: ...urge line into the DI water 5 Using BD FACSDiva software perform a system prime Repeat 3 times For BD FACS Calibur use BD Plate Manager software to run the prime 6 Remove the purge tubing 7 Reinstall the sheath line BD HTS sheath port HTS purge tubing DI water Purge tubing ...

Reviews: