Installation
POLARIS PROFESSIONAL
- für Zone 1/21
POLARIS Panel PC Professional 10,4" / 12,1" / 12,1" W
EN 26/68
Technical data subject to change.
04/2019
Work steps
(1)
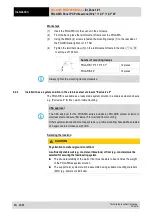
Insert the POLARIS into the cut-out in the enclosure.
(2)
From the back, place the reinforcement frame over the POLARIS.
(3)
Using the M4x12 (2) screws to fasten the mounting clamps (1) to the rear side of
the POLARIS and tighten to 1.37 Nm.
(4)
Tighten the terminal screw (3) on the reinforcement frame in the order
to
to a torque of 1.02 Nm.
Number of mounting clamps
POLARIS 15″/17.3"/19.1"
12 pieces
POLARIS 24"
14 pieces
Always tighten the mounting clamps crosswise.
6.2.2
Installation as a system solution in the stainless steel enclosure "Exclusive II"
The POLARIS is available as a ready-made system solution in a stainless steel enclosure
e.g. "Exclusive II" for floor, wall or table mounting.
CSA approval
The CSA approval for the POLARIS series includes an POLARIS system solution in
stainless steel enclosure "Exclusive II" for wall and floor mounting.
Other system solutions and mounting systems (e.g. table mounting) have
not
been tested
and approved in accordance with CSA.
Selecting the location
CAUTION
Pay attention to wall and ground condition!
A sufficiently stable wall (e.g. concrete or limestone) or floor (e.g. concrete) must be
selected for securing the load-bearing system.
The structural stability of the wall or floor must be able to bear 4 times the weight
of the POLARIS as system solution.
The support arm system must be assembled using suitable mounting materials
(M12) (e.g. dowels or stud bolts).

