


BH8-Series – User’s Manual
www.barrett.com
© 2007 Barrett Technology®, Inc.
Document: D3000, Version: AF.00
Page 14 of 82
3 System Setup
3.1 Mounting Method 1: Lab Bench Stand
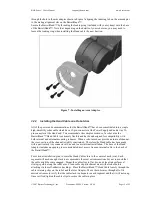
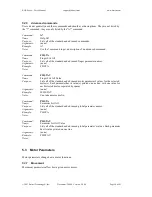
The Lexan Bench Stand you received with the BarrettHand™ has been provided for convenience
in programming the BarrettHand™ when a host robot arm is not available. Use the wire guide
clips to provide strain relief to the Hand cable. Figure 6 illustrates how to mount the Hand in the
Lexan Bench Stand.
a) place base on Hand
b) attach threaded ring c) attach Hand cable
d) screw in 2 retainer screws
e) open cable clips
f) secure all 3 clips
Figure 6 - Lab Bench Stand with Wire Strain Relief
Use the 2-mm hex wrench to open fingers 1,2, &3. Then, spread fingers to roughly 120 degrees
and rest the unit on its fingertips. Place the stand, feet up, onto the hand. Note the alignment of
the BarrettHand™ relative to the wire strain relief clips to ease connection of the BarrettHand™
Cable.
Make sure the Power Supply is turned OFF, and then route the BarrettHand™ Cable through all
three cable clips on the lab bench stand and plug it into the BarrettHand™. Tighten the cable clips
to hold the cable in place.
3.2 Mounting Method 2: On Robot Arm
3.2.1
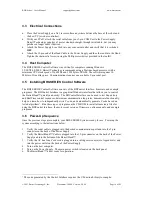
Robot-Arm Adapter
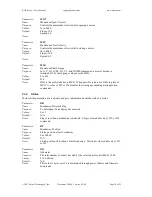
Like the Lexan Bench Stand, the Robot Arm Adapter is made to secure the BarrettHand™ in place
and to provide strain relief to the Hand cable as shown in Figure 7. The Arm Adapter is fabricated
for the tool-plate of your specific robot arm and is designed for low-profile, rigidity, and low
weight.
To mount your BarrettHand™ on a robot, bolt the arm adapter onto the tool-plate bolt circle,
located at the end tip of the robot arm. Next, insert the threaded base of the BarrettHand™


