3. Physical installation
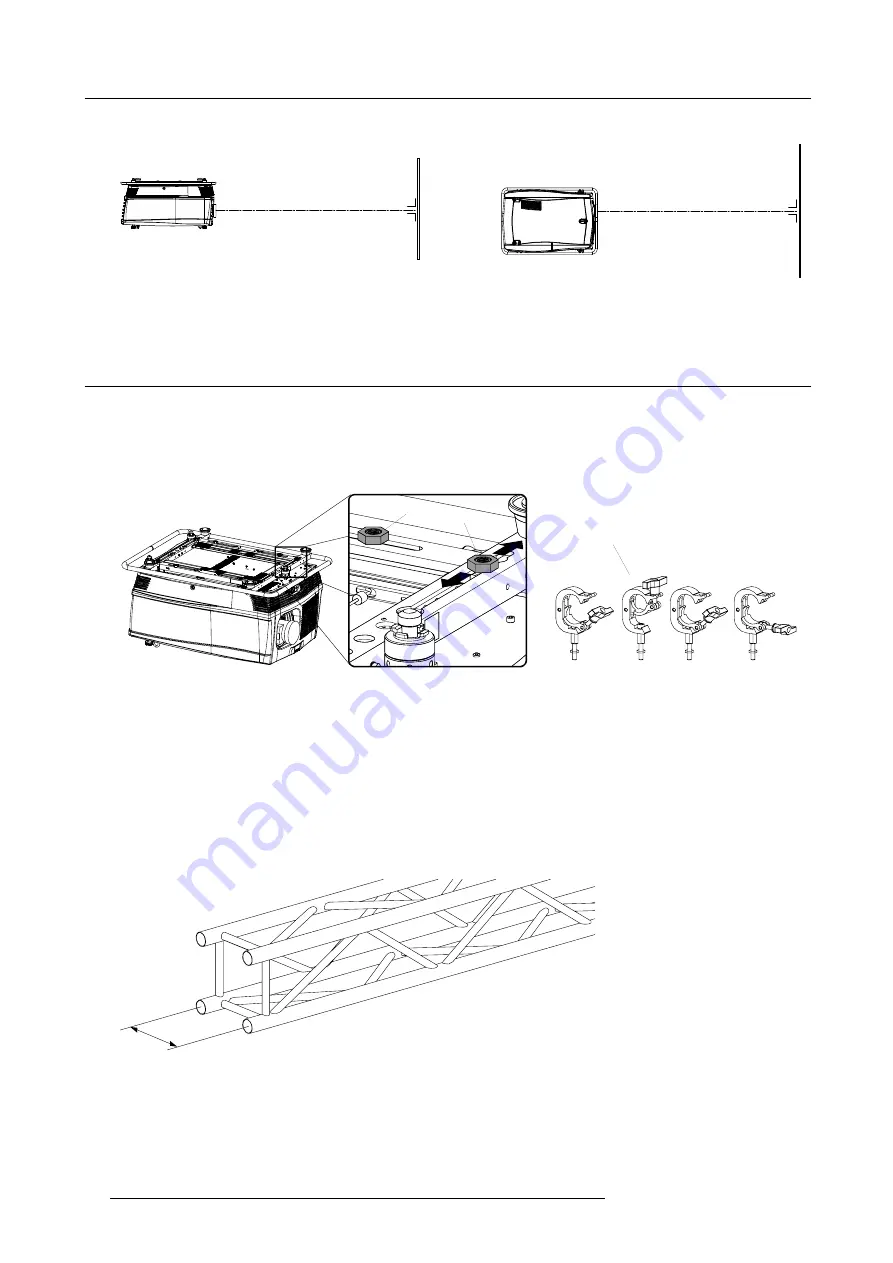
When this is achieved, the projector is set horizontal and vertical at right angles to the screen.
SCRE
EN
SCR
E
EN
Image 3-25
5. Fasten the lock nut (B) of the rigging clamps.
3.5
Suspension of the FLM projector with rigging clamps
Rigging points and rigging clamps
The carrying handle, at the bottom side of the projector, is provided with eight slots. Four slots are longitudinally (A) oriented and
four slots are transversely (B) oriented. Each slot contains a rigging point of which the position in the slot can be adjusted depending
on the size of the truss installation. The rigging clamps (C) can be attached to those rigging points, which allows an easy and fast
physical setup of the projector in a hanging con
fi
guration.
A
B
C
Image 3-26
Necessary tools
•
24 mm open ended spanner.
•
17 mm open ended spanner.
Necessary parts
•
Four rigging clamps (R820411).
•
Safety chains.
How to install and to use the rigging clamps ?
1. Measure the distance, center tube as reference, between the two used support bars of the truss.
X mm
Image 3-27
2. Turn the projector upside down and slide the rigging points on there place in the slots, according the measured distance and
secure this position. To release the nuts of the rigging points use a 24 mm open ended spanner. Ensure that the rigging points
are symmetrically lined up, so that the projector will hang in balance.
Warning:
Be careful while working with heavy loads.
Warning:
Always secure the rigging points after adjustment.
28
R59770179 FLM R22+ 15/03/2010
Summary of Contents for FLM R22+
Page 1: ...FLM R22 User guide R9004500 R59770179 04 15 03 2010...
Page 14: ...1 Safety 10 R59770179 FLM R22 15 03 2010...
Page 46: ...5 Connections 42 R59770179 FLM R22 15 03 2010...
Page 62: ...7 Start up of the Adjustment Mode 58 R59770179 FLM R22 15 03 2010...
Page 72: ...8 Input menu 68 R59770179 FLM R22 15 03 2010...
Page 98: ...9 Image menu 94 R59770179 FLM R22 15 03 2010...
Page 114: ...10 Layout menu Image 10 65 Image 10 66 Image 10 67 110 R59770179 FLM R22 15 03 2010...
Page 120: ...11 Lamp menu 116 R59770179 FLM R22 15 03 2010...
Page 148: ...12 Alignment menu 144 R59770179 FLM R22 15 03 2010...
Page 168: ...13 Projector control 164 R59770179 FLM R22 15 03 2010...
Page 184: ...14 Service menu 180 R59770179 FLM R22 15 03 2010...
Page 204: ...17 Removal of the projector covers 200 R59770179 FLM R22 15 03 2010...
Page 208: ...18 Dimensions 204 R59770179 FLM R22 15 03 2010...
Page 216: ...20 DMX chart 212 R59770179 FLM R22 15 03 2010...
Page 224: ...21 Troubleshooting 220 R59770179 FLM R22 15 03 2010...
Page 232: ...22 Specifications 228 R59770179 FLM R22 15 03 2010...
Page 234: ...23 Order information 230 R59770179 FLM R22 15 03 2010...


