3. Physical installation
B
A
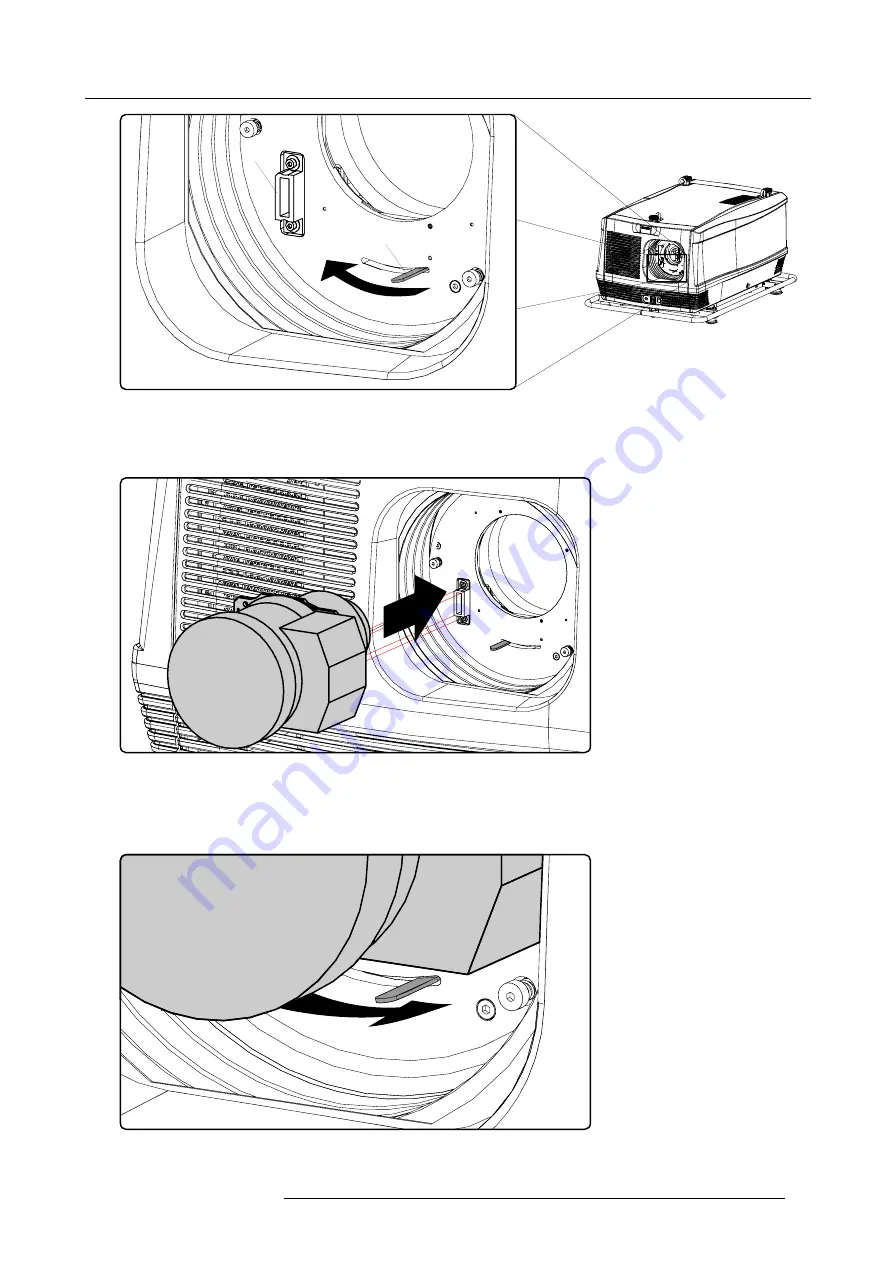
Image 3-17
4. Ensure that the lens holder stands in the On-Axis position (horizontal and vertical mid position).
Note:
The lens holder is placed default in the On-Axis position at factory.
5. Gently insert the lens in such a way that the lens connector matches the socket (B).
Image 3-18
6. Insert the lens until the connector seats into the socket.
Warning:
Do not release the Lens yet, as the Lens may fall out of the Lens Holder.
7. Secure the lens in the lens holder by sliding the lens lock handle into the “locked” position, which is away from the lens power
supply socket. Ensure the lens touches the front plate of the lens holder.
Image 3-19
8. Check if the lens is really secured by trying to pull the lens out of the lens holder.
R59770179 FLM R22+ 15/03/2010
25
Summary of Contents for FLM R22+
Page 1: ...FLM R22 User guide R9004500 R59770179 04 15 03 2010...
Page 14: ...1 Safety 10 R59770179 FLM R22 15 03 2010...
Page 46: ...5 Connections 42 R59770179 FLM R22 15 03 2010...
Page 62: ...7 Start up of the Adjustment Mode 58 R59770179 FLM R22 15 03 2010...
Page 72: ...8 Input menu 68 R59770179 FLM R22 15 03 2010...
Page 98: ...9 Image menu 94 R59770179 FLM R22 15 03 2010...
Page 114: ...10 Layout menu Image 10 65 Image 10 66 Image 10 67 110 R59770179 FLM R22 15 03 2010...
Page 120: ...11 Lamp menu 116 R59770179 FLM R22 15 03 2010...
Page 148: ...12 Alignment menu 144 R59770179 FLM R22 15 03 2010...
Page 168: ...13 Projector control 164 R59770179 FLM R22 15 03 2010...
Page 184: ...14 Service menu 180 R59770179 FLM R22 15 03 2010...
Page 204: ...17 Removal of the projector covers 200 R59770179 FLM R22 15 03 2010...
Page 208: ...18 Dimensions 204 R59770179 FLM R22 15 03 2010...
Page 216: ...20 DMX chart 212 R59770179 FLM R22 15 03 2010...
Page 224: ...21 Troubleshooting 220 R59770179 FLM R22 15 03 2010...
Page 232: ...22 Specifications 228 R59770179 FLM R22 15 03 2010...
Page 234: ...23 Order information 230 R59770179 FLM R22 15 03 2010...


