background image

44 

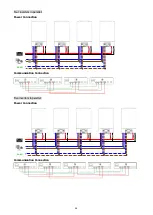
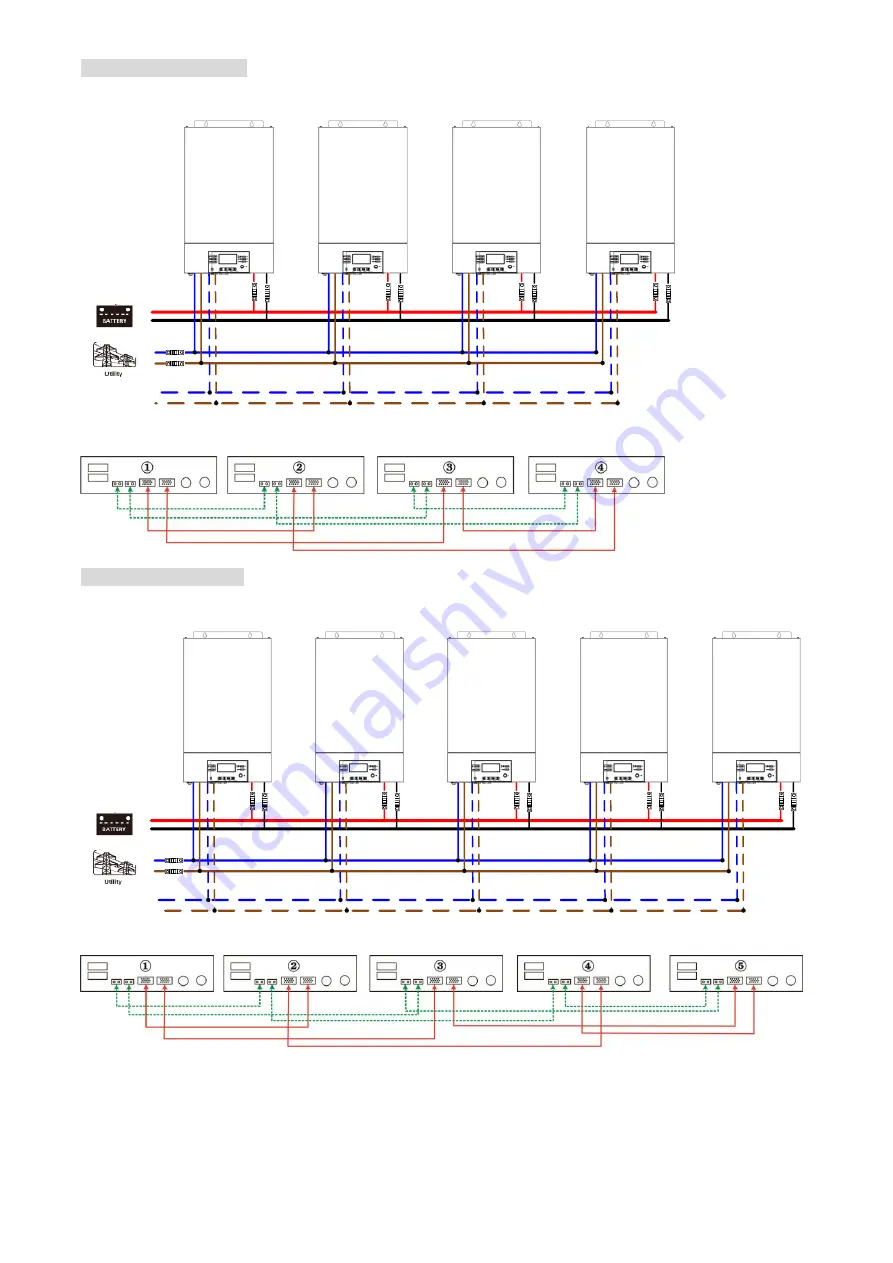
Four inverters in parallel: 

Power Connection 

Load

N

L

N

L


Communication Connection 


Five inverters in parallel: 

Power Connection 

Load

N

L

N

L


Communication Connection 


Summary of Contents for MKS III

Page 1: ...5KW with MPPT Solar Charger Inverter Charger Version 1 2 User Manual ...

Page 2: ...ERATION 10 Power ON OFF 10 Operation and Display Panel 10 LCD Display Icons 11 LCD Setting 13 Display Setting 25 Operating Mode Description 30 Faults Reference Code 32 Warning Indicator 32 BATTERY EQUALIZATION 33 SPECIFICATIONS 35 Table 1 Line Mode Specifications 35 Table 2 Inverter Mode Specifications 36 Table 3 Charge Mode Specifications 37 Table 4 General Specifications 37 TROUBLE SHOOTING 38 A...

Page 3: ... off the unit will not reduce this risk 5 CAUTION Only qualified personnel can install this device with battery 6 NEVER charge a frozen battery 7 For optimum operation of this inverter charger please follow required spec to select appropriate cable size It s very important to correctly operate this inverter charger 8 Be very cautious when working with metal tools on or around batteries A potential...

Page 4: ...uous power from PV solar modules solar panels battery and the utility When MPP input voltage of PV modules is within acceptable range see specification for the details this inverter is able to generate power to feed the grid utility and charge battery Galvanic isolation designed between PV DC and AC output so that user could connect any type of PV array to this inverter See Figure 1 for a simple d...

Page 5: ...n off switch 7 AC input connectors 8 AC output connectors Load connection 9 PV connectors 10 Battery connectors 11 Circuit breaker 12 Current sharing port 13 Parallel communication port 14 Dry contact 15 USB port for communication port and USB function port 16 LED indicators for USB function setting Output source priority timer Charger source priority setting 17 BMS communication port CAN RS 485 o...

Page 6: ...ts before selecting where to install Do not mount the inverter on flammable construction materials Mount on a solid surface Install this inverter at eye level in order to allow the LCD display to be read at all times The ambient temperature should be between 0 C and 55 C to ensure optimal operation The recommended installation position is to be adhered to the wall vertically Be sure to keep other ...

Page 7: ... efficient operation to use appropriate cable for battery connection To reduce risk of injury please use the proper recommended cable and terminal size as below Recommended battery cable and terminal size Model Typical Amperage Battery Capacity Wire Size Ring Terminal Torque Value Cable mm2 Dimensions D mm L mm 5KW 135A 200AH 2 4AWG 44 6 4 49 7 2 3 Nm Please follow below steps to implement battery...

Page 8: ...OUT and not the wrong way round and also that Line and Neutrals are connected correctly WARNING All wiring must be performed by a qualified personnel WARNING It s very important for system safety and efficient operation to use appropriate cable for AC input connection To reduce risk of injury please use the proper recommended cable size as below Suggested cable requirement for AC wires Model Gauge...

Page 9: ... PV modules please be sure to consider below parameters 1 Open circuit Voltage Voc of PV modules not exceeds max PV array open circuit voltage of inverter 2 Open circuit Voltage Voc of PV modules should be higher than min battery voltage Solar Charging Mode INVERTER MODEL 5KW Max PV Array Open Circuit Voltage 450 Vdc PV Array MPPT Voltage Range 120 430Vdc MPP Number 1 CAUTION Important Be sure to ...

Page 10: ... of PV input connector Recommended PV module Configuration PV Module Spec reference 250Wp Vmp 30 7Vdc Imp 8 15A Voc 37 4Vdc Isc 8 63A Cells 60 Total solar input power Solar input Q ty of modules 1500W 6 pieces in series 6 pcs 2000W 8 pieces in series 8 pcs 2750W 11 pieces in series 11 pcs 3000W 6 pieces in series 2 strings in parallel 12 pcs 4000W 8 pieces in series 2 strings in parallel 16 pcs 50...

Page 11: ...ghly 6 7 meters Dry Contact Signal There is one dry contact 3A 250VAC available on the bottom of the display panel It could be used to deliver signal to external device when battery voltage reaches warning level Unit Status Condition Dry contact port NC C NO C Power Off Unit is off and no output is powered Close Open Power On Output is powered from Utility Close Open Output is powered from Battery...

Page 12: ...atus and input output power information LCD display Indicators LED Indicator Color Solid Flashing Messages Setting LED 1 Green Solid On Output powered by utility Setting LED 2 Green Solid On Output powered by PV Setting LED 3 Green Solid On Output powered by battery Status indicators Green Solid On Output is available in bypass mode Flashing Output is powered by battery in inverter mode Green Soli...

Page 13: ...hing with warning code Fault lighting with fault code Output Information Indicate output voltage output frequency load percent load in VA load in Watt and discharging current Battery Information Indicates battery level by 0 24 25 49 50 74 and 75 100 in battery mode and charging status in line mode In AC mode it will present battery charging status Status Battery voltage LCD Display Constant Curren...

Page 14: ... the load level by 0 24 25 49 50 74 and 75 100 0 24 25 49 50 74 75 100 Mode Operation Information Indicates unit connects to the mains Indicates unit connects to the PV panel Indicates load is supplied by utility power Indicates the utility charger circuit is working Indicates the solar charger circuit is working Indicates the DC AC inverter circuit is working Indicates unit alarm is disabled Indi...

Page 15: ...y If solar energy is not sufficient to power all connected loads utility power will supply power the loads with solar at the same time Battery energy provides power to the loads only when solar energy and utility power are not available SBU priority Solar energy provides power to the loads as first priority If solar energy is not sufficient to power all connected loads battery energy will supply p...

Page 16: ...not be effected Saving mode enable If enabled the output of inverter will be off when connected load is pretty low or not detected 05 Battery type AGM Default Flooded User Defined If User Defined is selected battery charge voltage and low DC cut off voltage can be set up in program 26 27 and 29 Pylontech battery If selected programs of 02 26 27 and 29 will be automatically set up No need for furth...

Page 17: ...or further setting 06 Auto restart when overload occurs Restart disable Default Restart enable 07 Auto restart when over temperature occurs Restart disable Default Restart enable 08 Output voltage 220V 230V default 240V 09 Output frequency 50Hz Default 60Hz 11 Maximum utility charging current Note If setting value in program 02 is smaller than that in program in 11 the inverter will apply charging...

Page 18: ...t setting 46V Setting range is from 44V to 57V and increment of each click is 1V 5 default If WECO battery is selected in program 05 the setting value will be fixed at 5 of connected battery capacity 13 Setting voltage point back to battery mode when selecting SBU SBU priority or SUB solar first in program 01 Battery fully charged The setting range is from 48V to 64V and increment of each click is...

Page 19: ... Solar first Solar energy will charge battery as first priority Utility will charge battery only when solar energy is not available Utility first Utility will charge battery as first priority Solar energy will charge battery only when utility power is not available Solar and Utility Default Solar energy and utility will charge battery at the same time Only Solar Solar energy will be the only charg...

Page 20: ... Input voltage output voltage after no button is pressed for 1 minute Stay at latest screen If selected the display screen will stay at latest screen user finally switches 20 Backlight control Backlight on Default Backlight off 22 Beeps while primary source is interrupted Alarm on Default Alarm off 23 Overload bypass When enabled the unit will transfer to line mode if overload occurs in battery mo...

Page 21: ...0V to 64 0V Increment of each click is 0 1V 28 AC output mode This setting is able to set up only when the inverter is in standby mode Be sure that on off Switch is in OFF status Single This inverter is used in single phase application Parallel This inverter is operated in parallel system L1 phase L2 phase L3 phase 29 Low DC cut off voltage default setting 42 0V If self defined is selected in prog...

Page 22: ...lization Battery equalization Battery equalization disable Default If Flooded or User Defined is selected in program 05 this program can be set up 34 Battery equalization voltage Default setting is 58 4V Setting range is from 48V 64V Increment of each click is 0 1V 35 Battery equalized time 60min Default Setting range is from 5min to 900min Increment of each click is 5min 36 Battery equalized time...

Page 23: ...ediately and LCD main page will shows If Disable is selected it will cancel equalization function until next activated equalization time arrives based on program 37 setting At this time will not be shown in LCD main page 40 Reset all stored data for PV generated power and output load energy Not reset Default Reset 93 Erase all data log Not reset Default Reset 94 Data log recorded interval The maxi...

Page 24: ...ger source priority 1 USB Function Setting Insert an OTG USB disk into the USB port Press and hold button for 3 seconds to enter USB Setup Mode These functions including inverter firmware upgrade data log export and internal parameters re write from the USB disk Procedure LCD Screen Step 1 Press and hold button for 3 seconds to enter USB function setting mode Step 2 Press or button to enter the se...

Page 25: ...or USB On The Go functions Error Code Messages No USB disk is detected USB disk is protected from copying Document inside the USB disk contains the wrong format If any error occurs error code will only show for 3 seconds After 3 seconds it will automatically return to the main screen 2 Timer Setting for Output Source Priority This timer setting is to set up the output source priority per day Proce...

Page 26: ...r button to enter the selectable programs detail descriptions in Step 3 Step 3 Please select setting program by following each procedure Program Operation Procedure LCD Screen Press button to set up Solar First Timer Press button to select staring time Press or button to adjust values and press to confirm Press button to select end time Press or button to adjust values press button to confirm The ...

Page 27: ...ctable information is switched as the following table in order Selectable information LCD display Input voltage Output voltage Default Display Screen Input Voltage 230V output voltage 230V Input frequency Input frequency 50Hz PV voltage PV voltage 260V PV current PV current 2 5A PV power PV power 500W ...

Page 28: ...arging current 50A PV charging current 50A AC charging current 50A Charging power AC and PV charging power 500W PV charging power 500W AC charging power 500W Battery voltage and output voltage Battery voltage 50 0V output voltage 230V ...

Page 29: ...VA like below chart When load is larger than 1kVA 1KVA load in VA will present x xkVA like below chart Load in Watt When load is lower than 1kW load in W will present xxxW like below chart When load is larger than 1kW 1KW load in W will present x xkW like below chart Battery voltage DC discharging current Battery voltage 50 0V discharging current 50A ...

Page 30: ...generated this month 388kWh Load output energy this month 988kWh PV energy generated this year and Load output energy this year PV energy generated this year energy 3 88MWh Load output energy this year 9 88MWh PV energy generated totally and Load output total energy Total PV energy until now 38 8MWh Total load output energy until now 98 8MWh Real date Real date Nov 28 2017 Real time Real time 13 2...

Page 31: ...29 Main CPU version checking Main CPU version 00014 04 Secondary CPU version checking Secondary CPU version 00001 23 Bluetooth version checking Bluetooth version 00001 03 ...

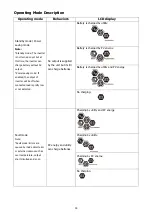
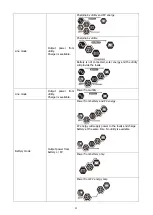
Page 32: ...load is pretty low or not detected No output is supplied by the unit but it still can charge batteries Battery is charged by utility Battery is charged by PV energy Battery is charged by utility and PV energy No charging Fault mode Note Fault mode Errors are caused by inside circuit error or external reasons such as over temperature output short circuited and so on PV energy and utility can charge...

Page 33: ...ergy and the utility will provide the loads Line mode Output power from utility Charger is available Power from utility Battery mode Output power from battery or PV Power from battery and PV energy PV energy will supply power to the loads and charge battery at the same time No utility is available Power from battery only Power from PV energy only ...

Page 34: ...er current 51 Over current or surge 52 Bus voltage is too low 53 Inverter soft start failed 55 Over DC voltage in AC output 57 Battery connection is open 58 Current sensor failed Warning Indicator Warning Code Warning Event Audible Alarm Icon flashing 01 Fan is locked when inverter is on Beep three times every second 02 Over temperature None 03 Battery is over charged Beep once every second 04 Low...

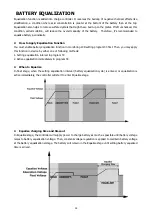
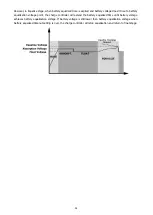
Page 35: ...g LCD setting program 33 first Then you may apply this function in device by either one of following methods 1 Setting equalization interval in program 37 2 Active equalization immediately in program 39 When to Equalize In float stage when the setting equalization interval battery equalization cycle is arrived or equalization is active immediately the controller will start to enter Equalize stage ...

Page 36: ...on voltage point the charge controller will extend the battery equalized time until battery voltage achieves battery equalization voltage If battery voltage is still lower than battery equalization voltage when battery equalized timeout setting is over the charge controller will stop equalization and return to float stage ...

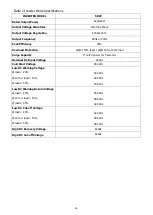
Page 37: ...c Nominal Input Frequency 50Hz 60Hz Auto detection Low Loss Frequency 40 1Hz Low Loss Return Frequency 42 1Hz High Loss Frequency 65 1Hz High Loss Return Frequency 63 1Hz Output Short Circuit Protection Line mode Circuit Breaker Battery mode Electronic Circuits Efficiency Line Mode 95 Rated R load battery full charged Transfer Time 10ms typical UPS 20ms typical Appliances Output power derating Whe...

Page 38: ...ction 5s 150 load 10s 110 150 load Surge Capacity 2 rated power for 5 seconds Nominal DC Input Voltage 48Vdc Cold Start Voltage 46 0Vdc Low DC Warning Voltage load 20 44 0Vdc 20 load 50 42 8Vdc load 50 40 4Vdc Low DC Warning Return Voltage load 20 46 0Vdc 20 load 50 44 8Vdc load 50 42 4Vdc Low DC Cut off Voltage load 20 42 0Vdc 20 load 50 40 8Vdc load 50 38 4Vdc High DC Recovery Voltage 62Vdc High...

Page 39: ... Constant Current Absorption Constant Voltage Maintenance Floating Current Voltage T1 T1 10 T0 minimum 10mins maximum 8hrs T0 2 43Vdc 2 35Vdc 2 25Vdc Solar Input INVERTER MODEL 5KW Rated Power 5000W Max PV Array Open Circuit Voltage 450Vdc PV Array MPPT Voltage Range 120Vdc 430Vdc Max Input Current 18A Table 4 General Specifications INVERTER MODEL 5 KW Safety Certification CE Operating Temperature...

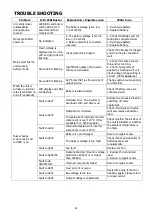
Page 40: ...n internal relay is switched on and off repeatedly LCD display and LEDs are flashing Battery is disconnected Check if battery wires are connected well Buzzer beeps continuously and red LED is on Fault code 07 Overload error The inverter is overload 110 and time is up Reduce the connected load by switching off some equipment Fault code 05 Output short circuited Check if wiring is connected well and...

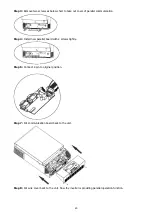
Page 41: ...erter is default supported parallel operation You may skip section 3 If not please purchase parallel kit and install this unit by following instruction from professional technical personnel in local dealer WARNING Please make sure all output N wires of each inverter must be always connected Otherwise it will cause inverter fault in error code 72 2 Package Contents In parallel kit you will find the...

Page 42: ...parallel communication Step 4 Install new parallel board with 2 screws tightly Step 6 Connect 2 pin to original position Step 7 Put communication board back to the unit Step 8 Put wire cover back to the unit Now the inverter is providing parallel operation function ...

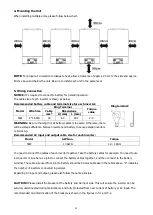
Page 43: ...tery to cause parallel inverters not working Recommended AC input and output cable size for each inverter Model AWG no Torque 5KW 10 AWG 1 2 1 6Nm You need to connect the cables of each inverter together Take the battery cables for example You need to use a connector or bus bar as a joint to connect the battery cables together and then connect to the battery terminal The cable size used from joint...

Page 44: ... 120A 230VAC 160A 230VAC 200A 230VAC 240A 230VAC 280A 230VAC 320A 230VAC 360A 230VAC Note1 Also you can use 50A breaker for only 1 unit and install one breaker at its AC input in each inverter Note2 Regarding three phase system you can use 4 pole breaker directly and the rating of the breaker should be compatible with the phase current limitation from the phase with maximum units Recommended batte...

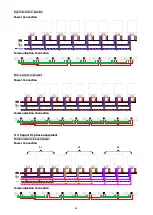
Page 45: ... 5 1 Parallel Operation in Single phase Two inverters in parallel Power Connection Load N L N L Communication Connection Three inverters in parallel Power Connection Load N L N L Communication Connection ...

Page 46: ...44 Four inverters in parallel Power Connection Load N L N L Communication Connection Five inverters in parallel Power Connection Load N L N L Communication Connection ...

Page 47: ...45 Six inverters in parallel Power Connection Load N L N L Communication Connection Seven inverters in parallel Power Connection Load N L N L Communication Connection ...

Page 48: ... N L N L Communication Connection Nine inverters in parallel Power Connection Load N L N L Communication Connection 5 2 Support 3 phase equipment Three inverters in each phase Power Connection Load N L1 P1 P2 P3 L2 L3 N L1 L2 L3 Communication Connection ...

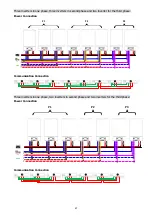
Page 49: ...rter for the third phase Power Connection Load N L1 P1 P2 P3 L2 L3 N L1 L2 L3 Communication Connection Three inverters in one phase two inverters in second phase and two inverters for the third phase Power Connection N L1 P1 P2 P3 L2 L3 N L1 L2 L3 Load Communication Connection ...

Page 50: ...er for the other two phases Power Connection Load N L1 P1 P2 P3 L2 L3 N L1 L2 L3 Note It s up to customer s demand to pick 7 inverters on any phase P1 L1 phase P2 L2 phase P3 L3 phase Communication Connection P1 P2 P3 Note If there is only one unit in one phase this unit doesn t need to connect the current sharing cable Or you connect it like as below ...

Page 51: ...or the other two phases Power Connection N L1 P1 P2 P3 L2 L3 N L1 L2 L3 Load Communication Connection Three inverters in one phase two inverters in second phase and one inverter for the third phase Power Connection N L1 P1 P2 P3 L2 L3 N L1 L2 L3 Load ...

Page 52: ...e and only one inverter for the remaining two phases Power Connection N L1 P1 P2 P3 L2 L3 N L1 L2 L3 Load Communication Connection Two inverters in two phases and only one inverter for the remaining phase Power Connection N L1 P1 P2 P3 L2 L3 N L1 L2 L3 Load ...

Page 53: ...wo inverters in one phase and only one inverter for the remaining phases Power Connection N L1 P1 P2 P3 L2 L3 N L1 L2 L3 Load Communication Connection One inverter in each phase Power Connection N L1 P1 P2 P3 L2 L3 N L1 L2 L3 Load ...

Page 54: ...he current sharing cable between the inverters which are in different phases Otherwise it may damage the inverters 6 PV Connection Please refer to user manual of single unit for PV Connection CAUTION Each inverter should connect to PV modules separately ...

Page 55: ...Please select 3P1 in program 28 for the inverters connected to L1 phase 3P2 in program 28 for the inverters connected to L2 phase and 3P3 in program 28 for the inverters connected to L3 phase Be sure to connect share current cable to units which are on the same phase Do NOT connect share current cable between units on different phases Parallel L1 phase L2 phase L3 phase Fault code display Fault Co...

Page 56: ...isplay in Slave unit Step 5 If there is no more fault alarm the parallel system is completely installed Step 6 Please switch on all breakers of Line wires in load side This system will start to provide power to the load Support three phase equipment Step 1 Check the following requirements before commissioning Correct wire connection Ensure all breakers in Line wires of load side are open and each ...

Page 57: ... problem remains please contact your installer 80 CAN data loss 1 Check if communication cables are connected well and restart the inverter 2 If the problem remains please contact your installer 81 Host data loss 82 Synchronization data loss 83 The battery voltage of each inverter is not the same 1 Make sure all inverters share same groups of batteries together 2 Remove all loads and disconnect AC...

Page 58: ...ter battery first battery are to set up or change the group address NOTE 1 is upper position and 0 is bottom position Dip 1 Dip 2 Dip 3 Dip 4 Group address 1 RS485 baud rate 9600 Restart to take effect 0 0 0 Single group only It s necessary to set up master battery with this setting and slave batteries are unrestricted 1 0 0 Multiple group condition It s necessary to set up master battery on the f...

Page 59: ...nly support common battery installation 2 Use one custom made RJ45 cable to connect any inverter no need to connect to a specific inverter and Lithium battery Simply set battery type of this inverter to PYL in LCD program 5 The remaining inverters are set as USE Step 2 Switch on Lithium battery Step 3 Press more than three seconds to start Lithium battery power output ready Step 4 Turn on the inve...

Page 60: ...pecific inverter and Lithium battery Simply set battery type of this inverter to WEC in LCD program 5 The remaining inverters are set as USE Step 2 Switch on Lithium battery Step 3 Turn on the inverter Step 4 Be sure to select battery type as WEC in LCD program 5 If communication between the inverter and battery is successful the battery icon on LCD display will flash Generally speaking it will ta...

Page 61: ...nverter and Lithium battery Simply set battery type of this inverter to SOL in LCD program 5 The remaining inverters are set as USE Step 2 Open DC isolator and switch on Lithium battery Step 3 Turn on the inverter Step 4 Be sure to select battery type as SOL in LCD program 5 If communication between the inverter and battery is successful the battery icon on LCD display will flash Generally speakin...

Page 62: ...emaining inverters are set as USE 3 Set the DIP address switches to ON OFF OFF OFF if it is a single battery If multiple batteries in parallel connect the RJ45 to the master unit s RS485 connector Step 2 Press more than three seconds to start Lithium battery power output ready Step 3 Turn on the inverter Step 5 Be sure to select battery type as BAK in LCD program 5 If communication between the inv...

Page 63: ...ilable when the battery type is setting as Pylontech Battery WECO Battery Soltaro Battery or BAK Battery After battery is connected and communication signal is not detected for 3 minutes buzzer will beep After 10 minutes inverter will stop charging and discharging to lithium battery Communication lost occurs after the inverter and battery is connected successfully Then buzzer beeps immediately If ...

Page 64: ... 400Ah min 5KW 500 1226 2576 1000 536 1226 1500 316 804 2000 222 542 2500 180 430 3000 152 364 3500 130 282 4000 100 224 4500 88 200 5000 80 180 Note Backup time depends on the quality of the battery age of battery and type of battery Specifications of batteries may vary depending on different manufacturers ...

Reviews: