1
Sacral Neuromodulation System
Clinician Programmer Manual
Model 1501 Clinician Programmer
Rx only
Page 1: ...1 Sacral Neuromodulation System Clinician Programmer Manual Model 1501 Clinician Programmer Rx only ...
Page 2: ...cs Modulation Technologies Inc registered or pending registration in the U S and other countries Refer to the appropriate clinician manuals for additional information on the Axonics SNM System including contraindications warnings precautions adverse events individualization of treatment patient selection and implant procedures ...
Page 3: ...rammer interaction with flammable atmospheres 8 Programmer interaction with other active implanted devices 8 Telemetry signal disruption from EMI 8 Unintended use 8 Accidental electrode contact 8 Warnings 9 Device Specifications 10 Operating characteristics 10 Storage and Usage Environment 10 Shipping and Storage environment 11 Maintenance 11 Handling and disposal 11 WirelessCommunication 12 ...
Page 4: ...dance Values 21 Controlling Stimulation Amplitude 22 Test Stimulation During Lead Implantation 27 Foramen Needle Test Stimulation 28 Initial Tined Lead Placement 30 Define Tined Lead Thresholds 32 Programming the Neurostimulator 36 Connecting to a Neurostimulator 37 Patient Device Screen Overview 39 Setting up a New Neurostimulator 40 Viewing the Status of a Neurostimulator 44 Hibernate Mode 49 Pr...
Page 5: ...gement 63 Troubleshooting 64 Issues with the CP display 64 Issues Communicating with a Neurostimulator 65 Issues Delivering Stimulation 66 Impedance Issue During Lead Implant 69 Impedance Issue with the Neurostimulator 70 Label Symbols 71 ...
Page 6: ... device Note The CP is required to implant a tined lead or program a Neurostimulator for chronic SNM therapy Confirm the availability and operation of a CP prior to beginning a lead implant procedure Note The Model 1501 Clinician Programmer only communicates with the implanted Neurostimulator Model 1101 It does not communicate with the Trial Stimulator Model 1601 Use the Model 2501 Clinician Progr...
Page 7: ...linicians should be experienced in the diagnosis and treatment of fecal incontinence and should be trained on the use of the Axonics SNM System Use in Specific Populations The safety and effectiveness of this therapy has not been established for Pregnant women Pediatric use patients under the age of 18 Patients with progressive systemic neurological diseases Bilateral stimulation Contraindications...
Page 8: ... program any of these devices may reset or reprogram the other devices Whenever the settings for these devices are changed a clinician familiar with each device should check the program settings of each device before the patient is released or as soon as possible Patients should contact their physician immediately if they experience symptoms that are likely to be related to the devices or their me...
Page 9: ...athermy or therapeutic ultrasound diathermy collectively described as diathermy should not be used during implantation of the Axonics SNM System or on patients implanted with the Axonics SNM System Diathermy can transmit energy through the CP and accessories or the implanted system potentially causing tissue damage at the location of the surface or implanted electrodes resulting in severe injury ...
Page 10: ...ht 1125 g Material Housing Polycarbonate and ABS resin blend Buttons Silicone with polyurethane coating Screen Touch screen LCD display 1280 x 800 pixels CP Test Stimulation Output Maximum Amplitude 12 5 mA Frequency 14 Hz Pulse width 210 μs Note Battery life may vary depending on frequency of use Storage and Usage Environment Usage environment The following lists the appropriate temperature humid...
Page 11: ... if it has returned to a temperature that is within the specified operating range Maintenance At least once a year the CP should be inspected for visible damage and should be charged and powered on to confirm the Log In screen is still accessible Significant physical damage or an inability to power on the device should be reported to the manufacturer and the device should not be used Handling and ...
Page 12: ...l Device Radio communication Service in part 95 of the FCC Rules and must not cause harmful interference to stations operating in the 400 150 406 000 MHz band in the Meteorological Aids i e transmitters and receivers used to communicate weather data the Meteorological Satellite or the Earth Exploration Satellite Services and must accept interference that may be caused by such stations including in...
Page 13: ...erence received including interference that may cause undesired operation Note Changes and modifications to the Clinician Programmer are not authorized by Axonics and could void FCC and IC certification and negate the user s authority to use the product Note The USB port on Clinician Programmer is disabled in all intended user screens Do not plug any devices into this USB port Some examples of dev...
Page 14: ...untered in multiple screens when using the CP The following sections include Getting Started Summary of CP Buttons and Connections Turning the CP on and off Logging in to the CP Navigating the Home screen General functions Description of Battery Level Icons and Charging Introduction to Clinician Programmer Prompts Understanding Impedance Values Controlling Stimulation Amplitude ...
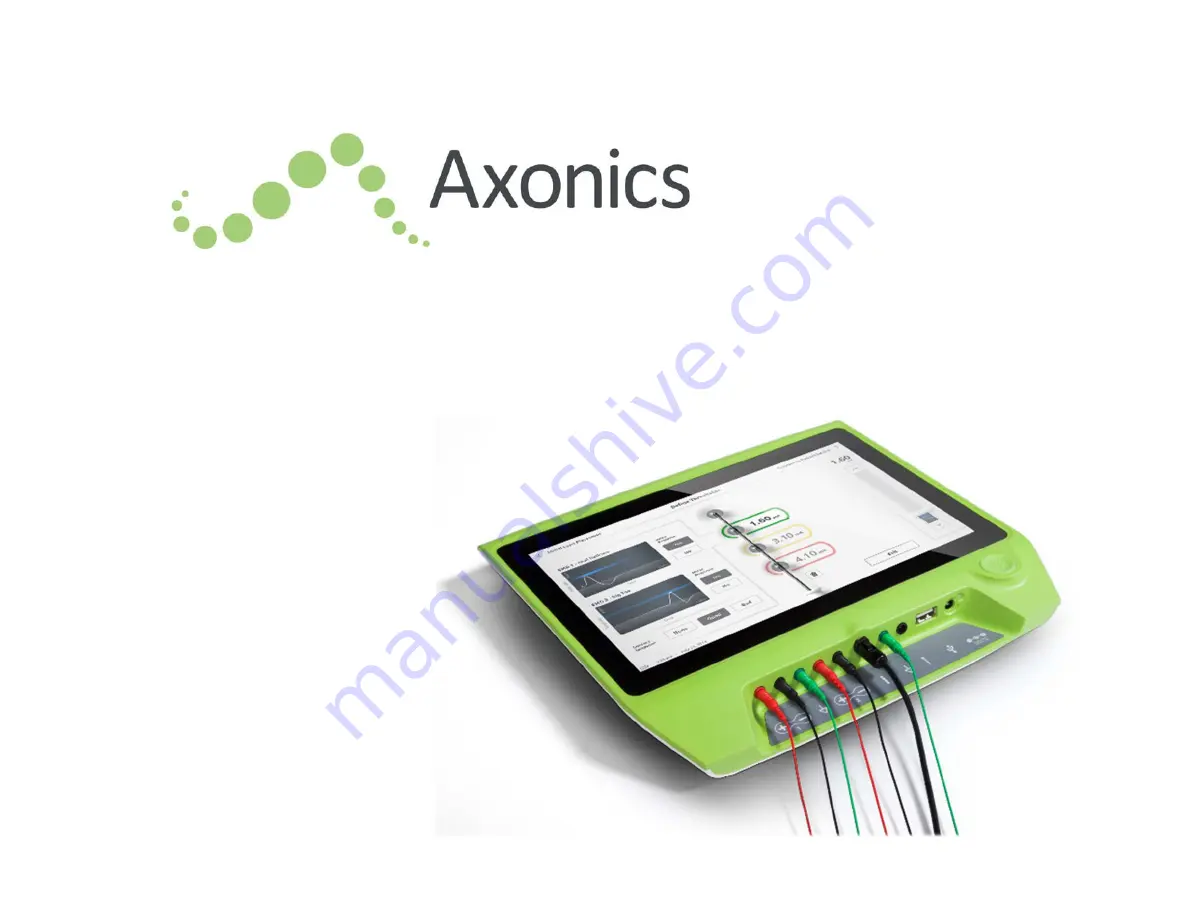
Page 15: ...as a Connector Panel with plugs for the cables that are used with the CP The symbols on the Connector Panel indicate which cable should be used with each plug Not Used Not Used Not Used Tined Lead Test Stimulation Stimulation Ground Foramen Needle Test Stimulation Power Input USB port The purposes and uses of these buttons and connections are described throughout this manual NOTE EMG functionality...
Page 16: ...nd Off Turning on the CP 1 Press and hold the power button to turn on the CP The CP screen will show the Axonics logo as the CP starts up The CP will proceed to the password protected Log In screen Turning off the CP From any CP screen press and hold the power button to turn off the CP ...
Page 17: ...rent user name There will not be a down arrow if no additional user names exist 4 A short list of names will appear when the down arrow is pressed Press a user name to select it to log in More names can be accessed by scrolling up and down the list using the arrows on the right 5 A key pad will appear when a user name is selected Enter the 4 digit passcode associated with the selected user name to...
Page 18: ...ng Lead Placement Deliver test stimulation during a lead placement procedure Connect to Patient Device Check the status of and program a Neurostimulator 1 2 CP Settings Change CP settings including default stimulation settings 3 4 5 6 Additional information about each of these functions is included in the following sections of this manual These buttons are for use by the Manufacturer only ...
Page 19: ... battery dying during the procedure Two minutes before the CP automatically shuts down due to a critically low battery the user will be prompted to charge the CP This prompt can only be disabled by plugging in and charging the CP Charging When the device is charging the battery icon shows 4 green bars and a lightning bolt Charging a fully depleted CP can take up to 6 hours How to Charge the CP To ...
Page 20: ...the user Types of Prompts An icon will be part of each prompt to indicate the purpose of the prompt Icons include Prompt Purpose Prompt Icon Query Requires confirmation to proceed in situations where inputs may result in system performance issue or disruption in the workflow If applicable the Progress Prompt will appear after input Progress Prompt A momentary display appears to confirm the progres...
Page 21: ...to the connection for foramen needle stimulation 4 impedance icons each corresponding to the connection for one of the electrodes on the tined lead The impedance icon can have one of 4 states Good The impedance level indicates a good connection and is preferred for stimulation OK The impedance level indicates an acceptable connection and is allowed for stimulation Bad Open The impedance level indi...
Page 22: ...ogrammed stimulation amplitude Increasing the pulse width in this situation may provide sufficient charge delivery to obtain the desired stimulation response Refer to the table at the end of this section for a summary of maximum achievable stimulation amplitudes under different stimulation conditions Axonics recommends testing alternative electrode configurations particularly those with lower impe...
Page 23: ...ivered stimulation amplitude may be lower than the programmed amplitude When stimulation is on the area under the slider bar will turn dark gray with horizontal blue bars 1 5 Stimulation may be set to increase amplitude automatically if Auto is selected Stimulation amplitude can be adjusted in two modes manual or automatic Manual amplitude adjustment 6 Manual amplitude adjustment is the default mo...
Page 24: ...tart at the programmed level and will not ramp from zero Automatic amplitude adjustment 1 5 In the automatic amplitude adjustment mode the stimulation amplitude automatically increases from 0mA to the amplitude value set by the user The amplitude increase can be stopped or stimulation can be turned off at any time 6 To use the automatic amplitude adjustment feature 4 Use the slider bar and up and ...
Page 25: ...e digital display at the top of the stimulation bar A red bar on the stimulation bar will represent the stimulation amplitude as it increases Note The stimulation bar and up and down arrows are not accessible to adjust stimulation To stop the increase in stimulation amplitude while still delivering stimulation press Auto To stop stimulation altogether press the stimulation button ...
Page 26: ...n 5000 2 5 2 2 2 0 2000 5 0 4 5 2 5 700 12 5 9 0 3 5 400 12 5 12 5 4 0 Impedances below 400 is considered a short circuit and impedances above 6000 is considered an open circuit If the stimulator is delivering less current than programmed on the CP when stimulation is active the blue number above the stimulation bar shows the actual delivered stimulation current If stimulation amplitude is being a...
Page 27: ...he foramen needle and the tined lead The test stimulation allows confirmation that the needle and lead are placed close to the sacral nerve This section describes how to use the Lead Placement module of the CP during a tined lead implant procedure Press Lead Placement on the Home screen to 1 start foramen needle test stimulation ...
Page 28: ...sed in the sterile field Note The stimulation ground cable is not sterile Do not place the ground electrode in the sterile field Note The CP is not sterile and cannot be sterilized When using the CP in a sterile field place it into a sterile bag Next press the Impedance button to confirm the foramen needle is connected A qualitative indication of the impedance Good OK or Bad will appear for 3 seco...
Page 29: ... colored to reflect the proximity of the needle to the sacral nerve This information is used to evaluate the proximity of the needle to the sacral nerve once the appropriate muscle responses are observed anal bellows and big toe flexion Grey unassigned Stimulation level is zero Green good Stimulation level between 0 and 3 mA Placement is acceptable Yellow okay Stimulation level between 3 and 4 mA ...
Page 30: ...ed lead test stimulation cable into the CP See the Tined Lead Implant Manual for instructions on connecting the tined lead test stimulation cable to the tined lead Press the impedance button to check the connection with the tined lead If the impedance for any electrode s is Bad adjust the tined lead connection and the ground pad then recheck the impedance See manual section Understanding Impedance...
Page 31: ...tined lead placement is generally acceptable or not After reviewing the stimulation responses select the path forward If the location is satisfactory move on to the Define Thresholds screen to characterize the stimulation response for each electrode If the tined lead location is not satisfactory reposition the tined lead and repeat this process If the tined lead needs to be removed and the foramen...
Page 32: ...e until stimulation is delivered with the selected electrode The box changes color depending on the stimulation amplitude and the motor and sensory responses evoked When stimulation is at the minimum amplitude that evokes the desired physiological response motor and or sensory the color around the electrode indicates the quality of that electrode Grey unassigned Stimulation level is zero Green goo...
Page 33: ...ode For each electrode the threshold saved is the last amplitude used to deliver stimulation Manually record the motor and sensory responses to stimulation by pressing the appropriate buttons Select a new electrode to stimulate or move on to connect to a Neurostimulator Note Only stimulation amplitude is adjustable during test stimulation The stimulation frequency is 14 Hz and the pulse width is 2...
Page 34: ...ostimulator This data can be used to inform which stimulation settings to use for therapy and the CP will provide recommended electrode configurations based on this information For example if the stimulation with a particular electrode elicited a bad sensation that electrode will not be included in recommended electrode configurations Clear All Thresholds The Clear All button appears once a thresh...
Page 35: ...nect to Patient Device to connect to a Neurostimulator if the Neurostimulator will be implanted during the same procedure Press Exit to exit the Lead Placement module and return to the Home screen Note Threshold data will be lost if the Exit button is used To transfer thresholds use Connect to Patient Device and connect to a Neurostimulator ...
Page 36: ...ow to Connect to a Neurostimulator Set up a new Neurostimulator View Neurostimulator status 1 Program a Neurostimulator s stimulation settings Connect to a Neurostimulator There are two ways to access the CP screen that connects to a Neurostimulator From the Home screen press Connect to Patient Device After implanting a tined lead press Connect to Patient Device on the Define Thresholds screen ...
Page 37: ... the displayed device 7 The CP will display a prompt while it connects to and 3 4 retrieves data from the Neurostimulator When connected to the device the CP will automatically open the Patient Device screen 6 Additional devices can be displayed by the CP if the first device found is not the targeted Neurostimulator Press the down arrow next to Show Additional Devices This will display up to 3 add...
Page 38: ... connect to the device The CP will display a prompt with a progress indicator as it connects to the patient device The CP will automatically open the Patient Device screen when connected to the selected device Note The list of available devices can be updated by pressing the Scan Again button Move closer to the targeted device to increase the likelihood that the CP finds the device ...
Page 39: ...p new Neurostimulators Check the status of Neurostimulators 6 The following information and functions are available on 4 the Patient Device screen 2 Basic device information Stimulation control module Threshold detail Electrode impedances Therapy History Current stimulation settings The following sections provide further detail on the information and functions available on the Patient Device scree...
Page 40: ... viewed in the Threshold Detail tab of the Patient Device screen B Input the serial number of the patient s Remote Control in the Remote Control ID field This pairs the Remote Control to the Neurostimulator allowing the Neurostimulator to receive commands from the Remote Control Note The Neurostimulator can only communicate with the Remote Control that is entered in this field C Enter the patient ...
Page 41: ...r part of the screen Enter the desired information The Patient ID must be a minimum of 4 characters Note In order to limit data security risks do not use the patient s name as the Patient ID The Remote Control ID must be the 10 character alpha numeric serial number of the Remote Control being paired to the Neurostimulator Press Set ID to save the input ID keyboard will disappear ...
Page 42: ...es may change from green to yellow as fibrous 2 tissue encapsulates the electrodes This change will not affect a patient s therapy because the current controlled Neurostimulator automatically compensates for impedance changes However such changes may require the Neurostimulator to be recharged more frequently Impedance changes from green or yellow to red may indicate an open circuit which may be c...
Page 43: ...ice screen is exited by 3 2 Pressing Disconnect to end the connection with the Neurostimulator and return to the Home screen Pressing Programming to proceed to set the Neurostimulator stimulation settings Pressing the Define Thresholds to redefine the stimulation thresholds for each electrode 1 ...
Page 44: ...he maximum amplitude or max This information should be provided to the patient when their device is programmed Note If a patient reports that their Neurostimulator battery is lasting 50 of the displayed Charging Frequency the Neurostimulator may have exceeded its useful life and may need to be replaced Note When a Neurostimulator has been implanted for 15 years replacement should be considered Lea...
Page 45: ...e or decrease the stimulation level This allows control of the stimulation 4 level as the patient would with their patient Remote Control Possible levels range from 1 7 Stimulation Turn stimulation on or off If stimulation is turned on it will come on at the stimulation level shown below the Stimulation button Hibernate Put the device in Hibernate Mode Note The CP including this button cannot be u...
Page 46: ...re used and notes entered during the programming session Threshold Detail tab This tab summarizes the stimulation threshold data previously captured For each electrode the tab shows the motor response sensory response and threshold stimulation amplitude recorded during the tined lead implantation procedure or during a programming session The color around the threshold amplitude indicates the quali...
Page 47: ...p up will 2 appear with a description of the error To resume the communication session and try to resolve the error with reprogramming press Clear Fault to remove the error notification from the Neurostimulator If additional errors exist the pop up will 4 3 display information about the next error which will also need to be cleared Press Cancel to exit the pop up If the pop up is exited without cl...
Page 48: ...m the Neurostimulator press 3 2 Disconnect in the lower right Proceed to Neurostimulator Programming From the Patient Device screen navigate to additional screens to Program the stimulation settings to the Neurostimulator Record new stimulation thresholds for each electrode 1 ...
Page 49: ...sure the battery is preserved for long periods in Hibernate Mode How to put the Neurostimulator into Hibernate Mode Press the Hibernate button A prompt will ask for confirmation before putting the Neurostimulator into Hibernate Mode The Neurostimulator will automatically disconnect from the CP and the CP will return to the Home screen when the Neurostimulator is in Hibernate Mode Note The CP and p...
Page 50: ...Neurostimulator see manual section Connecting to a Neurostimulator Navigate to the Programming screen from the Patient Device screen by pressing Programming in the top right corner of the Patient Device screen The Programming screen enables adjustment of the stimulation parameters and delivery of test stimulation Additional features include the ability to capture programming session notes ...
Page 51: ...lected a tined lead electrode must be selected as an anode to deliver stimulation ElectrodeRecommendations The Programming screen displays up to four recommended electrode configurations These recommendations are intended to provide directional guidance regarding which electrode configurations to test The recommendations are generated based on the stimulation thresholds and motor and sensory respo...
Page 52: ...ossible electrode states 2 Cathode or 3 Anode or Unassigned 5 If the electrode configuration is in Monopolar mode the Neurostimulator is set as the anode and the electrodes can be toggled between cathode and unassigned Note When manually adjusting electrode assignment invalid configurations may be created An alert will pop up if an attempt is made to exit this screen stimulate or set the therapy s...
Page 53: ... Several adjustable stimulation parameters are shown in the Stimulation Parameters box 5 To adjust frequency amplitude range and pulse width Press the left and right arrows to the sides of the current value to incrementally decrease and increase the parameter Frequency the stimulation frequency can be adjusted from 2 130 Hz Adjustments are made in 1 Hz increments from 2 50 Hz and 5 Hz increments f...
Page 54: ...the Remote Control Use the arrows to the left and right of the Amplitude Range value to adjust 3 it lower or higher 5 Note The amplitude range must be set when programming the Neurostimulator The Remote Control allows for 3 steps to increase from the baseline stimulation amplitude to the maximum amplitude defined as the baseline amplitude plus the Amplitude Range Test the stimulation range from th...
Page 55: ...ameter and a pop up will appear for adjusting the setting Cycling Allows stimulation to turn on and off automatically at specified intervals The time that stimulation is on and off are independently programmed On and off time can be programmed from 0 2 off to 59 seconds 1 minute to 59 minutes and 1 hour to 24 hours Note Cycling time can only be programmed to values longer than Ramping time Ramping...
Page 56: ...ling settings ramp settings frequency and pulse width cannot be changed Incremental changes can be made to the stimulation amplitude Save Therapy After therapy settings have been configured press Set Device Therapy to save the settings to the Neurostimulator To exit press Patient Device to return to the Patient Device screen Note If Set Device Therapy is not pressed prior to exiting the Neurostimu...
Page 57: ...will open the Therapy Note screen On the Therapy Note screen press the text field to type notes After entering notes press Save Note to exit and save the note To delete the note and start over press Clear Note The notes section is limited to 300 characters To exit without saving the note press Cancel to return to the Programming screen Saved notes can be viewed by pressing the notes icon in the Th...
Page 58: ...ered to set new thresholds For more information on setting thresholds see Define Tined Lead Thresholds in the Test Stimulation During Lead Implantation section of this manual A prompt will appear when the Define Thresholds screen is exited if the thresholds were changed The new thresholds can be saved and used to generate new electrode recommendations or the new thresholds can be cancelled and the...
Page 59: ...nagement and the use of the CP including General CP Settings Change general CP settings including default stimulation settings User Account Management Add modify or delete user accounts accessed through the General CP Settings button 1 2 3 4 Additional information about each of these functions is included in the following sections of this manual These buttons are for use by the Manufacturer only ...
Page 60: ... the CP user to start the programming session for all new Neurostimulators at their most frequently used or preferred stimulation settings Reset Default Therapy Settings The Reset Default Therapy Settings button returns all Default Therapy Settings to their original factory values The CP will provide a prompt for confirmation to restore default settings Navigate to Manage User Accounts Press Manag...
Page 61: ...ion Press this button to see the FCC required information about the wireless communication of this device This information is also included in this manual in the section Wireless Communication Advanced Settings These settings are for manufacturer use only ...
Page 62: ...r and 24 hour Press Set to confirm and return to CP Settings screen Press Cancel to return to CP Settings screen without saving changes Set Date Set month day year and date formatting Press Set to confirm and return to CP Settings screen Press Cancel to return to CP Settings screen without saving changes 2 ...
Page 63: ...new user Press OK Deleting a user Press the delete icon to the right of a user name to delete that user account 1 Enter the 4 digit passcode for the user name to delete in the pop up window that appears Press Delete User in the pop up window Changing a User Passcode Press Change Passcode to next to the user name Enter the current 4 digit passcode for that user name in the pop up window that appear...
Page 64: ...reen is unresponsive CP display is on but does not respond to touch Turn the CP off by holding the power button then turn the CP back on If the screen still does not respond to touch contact Axonics CP screen fails during use CP display turns blank during use Check the CP power light to see if the CP is no longer on If the CP is still on turn the CP off then back on If the CP power light is off ch...
Page 65: ...Remote Control is on or the CP still cannot connect to the Neurostimulator contact Axonics Communication with a Neurostimulator is interrupted or lost Error prompt appears stating that communication with Neurostimulator has been lost If communication is not re established CP will return to Connect to Patient Device screen Move closer to the Neurostimulator and hit the Scan Again button on the scre...
Page 66: ...mptom relief Check the lead impedance on the Patient Device screen If there is an impedance issue with the active electrode s reprogram the device to only use electrodes with acceptable impedance If there is still an issue confirm that the CP is communicating with the correct Neurostimulator Try disconnecting and reconnecting the CP to the Neurostimulator Lack of or change in stimulation sensation...
Page 67: ...delivered stimulation current blue value above the stimulation bar when stimulation is on and compare it to the programmed current grey value above the stimulation bar when stimulation is off The delivered current may be at its maximum if it is below the programmed current Increasing the programmed current will not increase the delivered current See Stimulation Output Ranges in the Controlling Sti...
Page 68: ...investigate other potential causes for the loss or change in stimulation including but not limited to lead migration sub optimal lead placement or other factors 8 A discussion with the patient about when and how stimulation changed may provide insights into the potential issue e g was the change sudden was it associated with any trauma or impact such as a fall ...
Page 69: ...e If the impedance is still bad replace the foramen needle and then the CP Contact Axonics if the impedance remains bad Red impedance icon s shows on the Define Thresholds screen when impedance is checked for tined lead connection to the tined lead stimulation cable Check that the tined lead test stimulation cable and ground pad are fully inserted into the CP and that the ground pad is on the pati...
Page 70: ... Neurostimulator strain relief If the lead cannot go all the way in back out the set screw turn counterclockwise and reinsert the lead Press the impedance button to refresh the impedance values If impedance is still red for any electrode s replace the CP and check the impedance Next replace the Neurostimulator and check the impedance Next replace the tined lead Contact Axonics if the impedance rem...
Page 71: ... physician Conformité Européenne European Conformity 2019 This symbol means that the device fully complies with AIMD Directive 90 385 EEC Notified Body reviewed and RED 2014 53 EU self certified Refer to instructions for use Consult accompanying documents Follow instructions for use operator manual Temperature limitation Stimulation ground Humidity limitation Tined Lead Test Stimulation Not used N...
Page 72: ... CA 92618 USA www axonicsmodulation com Tel 1 877 929 6642 Fax 1 949 396 6321 HealthLink Europe Services BV De Tweeling 20 22 5215 MC s Hertogenbosch The Netherlands 10 23 2019 All Rights Reserved Copyright 2019 Axonics Modulation Technologies Inc 110 0132 001 rA ...