41
Adv a n ce d Ope r a t ion
Usin g Spe cia l Se t t in gs
1 .
Load your docum ent in t he ADF w it h t he 1
st
page facing dow n and t he t op
of t he pages point ing t o t he feeder .
2 .
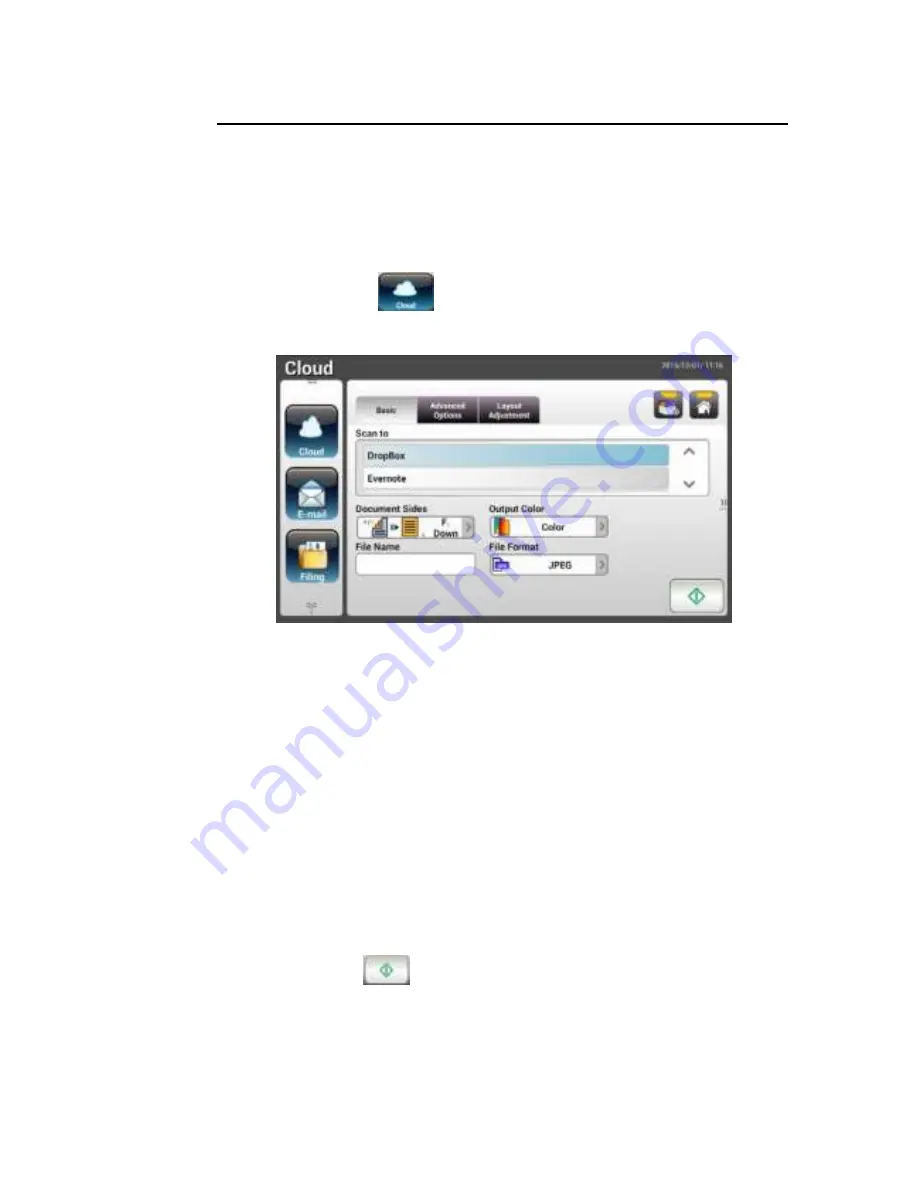
Pr ess t he Clou d
but t on on t he Hom e scr een. The LCD Touch Panel
prom pt s t he follow ing Clou d m ain scr een.
3 .
Choose your desir ed [ Sca n t o] cloud ser ver t o save your scanned im ages.
Ch oice : D r opbox , Ev e r n ot e , Google D r iv e .
4 .
On t he Ba sic scr een, check if t he docum ent sides, out put color , or file
nam e m eet s your r equir em ent s. I f not , change t he set t ings t o suit your
needs.
5 .
Tap t he Adv a n ce d Se t t in gs t ab t o pr om pt t he Adv a n ce d Se t t in gs scr een.
Change t he densit y, shar pness, cont r act , sat urat ion, and qualit y lev el and
select r esolut ion of t he scanned im age if t he default set t ings ar e not
sat isfact or y. ( For m or e infor m at ion about t he scan set t ings, please r efer t o
t he pr eceding sect ion – Scanning and Sending Your Docum ent s t o E- m ail
Addr esses on page 31.)
6 .
Tap t he La y ou t Adj u st m e n t t ab t o pr om pt t he La y ou t Adj u st m e n t
screen. Change original size and original orient at ion if t he default set t ings
ar e not sat isfact or y. ( For m or e infor m at ion about t he scan set t ings, please
r efer t o t he pr eceding sect ion – Scanning and Sending Your Docum ent s t o
E- m ail Addr esses on page 33.)
7 .
Tap t he St a r t
but t on. The scanner st ar t s scanning your docum ent .