VENUE System Restore
21
Installing VENUE Software on the S6L Control Surface
After installing and activating VENUE software on your E6L engine, install and activate VENUE software on your S6L control
surface, and then configure your system’s touchscreens.
Installing VENUE Software on S6L
Use the S6L Control Surface System Restore USB Drive to install VENUE software on your S6L control surface.
To install VENUE software:
1
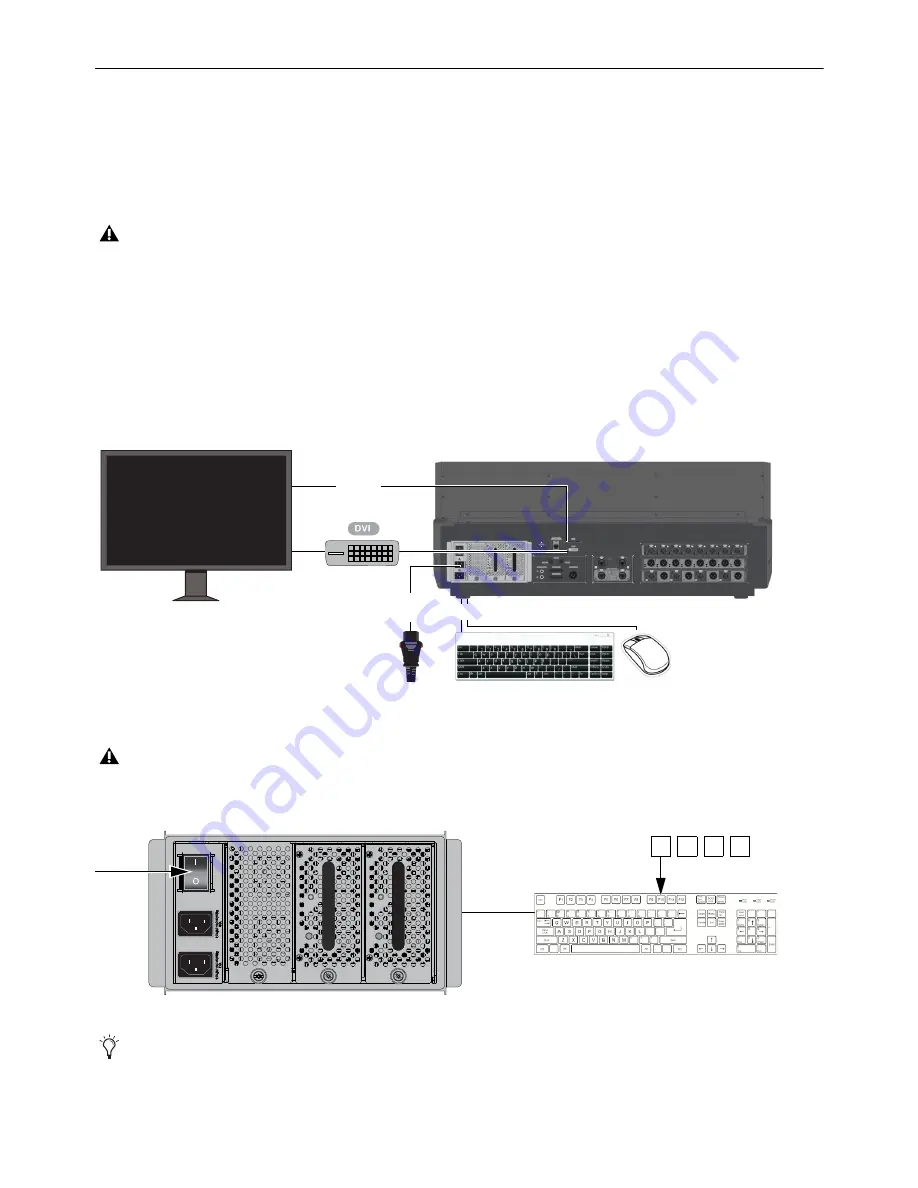
Connect the following to your S6L control surface:
• An included IEC power cable from AC power inlet
A
on the back panel of the S6L to your power source.
• A USB keyboard and mouse to the two USB ports on the S6L front panel (below the armrest).
• The DVI monitor you are using with your S6L control surface to the DVI port on the back the S6L, and power on the monitor.
• If the monitor has a touchscreen function, a USB cable from one of the USB ports on the back of the S6L control surface to
the USB port on the monitor.
2
Insert the S6L Control Surface System Restore USB Drive into an available USB port on S6L.
3
Power on your S6L control surface using the back panel power switch, then repeatedly press
F10
on the keyboard until the “Wel-
come to Avid’s VENUE System Restore USB Drive” dialog appears on the Master Touch Screen (MTS).
Make sure your S6L system components are not connected while installing System Restore software, and that your S6L is pow-
ered off before starting this procedure.
Required connections for installing and activating VENUE System Restore software on the S6L control surface
Make sure to use the S6L Control Surface System Restore USB Drive, not the E6L Engine System Restore USB Drive.
S6L control surface power switch (S6L-24D shown), and repeatedly pressing F10
Some models of USB keyboards require repeated pressing of F10 (holding it down in between pressings) to register.
Ethernet
IEC
power
USB
DVI Monitor
(for touchscreen)
USB (to front panel USB ports)
OK
OK
A
B
F10 F10 F10 F10
+
+
+
+
Summary of Contents for VENUE Local 16
Page 1: ...Avid VENUE S6L Installation Guide...
Page 8: ...Part I First Time Setup...
Page 17: ...Part II Software Installation...
Page 33: ...Part III Network Connections...
Page 46: ...Part IV Completing the Installation...
Page 63: ...Part V Reference...


