Avermedia AVerDiGi EH5216 Series User Manual Download Page 106


100 

8.1.3  To Use the PDAViewer   

1. Run the 

PDAViewer 

in the Programs. 

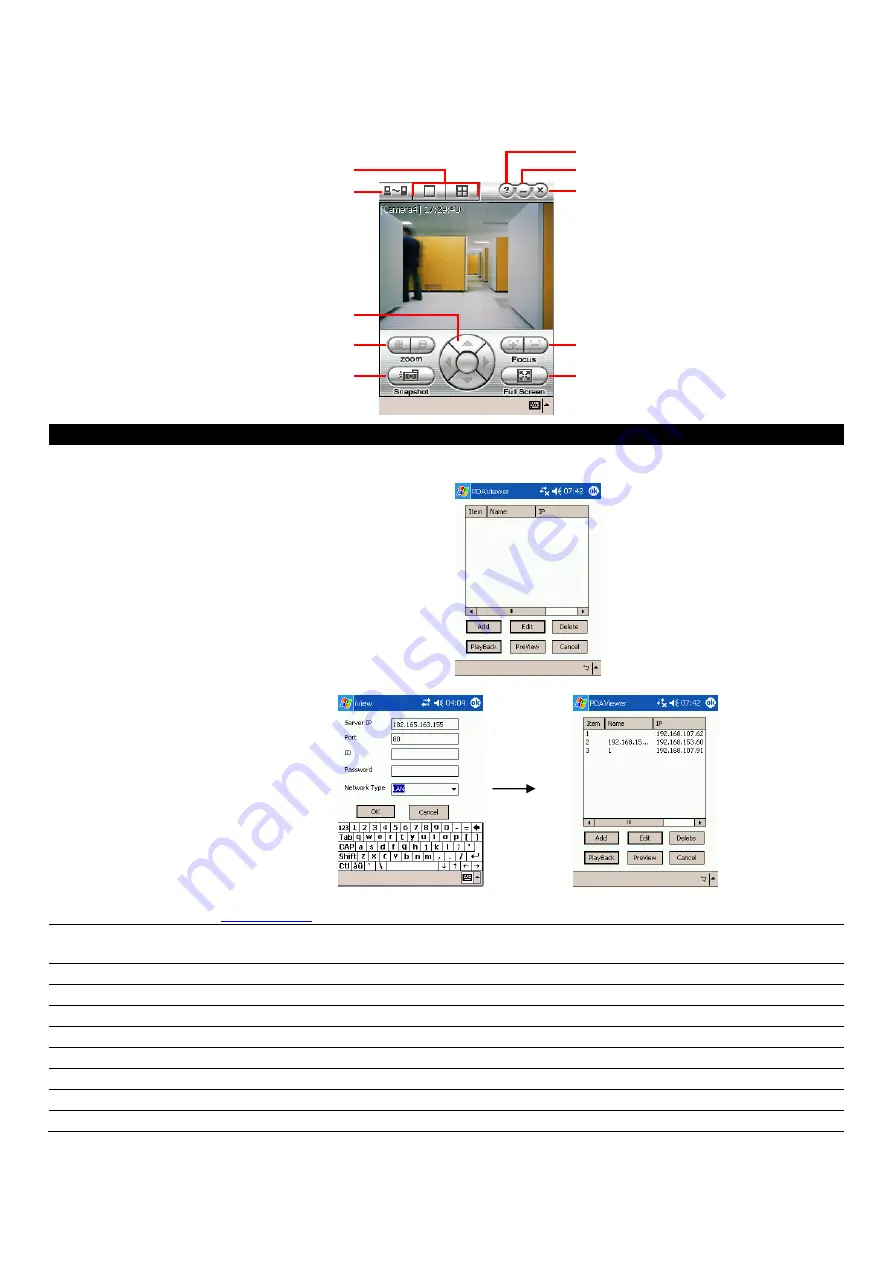
2.  Familiarizing the PDAViewer buttons. 

(7)

(6)

(5)

(3)

(4)

(8)

(9)

(10)

(1)

(2)


Name 

Function 

(1) Connect 

Hook up to the DVR server. Make sure you are connected to internet.   
When the iView screen appears, click Add to add DVR server. 


Enter the server IP, port, user ID, password and select the connection type. Then, click 

OK


User can playback the recorded video from remote DVR server in PDAViewer.(see also 

Chapter 8.1.4

(2) Split Screen Mode 

Select between 2 screen display types. It also allows you to switch and view different camera 
number or channels. 

(3) About 

Display the PDAViewer software version. 

(4) Minimize 

Reduce the size to taskbar. 

(5) Exit 

Close the PDAViewer. 

(6) Focus 

Adjust the focus of PTZ camera to produce clear image. 

(7) Full Screen 

Use the entire screen to only display the video. 

(8) Snapshot 

Capture and save the screen shot in *.bmp format. 

(9) Zoom 

Zoom in and out the PTZ camera image. 

(10) Direction buttons 

Adjust and position the focal point of the PTZ camera. 

Summary of Contents for AVerDiGi EH5216 Series

Page 1: ...AVerMedia AVerDiGi EH5216 series User Manual Feb 2009 EH5216 EH5216 EH5216 Lite...

Page 2: ...lied is made with respect to the contents of this documentation its quality performance merchantability or fitness for a particular purpose Information presented in this documentation has been careful...

Page 3: ...IF THERE IS ANY DAMAGE SHORTAGE OR INAPPROPRIATE ITEM IN THE PACKAGE PLEASE CONTACT WITH YOUR LOCAL DEALER WARRANTY VOID FOR ANY UNAUTHORIZED PRODUCT MODIFICATION NOTICE INFORMATION IN THIS DOCUMENT I...

Page 4: ...t Time Using the DVR Unit 19 2 1 2 Using the Virtual Keyboard 20 2 2 Familiarizing the Buttons in Preview Mode 21 2 2 1 Setting Up and Using the Emap 22 2 2 2 Familiarizing the Buttons in PTZ Camera C...

Page 5: ...Setup Remote System Setting 71 7 1 1 1 System Setting 71 7 1 1 2 Camera Setting 73 7 1 1 3 Record Setting 77 7 1 1 4 Network Setting 81 7 1 1 5 Alarm Setting 83 7 2 Familiarizing the Buttons in WebVi...

Page 6: ...2 2 To Setup Remote System Setting 107 9 2 2 1 System Setting 107 9 2 2 2 Camera Setting 109 9 2 2 3 Record Setting 113 9 2 2 4 Network Setting 117 9 2 2 5 Alarm Setting 119 9 3 Remote Backup 123 9 3...

Page 7: ...The power cord varies depending on the standard power outlet of the country where it is sold 6 2 SATA cable 7 12 screws for HDD installation 8 Software CD User Manual included 1 1 1 Optional Accessor...

Page 8: ...s up to 1900 x 1200 resolution CH16 supports up to 5 Megapixel resolution Video Feature 16 composite video inputs BNC Connectors and or 16 IP camera selected IP cameras Max of 16 video feed per system...

Page 9: ...error Launch E map Warning sound Send Emails Send files to FTP Send SMS requires SMS modem Send video to Central Management System PTZ preset point tracking Start recording Enlarge camera view Others...

Page 10: ...lens to down Move to down direction on menu control Confirm or make a selection 11 Number buttons Channel camera selection number in playback and preview mode For the channel over 10 press then press...

Page 11: ...en drive external hard disk mouse and so on i The USB storage device must be in FAT32 format 14 Playback buttons To playback video at faster speed To start playback To pause playback To rewind the rec...

Page 12: ...ports for connecting USB device ex USB pen drive external hard disk mouse and so on i The USB storage device must be in FAT32 format 1 3 3 EH5216 Lite Name Function 1 System Power indicator System po...

Page 13: ...Monitor 1 2 Output the video signal to SPOT monitor when receive the alarm events 6 Video Loop Out Output the video signal to a CCTV monitor Only output one channel signal at a time 7 eSATA port For c...

Page 14: ...loss of programs or other data on your information handling system or otherwise This includes direct indirect incidental special or consequential damages resulting from the incompatibility caused by...

Page 15: ...s three hard disks then plug three SATA cables into each SATA connectors on the PC board 9 Plug the power cable into hard disk 10 Plug the SATA cable into hard disk i User can leave un plug the SATA c...

Page 16: ...3 If user wants to install 4th HDD then follow the steps to continue Otherwise go to the last two steps to complete the installation 14 Place the 4th hard disk on the HDD holder The head side of hard...

Page 17: ...the power cable into the hard disk 18 Plug the SATA cable into the hard disk i The SATA cable is an optional accessory Please purchase from your dealer 19 Place the HDD holder inside the DVR unit The...

Page 18: ...ch the screw hole on the DVR unit and HDD holder should hook on the stabled hook on the DVR unit 21 Screwed the HDD holder inside the DVR unit 22 Screwed the holder on the DVR unit 23 The look of four...

Page 19: ...devices and output video to a TV or CRT LCD monitor Follow the illustration below to make the connection For backup recorded video plugging the pen drive or external hard disk through USB port that a...

Page 20: ...4 Pen drive and external hard disk must be FAT32 format i All connected devices have its own power supply is necessary DVR unit can connect 16 cameras in analog and IP cameras combo EH5216 Lite EH5216...

Page 21: ...4 Sensor 4 signal 12 Sensor 12 signal G Sensor ground G Sensor ground 5 Sensor 5 signal 13 Sensor 13 signal 6 Sensor 6 signal 14 Sensor 14 signal 7 Sensor 7 signal 15 Sensor 15 signal 8 Sensor 8 signa...

Page 22: ...torage device pen drive or external hard disk and DVD ROM 10 To reset alarm status 11 Switch to Emap mode 12 Switch to PTZ mode Press channel number can switch to PTZ control mode if the selected came...

Page 23: ...lay Display channel name only None i doesn t have any functions 14 Switch to character mode Press and then press the number button to enter the characters numbers and symbols comma semicolon slash col...

Page 24: ...in playback and preview mode Channel camera selection number in playback and preview mode As a preset position with at PTZ control mode With button can switch to different screen display modes and en...

Page 25: ...rol i For the first time using DVR unit using mouse and keyboard to setup all configurations 2 1 1 First Time Using the DVR Unit 1 Connect the mouse and keyboard to DVR unit through USB interface 2 Po...

Page 26: ...IP camera a Click Setup Camera b Select camera channel and type of camera IP Camera c And then enable the camera d Click IP Setting e Enable Protocol and then select protocol mode video format and cha...

Page 27: ...ch area and the location of camera sensor relay and the warning see also Chapter 2 2 1 5 Network Enable disable remote system access This feature allows you to access DVR server from a remote location...

Page 28: ...map When the open dialog box appears locate and select the map and click Open 4 When the inserted map appears on the Emap screen click Edit You may now drag the camera sensor and relay icons to its pl...

Page 29: ...m Zoom in and out the image 6 Direction buttons Adjust and position the focal point of the PTZ camera 7 Camera ID pane Display the PTZ camera number that is being operated 8 Save Camera preset positio...

Page 30: ...main interface The Event log viewer window will show up 2 Select the Date to view 3 To filter the records select and click the select button to display Event System Operation Network or All 4 Use the...

Page 31: ...e is a recorded video file on that period of time While the red bar indicates that you are currently viewing the recorded video file 4 Playback Control Buttons Begin Move at the beginning of the recor...

Page 32: ...rt click Segment button again 3 Click Export button Output Video Clip to save the video segment to the USB storage device 12 Full screen View in full screen To return press the right button of the mou...

Page 33: ...k one in the bookmark list to review the file 2 3 2 Using Visual Search 1 Click Visual Search 2 In the Visual Search Setting dialog box select the Camera number and the date Then click OK 3 When a ser...

Page 34: ...28 4 On the time second screen click the channel and playback button will appear Click playback button to playback the selected channel video frame...

Page 35: ...arch would stop at the frame that matches the condition To keep on searching click 4 You may also set to search and list all the result Set the Begin Time time of End Time and Searching Interval Then...

Page 36: ...it without saving 1 2 3 4 5 6 7 9 10 11 12 8 1 Storage Path Set the HDD on where to save the data In case you have more than one storage device the system automatically saves the data to the next stor...

Page 37: ...the system to display the tool tips and dialogs based on the selected language Default language is in English 6 Video Standard Change and select the proper video system according to your camera video...

Page 38: ...the Auto Scan function from 3 to 10 seconds This automatically switches to the next video in cycle depending on the set time gap 10 Login Enable the conditions in Login section you want the system to...

Page 39: ...k And then plug USB disk into DVR unit 3 Select the USB disk if there is more than one USB disk from drop down list The DVR unit will auto detects the firmware 4 Click OK to start upgrading IPCam Modu...

Page 40: ...era When there is no video source on the camera we suggest disabling it so that the system won t detect it as video loss error 3 Input Select the camera type as IP Camera 4 Camera Display Enable disab...

Page 41: ...t Video size Frame rate Bitrate mode and Quality of camera Also user can adjust Bright Contrast Hue Saturation and I O Control of the camera i The selection and adjustment items may vary by the camera...

Page 42: ...in Name column 4 The system automatically detects the camera and input relates information In the Content section enter relay Description 5 In the test section click Test to check the relay status Re...

Page 43: ...r 3 Input Select the camera type as Analog Camera 4 Camera Display Enable disable to show the video Even if the video of the selected camera is hidden you can still record the video and preview it in...

Page 44: ...as video loss error 3 Input Select the camera type as Remote DVR 4 Camera Display Enable disable to show the video Even if the video of the selected camera is hidden you can still record the video and...

Page 45: ...Schedule button and select the Recording Mode and then click on the time or day blocks When the system starts recording a red triangle mark would appear at the upper left corner of the screen The rec...

Page 46: ...hen click on the time or day blocks When the system starts recording a red triangle mark would appear at the upper left corner of the screen The recording modes are listed below Always Recording Recor...

Page 47: ...ach camera can adjust video size and frame rate individually Click Default will back to the factory default value The frame rate usage is shown in Used and Unused columns by CIF mode i Only analog cam...

Page 48: ...ccessing DVR server from the remote location via internet Click Setting to setup DVR IP Using the following IP address Assigns an IP address for the DVR system Fill in the IP related parameters in IP...

Page 49: ...er has setup when register the domain name DDNS Server Name Select your DDNS server The default only has one DDNS server now It may provide more DDNS in future DDNS Server Port Fill in the port that c...

Page 50: ...44 Network Bandwidth Limit By Channel Set the network bandwidth by each channel All Set the total network bandwidth consumption limit...

Page 51: ...ctivate DVR remote system to access at the set time After the appointed time the Network function will be disabled If the Network function is already enabled the Network function will not be disabled...

Page 52: ...ed file or click camera 01 16 or time 00 23 to select the whole row or column The blue block turns red when it is selected The block that appears in white doesn t have data If you want to set the spec...

Page 53: ...split screen mode To zoom in an area on the screen Right click and Drag a square on the area you want to enlarge 2 Progress bar Show the progress of the file being played You may move the bar to seek...

Page 54: ...he camera ID number to switch and view other camera 8 Language Switch to different UI language 9 Export Export includes Snapshot Print and Output Video Clip function Snapshot Capture and save the scre...

Page 55: ...ctivities that were recorded in event log i e Sensor Motion Video Loss See also Chapter 3 6 3 15 Intelligent Search Search the changes in the motion detector frame See also Chapter 3 6 4 16 Audio Enab...

Page 56: ...o view 3 6 4 To Search Using the Intelligent Search 1 Click on the video screen on where you want to search 2 Click Intelligent Search The Intelligent Search text red would appear at the lower left co...

Page 57: ...umber 2 Enter sensor name in Name column 3 The system automatically detects the card and input number In the Content section enter Description of sensor 4 In the test section click Test to check the s...

Page 58: ...ID number 2 Enter relay name in Name column 3 The system automatically detects the card and input number In the Content section enter Description of relay 4 In the test section click Test to trigger...

Page 59: ...o 23 represent the time in 24 hour clock Select the time and click the block you want to activate or deactivate the alarm function When it is deactivated the color of the block turns white 4 In 3 Cond...

Page 60: ...when the alarm condition is activated Enlarge Camera View Switch to only display video in Preview mode from where the alarm is activated a Select the camera from drop down list to specify which camera...

Page 61: ...SMTP Server and port If your e mail system requires user identification enable Authentication check box and enter ID and Password 2 Mail Fill the mailing information From Enter the sender e mail addr...

Page 62: ...time the alarm recording will continue recording until alarm is reset 6 Click OK to accept the new settings and Cancel to exit without saving PTZ preset point Position the PTZ camera based on the pre...

Page 63: ...rt a new user Delete to remove the selected user Edit to modify the user control right OK to exit and accept the setting and Cancel to exit without saving the setting To Add a User Account 7 In the Us...

Page 64: ...nite check box to access DVR without time limit If you want to set time limit enter the number of minutes in Minute text box 4 Visible Camera Select the camera number that would allow the user to acce...

Page 65: ...stalling the USB Playback Console To install the USB Playback Console 1 Place Installation CD into the CD ROM drive When the installation main screen appears click Install USB Playback Console and the...

Page 66: ...recorded video file of the entire camera or one camera on screen 4 Playback Controller Begin Move at the beginning of the recorded video file Previous Go back to the previous frame by frame Slower Pla...

Page 67: ...ort Export includes Snapshot Print and Output Video Clip function Snapshot Capture and save the screen shot either in jpg or bmp format Print Print the screen shot Output to AVI Save the segmented fil...

Page 68: ...click Segment button again 3 Click Output button to save the wanted portion 4 In the Save As dialog box locate on where user wants to save the file type the filename and select the video format 4 3 2...

Page 69: ...on 2 Select Backup File dvr and click OK 3 Locate the backup file folder and click OK i When open the backup video file just locate the where backup file folder is 4 And then Playback Date Time Select...

Page 70: ...source hard disk 3 In Backup date time selection windows select the date and time 00 24 represents hours and 01 16 represents channels Blue block means there has recorded file Red block means the blo...

Page 71: ...ication click the Watermark button on USB Playback Application main interface 2 In the ImageVerification screen click Load Source Image and locate the image source 3 Click Verify Image to begin the pr...

Page 72: ...rame Pause Briefly stop playing the video file Play Play the video file Faster Play the video file at the faster speed Next Go to the next frame End Go to the end of the video file 4 Save Video Save t...

Page 73: ...he jolt in the recorded video also see Chapter 7 1 21 Add Setting Include the new setting to the temporary setting block 22 Rename Change the name of the selected setting in the temporary setting bloc...

Page 74: ...ould be able to connect and login afterwards For Windows 2000 click Yes when the Security Warning dialog box appears For Windows XP click Install when the Internet Explorer Security Warning dialog box...

Page 75: ...k on the screen to switch to different camera view 5 Split screen view To view all cameras on screen simultaneously 6 Audio Enable disable remote sound 7 Record Start to record the video of the select...

Page 76: ...k to enable disable viewing the camera Click Add Server and select the server type between DVR and IP Cam to add Click Delete Server to delete the selected item Click Import to load the previous saved...

Page 77: ...lly erase the event and alarm log files after a certain days enable the Delete event and alarm log after check box and enter the numbers of days in Days text box 3 Overwrite Enable When there is not e...

Page 78: ...e next video in cycle depending on the set time gap 5 Login Enable the conditions in Login section you want the system to automatically carry out Auto record when login Automatically start video recor...

Page 79: ...t is selected 2 Enable Set to enable disable the selected camera When there is no video source on the camera we suggest disabling it so that the system won t detect it as video loss error 3 Input Sele...

Page 80: ...the Protocol Model Video Format and Channel of the IP camera 3 Enter IP address and connecting port in IP Camera Site column 4 Also user can enter URL of IP camera instead of IP address 5 If the IP ca...

Page 81: ...oss error 3 Input Select the camera type as General Camera For IP camera setting see IP Camera Setting To modify camera of remote DVR see Remote DVR Camera Setting 4 Camera Display Enable disable to s...

Page 82: ...it so that the system won t detect it as video loss error 3 Input Select the camera type as Remote DVR For IP camera setting see IP Camera Setting To modify analog camera setting see Analog Camera Se...

Page 83: ...n one camera Right click on the camera icon To select one camera only Left click on the camera icon The camera icon turns purple when it is selected 2 Recording Mode The horizontal blocks from 00 to 2...

Page 84: ...and stop based on the Start Record Prior and Stop Record After settings Smart Recording Automatically switch to recorded at the maximum frame rate setting once a motion is detected and if there is no...

Page 85: ...in full 24 hours and 7 days a week select the recording mode and click the button If you want to only record at a particular time or day click Schedule button and select the Recording Mode and then cl...

Page 86: ...ression level and uses more hard disk space 5 Frame Rate Set the maximum and minimum number of frames to be recorded during motion and motionless state The frame rate ranges from 01 to 30 for NTSC and...

Page 87: ...internet using WebViewer Remote Console PDA Viewer and JAVAViewer still image To select all the cameras enable the ALL check box 3 Network Time Synchronization Adjust the DVR system time same as netwo...

Page 88: ...82 Network Bandwidth Limit By Channel Set the network bandwidth by each channel All Set the total network bandwidth consumption limit...

Page 89: ...to 23 represent the time in 24 hour clock Select the time and click the block you want to activate or deactivate the alarm function When it is deactivated the color of the block turns white 4 In 3 Co...

Page 90: ...for that period then the alarm will be sent out 7 In 6 Alarm Reset click the camera number to set the reset condition of alarm Once alarm is reset all alarm action will stop at the moment If the senso...

Page 91: ...on in second 8 Click OK to exit and accept the setting and Cancel to exit without saving the setting Send E mail Send an electronic text message Beside the Send Email check box click Detail In the E m...

Page 92: ...time the alarm recording will continue recording until alarm is reset 6 Click OK to accept the new settings and Cancel to exit without saving PTZ preset point Position the PTZ camera based on the pre...

Page 93: ...alog box Select column click to enable disable viewing and controlling the PTZ camera Click OK to exit and save the setting and Cancel to exit without saving the setting 4 Focus Adjust the focus manua...

Page 94: ...sole setting see also Chapter 7 3 1 8 PTZ Access PTZ control panel EH supports IP camera PTZ function see Chapter 7 3 2 9 Preview Switch to Preview Playback mode This allows you to view live camera di...

Page 95: ...le network storage check box to send the recorded video in network attached storage i To add network storage the Internet storage drive folder must be mapped as Network Driver in DVR server To know ho...

Page 96: ...m Zoom in and out the image 6 Direction buttons Adjust and position the focal point of the PTZ camera 7 Camera ID pane Display the PTZ camera number that is being operated 8 Save Camera preset positio...

Page 97: ...rom 00 to 23 represent the time in 24 hour clock The numbers from 01 to 8 represent the camera number To Make a Selection 1 Select the date in the calendar Use and buttons to shift the calendar to the...

Page 98: ...a you want to enlarge To back to normal view right click the channel screen again 2 Progress bar Show the progress of the file being played You may move the bar to seek at any location of the track 3...

Page 99: ...HDD capacity in preview mode and play speed in playback mode 9 Camera ID Show the number of cameras that are being viewed When you are in single screen mode click the camera ID number to switch and v...

Page 100: ...frame Slower Play the recorded video file at the speed of 1 2x 1 4x or 1 8x Rewind Wind back the recorded video file Pause Briefly stop playing the recorded video file Play Play the recorded video fi...

Page 101: ...in Playback compact mode To return press the right button of the mouse or ESC on the keyboard When you switch to full screen in multiple screen mode Left click to toggle to only display one of the vid...

Page 102: ...ock The blue bar on top of the hour button indicates that there is a recorded video file on that period of time While the red bar indicates that you are currently viewing the recorded video file 5 Pla...

Page 103: ...To cancel segmentation or set the segment marks from the start click Segment button again 3 Click Export button Output Video Clip to save the wanted clip 4 In the Save As dialog box locate on where yo...

Page 104: ...DA support IE browser and is connected to the internet To use this feature you need to install the PDA Viewer software either thru ActiveSync connection or download it from the internet Please check i...

Page 105: ...ll PDAViewer from the Internet Make sure you are connected to the internet 1 Open the web browser and enter the server IP Then click the hyperlink Download PDAViewer 2 When the Download dialog box app...

Page 106: ...m remote DVR server in PDAViewer see also Chapter 8 1 4 2 Split Screen Mode Select between 2 screen display types It also allows you to switch and view different camera number or channels 3 About Disp...

Page 107: ...ok up to the DVR server 3 Click Connect icon and select the DVR server 4 Click Playback to enter playback option screen 5 Select the camera data and time 6 Click Playback to start playing the recorded...

Page 108: ...102 11 User can change the relay status Select the relay and tap on video screen longer the pop up menu will appear and then select the status ON OFF Tigger...

Page 109: ...en click Connect 2 When the Download screen appears select JAVA Viewer jad and download it to your mobile phone 3 After the installation the JAVAViewer will be in your mobile phone system To find the...

Page 110: ...104 7 The JAVAViewer support PTZ control function you can refer to Help file for detail function control key Select menu and go the way down to select the Help file...

Page 111: ...rt Programs DSS Tool Dispatch 3 In the DVR Server section enter the NV DVR server IP port user ID and password You can also select to display the language you prefer 4 Auto connect when start Enable t...

Page 112: ...te DVR server s IP address Port the port use to connect to remote DVR server The port number is same the Webviewer port on the remote DVR server The default is 80 User ID fill in the remote DVR server...

Page 113: ...after check box and enter the numbers of days in Days text box 2 Delete event and alarm log after If you want the system to automatically erase the event and alarm log files after a certain days enabl...

Page 114: ...to 10 seconds This automatically switches to the next video in cycle depending on the set time gap 5 Login Enable the conditions in Login section you want the system to automatically carry out Auto r...

Page 115: ...t is selected 2 Enable Set to enable disable the selected camera When there is no video source on the camera we suggest disabling it so that the system won t detect it as video loss error 3 Input Sele...

Page 116: ...the Protocol Model Video Format and Channel of the IP camera 3 Enter IP address and connecting port in IP Camera Site column 4 Also user can enter URL of IP camera instead of IP address 5 If the IP c...

Page 117: ...Camera Setting To modify camera of remote DVR see Remote DVR Camera Setting 4 Camera Display Enable disable to show the video Even if the video of the selected camera is hidden you can still record t...

Page 118: ...era Setting To modify analog camera setting see Analog Camera Setting 4 Camera Display Enable disable to show the video Even if the video of the selected camera is hidden you can still record the vide...

Page 119: ...lect one camera only Left click on the camera icon The camera icon turns purple when it is selected 2 Recording Mode The horizontal blocks from 00 to 23 represent the time in 24 hour clock and the ver...

Page 120: ...s and stop based on the Start Record Prior and Stop Record After settings Smart Recording Automatically switch to recorded at the maximum frame rate setting once a motion is detected and if there is n...

Page 121: ...in full 24 hours and 7 days a week select the recording mode and click the button If you want to only record at a particular time or day click Schedule button and select the Recording Mode and then c...

Page 122: ...ression level and uses more hard disk space 5 Frame Rate Set the maximum and minimum number of frames to be recorded during motion and motionless state The frame rate ranges from 01 to 30 for NTSC and...

Page 123: ...internet using WebViewer Remote Console PDA Viewer and JAVAViewer still image To select all the cameras enable the ALL check box 3 Network Time Synchronization Adjust the DVR system time same as netwo...

Page 124: ...118 Network Bandwidth Limit By Channel Set the network bandwidth by each channel All Set the total network bandwidth consumption limit...

Page 125: ...to 23 represent the time in 24 hour clock Select the time and click the block you want to activate or deactivate the alarm function When it is deactivated the color of the block turns white 4 In 3 Co...

Page 126: ...for that period then the alarm will be sent out 7 In 6 Alarm Reset click the camera number to set the reset condition of alarm Once alarm is reset all alarm action will stop at the moment If the senso...

Page 127: ...ion in second 12 Click OK to exit and accept the setting and Cancel to exit without saving the setting Send E mail Send an electronic text message Beside the Send Email check box click Detail In the E...

Page 128: ...e time the alarm recording will continue recording until alarm is reset 6 Click OK to accept the new settings and Cancel to exit without saving PTZ preset point Position the PTZ camera based on the pr...

Page 129: ...e i To back up the data you must have at least 2G hard disk space 9 3 1 To back up the recoded data from the DVR server 1 Make sure you are connected to the internet 2 Click Start Program DSS Tool Rem...

Page 130: ...e file Manual Backup mode the backup progress will start when user press the backup button Click File Select to choose the date time and camera you want to back up Click Browse to set the storage path...

Page 131: ...125 8 For manually backup click file select button and select the DVR to backup...

Page 132: ...register your domain name on the following Web site http ddns avers com tw 1 User Login Browse the website ddns avers com tw with Microsoft IE or Netscape Navigator to access the following dialog 2 Fi...

Page 133: ...k Service Port The following table shows the ports that DVR server uses for certain network service Port Variable Remote Console 5550 Y WebViewer 80 Y CM3000 80 Y Firmware Update 5005 Y DVR DDNS Uploa...

Page 134: ...ys and descriptions Function Keys Description Q Exit System F1 Display system information F2 Start recording F3 Enable network function F4 Access system settings F5 Switch to playback mode F6 Switch t...

Page 135: ...h product 4 AVerMedia does not warrant that this product will meet your requirements it is your responsibility to determine the suitability of this product for your purpose WHAT WE WILL AND WILL NOT P...

Reviews: