


Plot from a Layout
|
155
The Create Layout wizard guides you through the creation of a layout.
3
In the Create Layout wizard, on the Begin page, enter a name for the new layout. Type
Elevation
and Floor Plan
. Click Next.
4
On the Printer page, select the printer that you want to use to plot this layout. Select
DWF6
ePlot.pc3
. Click Next.
For this tutorial, you will plot the drawing to a DWF file rather than to a plotter. DWF (Design
Web Format) files are convenient for distributing drawings using email, FTP sites, project
websites, or CDs. DWF files are smaller, faster, and provide greater resolution than other popular
options. DWF files can be viewed using Autodesk® Design Review, a viewer available as a free
download from the Autodesk website.
5
On the Paper Size page, the paper sizes available in the list are based on the printer that you
selected. Select Letter or ANSI A (8.5
x
11.0 inches) for the paper size. Make sure that Paper Size
in Units lists a width of 11.0 inches and a height of 8.5 inches. Click Next.
6
On the Orientation page, click Portrait for that orientation. Click Next.
7
On the Title Block page, click None from the list of available title blocks. Click Next. (You insert
a title block once the layout is created.)
8
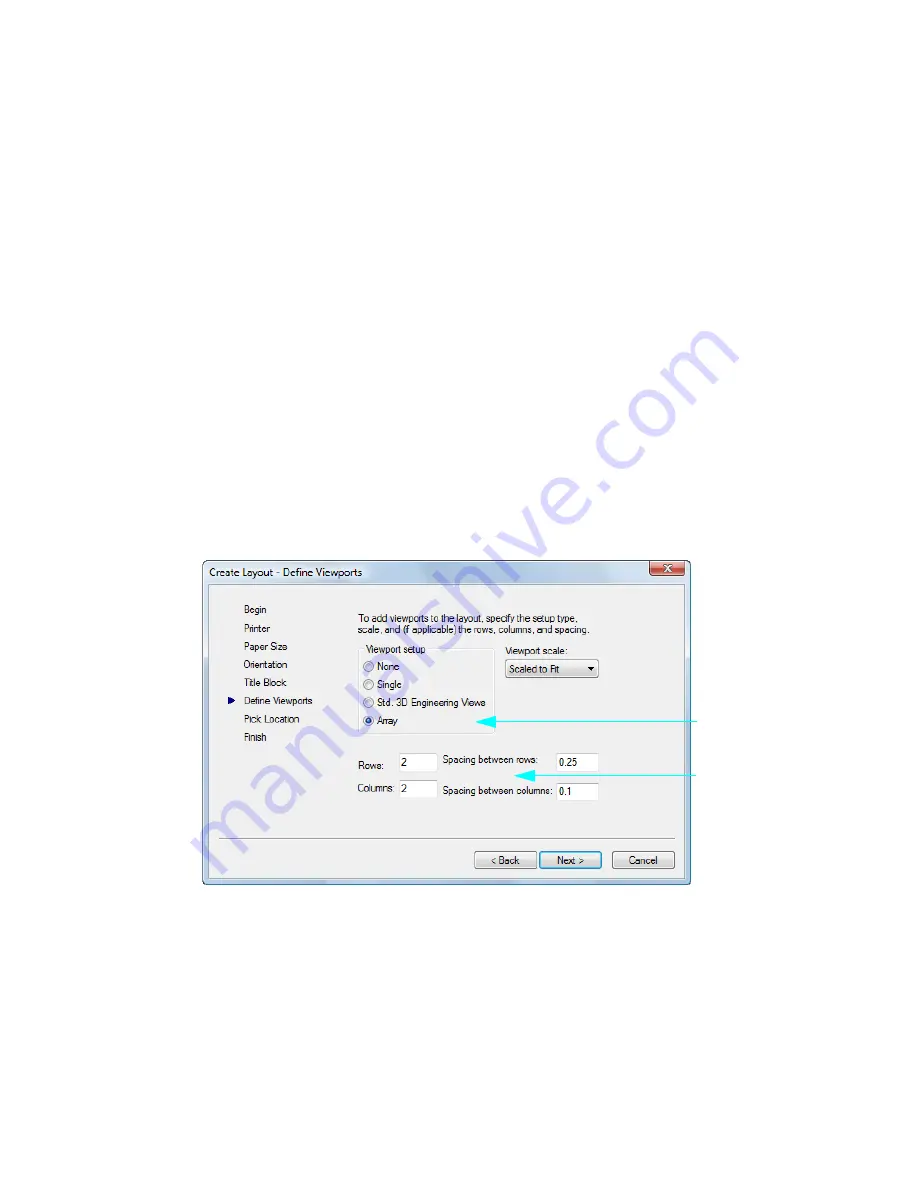
On the Define Viewports page, under Viewport Setup, click Array. Leave the Viewport Scale as
Scaled to Fit. (You change the scale later.) In the Rows box, type
2
. In the Columns box, type
1
.
In the Spacing Between Rows box, type
0.25
. In the Spacing Between Columns box, type
0.1
. This
creates two viewports, vertically aligned, with a gap between them. Click Next.
9
On the Pick Location page, select Select Location. In the drawing area, click and drag to create a
rectangular layout viewport that is just inside the printable area (the dashed lines).
10
On the Finish page, click Finish to complete the creation of the new layout and viewports.
Notice that two viewports have been created.
select the
Array option.
specify 2 rows
with 1 column.
Summary of Contents for 057A1-05A111-1001 - AutoCAD LT 2009
Page 1: ...January 2008 Getting Started ...
Page 6: ...vi ...
Page 7: ...Make the Transition from Paper to CAD ...
Page 8: ... 127 6 7 127 6 7 7 127 5 3 6 127 5 5 5 5 5 5 5 5 5 6 276 ...
Page 10: ...352326 5281 225 3 1 352326 9 7 21 6287 ...
Page 12: ......
Page 14: ......
Page 16: ......
Page 18: ......
Page 20: ......
Page 22: ... ...
Page 24: ......
Page 26: ...20 ...
Page 34: ...28 ...
Page 41: ......
Page 43: ...Change Views Zoom to Magnify a View 38 Pan to Reposition a View 39 ...
Page 47: ......
Page 61: ...Draw Objects Object Properties Overview 56 Draw Lines 64 Draw Circles and Arcs 67 ...
Page 75: ......
Page 89: ......
Page 119: ......
Page 129: ......
Page 130: ......
Page 137: ......
Page 151: ......
Page 174: ...168 ...
Page 184: ...178 Index ...


