
Verifit
®
User's Guide Version 4.8
©
November 2016
specifies the level-dependent gain required to correct abnormal loudness as modeled by his cochlear hearing loss
simulation. It provides two approaches to correcting for the hearing loss:
Camfit restoration
aims to amplify sounds that are soft, comfortable and loud for a person with normal hearing
so that they are soft, comfortable and loud for a hearing aid wearer. This is the stated goal of the IHAFF
(International Hearing Aid Fitting Forum) fitting method.
Camfit equalisation
aims to amplify speech to produce the same loudness in each critical band. It has been
argued that this is likely to give the highest intelligibility for a given overall loudness. This is the rationale
behind the NAL fitting methods and will generally produce similar targets.
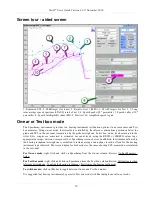
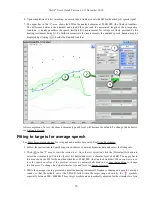
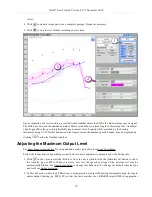
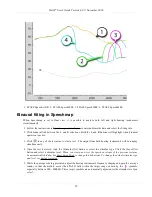
Using Speechmap
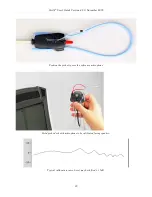
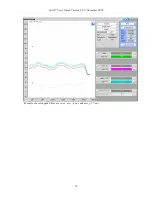
The Speechmap fitting environment provides a number of distinctly different stimuli. Speech and noise are
analyzed in 1/3 octave bands and for most speech stimuli data are presented as 3 curves. The top curve is the
level exceeded 1% of the time (speech peaks), the lower curve is the level exceeded 70% of the time (speech
valleys) and the middle curve is the average. Clicking
causes the signal to be presented continuously - the
speech signals run in a loop - and the curves are updated frequently to show any changes you make to the
hearing instrument. Clicking on
restarts the speech passage and the curves are then calculated for the entire
passage, producing an accurate display of the speech region and LTASS, and an accurate SII calculation. When
using live speech, a pause button [
;
] captures short-term speech features. See SII calculation in Speechmap and
Speechmap Technical Details.
Before starting, please see On-Ear Measures - Setup, Speechmap Setup, Speechmap facts, On-ear or Test box
mode.
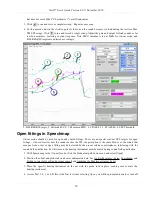
1.
To access Speechmap:
right click and then select Speechmap under On-ear or Test box.
2.
To change screen setup:
see On-Ear Measures Screen Setup, and On-ear or Test box mode.
3.
To set up hearing instrument type:
click on ▼ in the Audiometry section. For on-ear mode choices
include: BTE, ITE, ITC, CIC, CIC-shallow, Open, Body, and FM. For test box mode select from: BTE +
mold, BTE + HA-4, ITE, ITC, CIC, CIC-shallow, RITE (receiver in the ear), Body, or FM. In test box mode
this determines the RECD applied to the coupler microphone and the MLE (microphone location effects)
applied to the speaker signal.
4.
To enter audiometric data:
see Assessment data entry.
5. To start a test: click on
in any of the test areas
6. To select stimulus type: click the down arrow beside the stimulus window and select from the list. See Setup
Speechmap to customize the list.
7. To select stimulus level: click the down arrow beside the stimulus window and select from the list.
8. To complete a measurement and store the result: click on
while the stimulus is running.
9. To stop a test without recording any test data: click on
10.To capture the current screen curves when using live speech: click on the pause button [
;
].
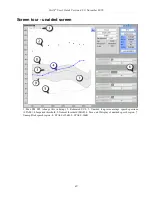
See, Screen tour and Speechmap Fitting Procedures.
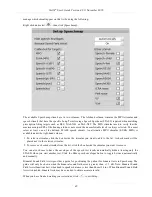
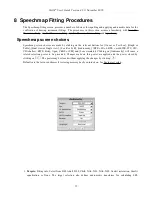
Speechmap Setup
Speechmap provides a number of different test stimuli for fitting hearing aids and testing various aspects of their
performance. Each time you run a test, you have the opportunity to select the stimulus from a list. You can
47
Summary of Contents for verifit
Page 1: ...Audioscan Verifit User s Guide 4 8 November 2016...
Page 17: ...Verifit User s Guide Version 4 8 November 2016 EC Declaration of Conformity 17...
Page 92: ...Verifit User s Guide Version 4 8 November 2016 92...
Page 94: ...Verifit User s Guide Version 4 8 November 2016 94...
Page 107: ...Verifit User s Guide Version 4 8 November 2016 Telecoil test results 107...
Page 123: ...Verifit User s Guide Version 4 8 November 2016 123...
Page 148: ...Verifit User s Guide Version 4 8 November 2016 148...
Page 149: ...Verifit User s Guide Version 4 8 November 2016 149...
Page 159: ...Verifit User s Guide Version 4 8 November 2016 159...


