


CHAPTER 13: FIELD REPLACEMENTS
13-2
DigiVu
®
Series Multichannel MPEG-2/H.264 Encoder/Multiplexer with QAM &/or IP Output - Installation & Operation Manual
13.3 Field Replacement of Plug-in Cards
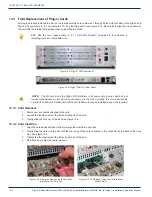
All plug-in cards are installed in a slot on the rear panel which are numbered 1 through 5 plus AUX (6th slot) on the DigiVu and
DigiVu CD, see Figure 2-13, and numbered 1 & 2 on the DigiVu Mini, see Figure 2-14. Be careful to align the circuit board of
the card with the internal card guides when re-inserting the cards.
FYI:
See the card support table in
“2.7.1 Card Slot Support” on page 2-8
for guidance in
installing cards into compatible slots.
NOTE:
The 6th card slot in the DigiVu 3RU platforms is for power only to cards which do not
require management, as this slot does not show up in the GUI. Currently, this slot is exclusively
used for the 2-Way A/V Splitter card but the A/V Splitter card may be installed in any slot if required.
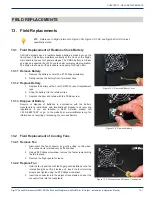
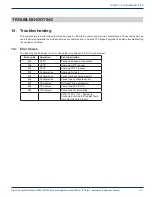
13.3.1 Card Removal
1. Disconnect any cables attached to the card.
2. Loosen the thumbscrews at the left and right end of the card.
3. Gently slide the card out of the slot. See Figure 13-6.
13.3.2 Card Insertion
1. Align the card edges with the internal metal guides inside the card slot.
2. Gently slide the card into the slot until the rear edge of the card is seated in the connector at the back of the card
3. Tighten the thumbscrews at the left and right end of the card.
4. Re-attach any cables that were removed.
Figure 13-4: DigiVu
®
3RU Rear Panel
Figure 13-5: DigiVu
®
Mini 1RU Rear Panel
Figure 13-6:
Release Screws on Both Card Ends
and Gently Pull Card Out
Figure 13-7:
To Replace - Align Card with Internal
Metal Guides


