background image

 Chapter 4. Browser Operation

19

Energy

Connections

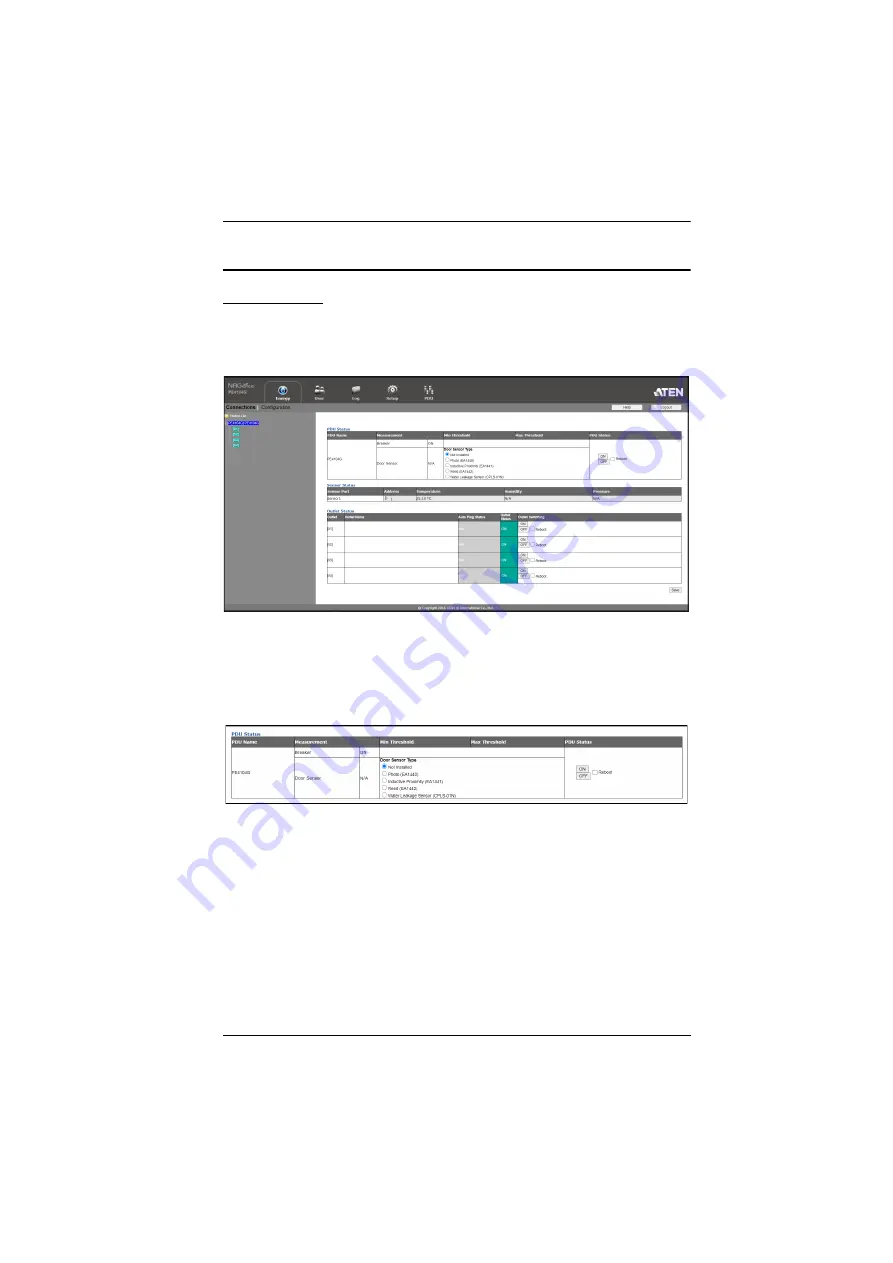
When you log in to the PE4104G, the interface opens with its default selection 
of the 

Energy

 tab; and the 

Connections

 menu. The contents of the 

PDU Status

Sensor Status

, and 

Outlet Status

 sections are displayed in the main panel.

PDU Status

The PE4104G supports PDU device level monitoring. The 

PDU Status 

section 

allows you to set up a power management configuration for the PDU device as 
a whole:

Breaker On / Off

This field indicates the breaker status. 

On

: Breaker status is normal

Off

: Breaker is switched off and you have to manually switch the 

breaker to 

On

.

Door Sensor Type

You can choose a door sensor type for the connected door sensor by 
checking the available checkboxes. 

Summary of Contents for PE4104G

Page 1: ...IP Control Box PE4104G User Manual www aten com...

Page 2: ...at his own expense FCC Caution Any changes or modifications not expressly approved by the party responsible for compliance could void the user s authority to operate this equipment This device complie...

Page 3: ...or consequential damages resulting from any defect in the software The manufacturer of this system is not responsible for any radio and or TV interference caused by unauthorized modifications to this...

Page 4: ...d in good order If anything is missing or was damaged in shipping contact your dealer Read this manual thoroughly and follow the installation and operation procedures carefully to prevent any damage t...

Page 5: ...s 4 Sensor Management 4 Cable Holders 4 Components 5 PE4104G Front View 5 PE4104G Rear View 6 Chapter 2 Hardware Setup Rack Mounting 7 Desktop Mount 7 Using the Rack Mount Ears 7 Installation 9 Securi...

Page 6: ...m Log 28 Notification Settings 29 Setup 31 Device Configuration 31 General 31 Service Ports 32 IPv4 Configuration 33 Event Notification 34 Date Time 37 Finishing Up 38 Security 39 Working Mode 40 TLS...

Page 7: ...7 Read Environmental Value 59 Close Telnet Session 60 Reboot PDU Device 61 Reset All PDU Config to Default Value 61 Appendix Safety Instructions 63 General 63 Rack Mounting 65 Technical Support 66 Int...

Page 8: ...provides step by step instructions for setting up your installation and explains some basic operation procedures Chapter 3 Basic Operation and First Time Setup explains the procedures that the Admini...

Page 9: ...ndicates keys you should press For example Enter means to press the Enter key If keys need to be chorded they appear together in the same bracket with a plus sign between them Ctrl Alt 1 Numbered list...

Page 10: ...PE4104G User Manual x This Page Intentionally Left Blank...

Page 11: ...support for eco DC software it provides an easy method for managing multiple devices offering an intuitive and user friendly Graphical User Interface that allows you to configure a PDU device reboot t...

Page 12: ...HTTPS SSL SMTP ARP NTP DNS SNMP V1 V2 V3 auto sense Ping Telnet Modbus Over TCP IP Works with web based eco DC software Operation Local and Remote power outlet control On Off Power Cycle by individua...

Page 13: ...tion For cold booting of attached computers the computer s BIOS must support wake on LAN or System after AC Back For Safe Shutdown The computer must be running Windows Windows 2000 or higher or Linux...

Page 14: ...agement Sensors can be managed via the PE4104G s built in graphical user interface GUI or with the eco DC software that can be downloaded from the ATEN website Cable Holders Cable holders are optional...

Page 15: ...lights orange when a sensor is connected to the sensor port 4 Door Sensor Dry Contact Port The external door sensor plug into this Door Sensor Dry Contact port 5 Power Control Buttons LED Each Power...

Page 16: ...Connects to a suitable grounding object 2 Power Outlet Sockets Electrical appliances plug in here 3 Circuit Breaker Protects the PDU from damage caused by excess current from an overload or short cir...

Page 17: ...ly support its weight plug the weight of its attached cables Using the Rack Mount Ears 1 Decide where you would rack mount the unit and choose the place you would attach the rack mount ear Position 1...

Page 18: ...n and stabilize the mounting ear using M3 Phillips Hex Screws 3 Align the unit and the mounting ear to the rack and stabilize the unit using rack screws Let the buttons stabilize in the button holes a...

Page 19: ...ct connect its power cable to any available outlet on the unit Optionally use ATEN Lok U Plug cable holders to secure them See Securing the Cable page 10 3 Connect an internet enabled LAN cable into t...

Page 20: ...l power outlets as shown below Note Lok U Plug Cable Holders and their Installation Tools are optional and sold separately See Cable Holders page 4 Note Lok U Plug Cable Holders and their Installation...

Page 21: ...supported Internet browser from any platform See First Time Setup page 12 and the following sections in this chapter for full details eco DC The eco DC Energy Management Software eco DC provides you...

Page 22: ...his is the first time you are logging in use the default Username administrator and the default Password password For security purposes we recommend changing them to something unique see Changing the...

Page 23: ...trator Login To change the default Administrator username and password do the following 1 Click the User tab The Accounts page has a detailed list of users with more information about them in the larg...

Page 24: ...ual 14 Moving On After setting up the network and changing the default Administrator username and password you can proceed to other administration activities including adding users This is covered in...

Page 25: ...PE4104G do the following 1 Open your browser and specify the IP address of the PE4104G you want to access in the browser s URL location bar Note You can get the IP address from the PE4104G administra...

Page 26: ...and Password set by the administrator and select your language Options are English default Traditional Chinese Simplified Chinese Japanese German Italian Spanish French Russian Korean Portuguese 4 Th...

Page 27: ...in the tab bar are determined by the user s type and the authorization options that were selected when the user s account was created 2 Menu Bar The menu bar contains operational sub categories that...

Page 28: ...PE4104G User Manual 18 6 Interactive Display Panel This is your main work area The screens that appear reflect your menu choices and Sidebar node selection No Item Description...

Page 29: ...the main panel PDU Status The PE4104G supports PDU device level monitoring The PDU Status section allows you to set up a power management configuration for the PDU device as a whole Breaker On Off Thi...

Page 30: ...n threshold settings for Temperature Humidity and Differential Pressure Note Sensors are optional accessories Check with your dealer for information about eco DC software Outlet Status The PE4104G sup...

Page 31: ...e Power ON Delay setting to set the amount of time the eco PDU waits before powering on an outlet See Power ON Delay in the table on the next page Buzzer Setting Checking the Enable Buzzer Alarm box s...

Page 32: ...t turns on the power to the outlet You must check the Enable Power On Time Schedule Setting box for this setting to take effect See Power On Time Schedule Settings page 21 for details Note The default...

Page 33: ...AC Back This is a Safe Shutdown and Restart option If this is selected when an Outlet is turned Off the eco PDU first sends a message to the computer telling it to prepare for a shutdown it then wait...

Page 34: ...ent to test the network device Wait time before first ping Enter the number of seconds of waiting time to ping the device after the first ping was sent to test the network device Consecutive failed pi...

Page 35: ...is a pre installed administrator account It can be used to set up the device and to begin creating users The Username for this account is administrator the password is password For security purposes w...

Page 36: ...er do the following 1 Select the Enable or Disable in the Management drop down menu 2 Key in a name and password in the Name and Password fields 3 Set the outlet by outlet permissions of the user in t...

Page 37: ...ssword From 1 to 16 characters are allowed depending on the Account Policy settings See Account Policy page 40 Outlet This field allows you to set the outlet by outlet permissions of the user Click on...

Page 38: ...e entry box to the right of the Refresh button lets you set the number of events to display per page Simply key in the number of your choice The top right of the main panel shows the total number of p...

Page 39: ...first open the page only the main category items appear Main category item rows have a gray background Sub category items are nested under the main category headings Click the arrow in front of the m...

Page 40: ...events you want When you have finished making your setting choices click Save When a specified log event occurs notification of that event will be sent to the selected component Reset Digital Output I...

Page 41: ...wing sections General Item Meaning PDU Name This field lets you give the device a unique name Simply delete whatever is in the text box and key in the name of your choice Click Save located at the bot...

Page 42: ...be found Select whether to allow only secure browser logins as show below An explanation of the fields is given in the table below Note 1 Valid entries for all of the Service Ports are from 1 65535 2...

Page 43: ...the Set IP address manually radio button and fill in the IP address with values appropriate for your network For automatic DNS Server address assignment select the Obtain DNS Server address automatica...

Page 44: ...Trap Receivers and Syslog Server Each section is described below SMTP Server To have the PE4104G email reports from the SMTP server to you do the following 1 Enable the Enable report from the followin...

Page 45: ...NMP Trap Receivers Up to four SNMP management stations can be specified If you want to use SNMP trap notifications do the following 1 Check Enable SNMP Trap 2 Select which version of SNMP you want to...

Page 46: ...SNMP version 5 Key in the auth privacy password s that correspond to each of the stations Syslog Server To record all the events that take place on eco PDU devices and write them to the PE4104G s Sys...

Page 47: ...it is at If your country or region employs Daylight Saving Time Summer Time check the corresponding checkbox Manual Input Use this section to specify the PE4104G s date and time manually Click the ca...

Page 48: ...stment checkbox 2 Drop down the time server list to select your preferred time server or Check the Preferred custom server IP checkbox and key in the IP address of the time server of your choice 3 If...

Page 49: ...Chapter 4 Browser Operation 39 Security The Security page controls access to the PE4104G device...

Page 50: ...tocol TLS Support If TLS Support is checked the PDU is accessible on older computers or older web browsers that support TLS1 0 or TLS1 1 data encryptioin IPInstaller Setting If Disable is checked the...

Page 51: ...addresses within the filter range are allowed access all other addresses are denied access Item Description Minimum Username Length Sets the minimum number of characters required for a username Accept...

Page 52: ...clude button is checked all the addresses within the filter range are denied access all other addresses are allowed access Adding Filters To add an IP filter do the following 1 Click Add A dialog box...

Page 53: ...Repeat these steps for any additional MAC addresses you want to filter IP Filter MAC Filter Conflict If there is a conflict between an IP filter and a MAC filter for example where a computer s IP addr...

Page 54: ...Preferred server is 1812 the default port number for the Alternate server is 1645 Note Make sure that the port numbers you specify here match the port numbers used by the RADIUS servers 3 In the Timeo...

Page 55: ...cate section allows you to use your own private encryption key and signed certificate rather than the default ATEN certificate There are two methods for establishing your private certificate generatin...

Page 56: ...ht of Certificate browse to where your certificate file is located and select it 3 Click Upload to complete the procedure Note 1 Clicking Restore Default returns the device to using the default ATEN c...

Page 57: ...e to a convenient location on your computer Item Description Check Main Firmware Version If you enable Check Main Firmware Version the eco PDU s current firmware level is compared with that of the upg...

Page 58: ...upgrade file is installed without checking what its level is Once the upgrade completes successfully the switch resets itself 4 Log in again and check the firmware version to be sure it is the new one...

Page 59: ...t lists the PE4104G only Backup To backup the device s settings do the following 1 In the Password field key in a password for the file Note Entering a password is optional If you do enter a password...

Page 60: ...no need to return it to its original name 2 In the Password field key in the same password that you used to save the file Note If you did not set a password when you created the backup file you can o...

Page 61: ...can help you as you work your way through the text based commands used to control the eco PDU that are discussed in this guide Telnet is available on all eco PDUs installed with the latest firmware Y...

Page 62: ...the login prompt enter Username teladmin and Password telpwd Note The Telnet username and password can be configured on the User tab of the PE4104G s web GUI 5 When the Telnet session is established...

Page 63: ...s to view and configure the PE4104G are provide in the following sections You can reference information provided in the user manual for the functions as you use the commands Verification After sending...

Page 64: ...let Status commands The following table lists the available Read Outlet Status commands Note 1 Each command string can be separated with a space 2 The Option command string can be skipped and format w...

Page 65: ...time delay set for the outlet type the following sw o01 delay on Enter 3 For example if you want to reboot outlet 03 type the following sw o03 reboot Enter The following tables show the possible valu...

Page 66: ...string can be skipped and delay will be used by default Command Outlet Option Control Enter Description sw oXX imme delay on Enter Switch outlet XX on with option imme or delay XX Outlet number 01 04...

Page 67: ...t of bank 02 with a format return string type the following read meter bnk o02 pd format Enter 3 For example if you want to read the voltage frequency measurement of the PDU with a simple return strin...

Page 68: ...surement and the selected power outlet format Return format string of the selected measurement and the selected power outlet Com mand Target Outlet Measurement Option Enter Description read meter dev...

Page 69: ...ormat return sting type the following read sensor o01 format Enter The following tables show the possible values for the Read Environmental Value commands Command Description read sensor Read environm...

Page 70: ...ws Command Enter 1 For example if you want to disconnect the telnet session type the following quit Enter The following table shows the value for the Close Telnet Session command The following table l...

Page 71: ...reset the PE4104G to the default factory settings The formula for Reset All PDU Config to Default Value commands is as follows Command Enter 1 For example if you want to reset the PE4104G type the fol...

Page 72: ...PE4104G User Manual 62 This Page Intentionally Left Blank...

Page 73: ...ation has been provided Never spill liquid of any kind on the device Unplug the device from the wall outlet before cleaning Do not use liquid or aerosol cleaners Use a damp cloth for cleaning The devi...

Page 74: ...ire or electrical shock Do not attempt to service the device yourself Refer all servicing to qualified service personnel If the following conditions occur unplug the device from the wall outlet and br...

Page 75: ...nd stable before extending a device from the rack Do not overload the AC supply branch circuit that provides power to the rack The total rack load should not exceed 80 percent of the branch circuit ra...

Page 76: ...Product model number serial number and date of purchase Your computer configuration including operating system revision level expansion cards and software Any error messages displayed at the time the...

Page 77: ...ess See Notification Settings page 46 Method 1 For computers running Windows an IP address can be determined and or assigned with the IP Installer utility The utility can be obtained from the Download...

Page 78: ...d the program Method 2 1 Set your computer s IP address to 192 168 0 XXX Where XXX represents any number or numbers except 60 192 168 0 60 is the default address of the eco PDU 2 Specify the device s...

Page 79: ...RJ11 Door Sensor 1 x Phoenix Connector 12V D1 D1 12V G Electrical Nominal Input Voltage 100 240 VAC Maximum Input Current 10A Max Input Frequency 50 60Hz Input Connection IEC C14 Input Power 2400VA Ma...

Page 80: ...0 X 11 50 X 20 00 cm 1 73 x 4 53 x 7 87 in Weight 0 90 kg 1 98 lb Power Cord Length 3 m Environmental Temperature Operating Storage 0 50 C 20 60 C Humidity Operating Storage 0 80 C RH Non Condensing C...

Page 81: ...you can clear the login information with the following procedure 1 Power off the PE4104G and remove its housing 2 Short the jumper labeled J4 PIN1 and PIN2 3 Power on the PE4104G 4 When the 2 digit 7...

Page 82: ...provide a repair service without charge during the Warranty Period If a product is detective ATEN will at its discretion have the option to 1 repair said product with new or repaired components or 2...

Reviews: