


ASUS Z8NH-D12 Series
2-5
2.2
Motherboard overview
Before you install the motherboard, study the configuration of your chassis to
ensure that the motherboard fits into it.
To optimize the motherboard features, we highly recommend that you install it in an
SSI EEB 1.1 compliant chassis.
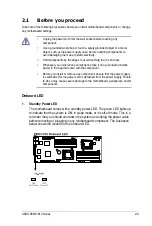
2.2.1
Placement direction
When installing the motherboard, ensure that you place it into the chassis in the
correct orientation. The edge with external ports goes to the rear part of the chassis
as indicated in the image below.
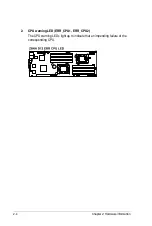
2.2.2
Screw holes
Place eight (8) screws into the holes indicated by circles to secure the motherboard
to the chassis.
DO NOT overtighten the screws! Doing so can damage the motherboard.
Ensure to unplug the chassis power cord before installing or removing the
motherboard. Failure to do so can cause you physical injury and damage
motherboard components!
Place this side towards
the rear of the chassis
Summary of Contents for Z8NH-D12
Page 1: ...Motherboard Z8NH D12 Series Z8NH D12 Z8PH D12 IFB Z8PH D12 SE QDR ...
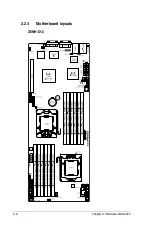
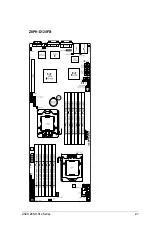
Page 24: ...2 6 Chapter 2 Hardware information 2 2 4 Motherboard layouts Z8NH D12 ...
Page 25: ...ASUS Z8NH D12 Series 2 7 Z8PH D12 IFB ...
Page 26: ...2 8 Chapter 2 Hardware information Z8PH D12 SE QDR ...
Page 56: ...2 38 Chapter 2 Hardware information ...
Page 100: ...4 40 Chapter 4 BIOS setup ...
Page 167: ...ASUS Z8NH D12 Series 6 33 8 Click your preferred options and click Finish to exit the wizard ...
Page 175: ...ASUS Z8NH D12 Series A 3 A 1 Z8NH D12 block diagram ...
Page 176: ...A 4 Appendix A Reference information A 2 Z8PH D12 IFB block diagram ...
Page 177: ...ASUS Z8NH D12 Series A 5 A 3 Z8PH D12 SE QDR block diagram ...