2-18
Installing Asanté MacCon Cards
Installing a MacCon3 IIsi and a Radius Pivot IIsi
To install a MacCon3 IIsi card and a Radius Pivot IIsi card, perform the
first three steps on page 2-17, then perform the steps below.
Caution
Handle the Asanté cards and the video cards carefully so they remain
plugged together. Be careful not to bend or twist the cards, especially
when they are plugged together at right angles to each other.
1
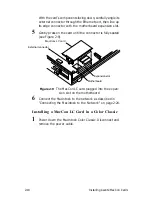
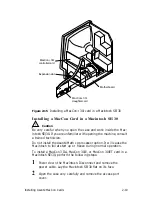
Remove the AUI part of the Asanté daughter card by re-
moving the two screws beneath the AUI latch and gently re-
moving the AUI part (see Figure 2-13).
2
Replace this part with the Radius video DB-15 cable, using
two screws to attach the cable.
∆
Note: Do not connect an AUI cable to this port. This is
now a video connector. Connecting a thick cable to this
port, renders the video card unusable.
3
Plug the assembled Asanté daughter card into the rear of
the chassis.
4
Since the two cards cannot use the same slot address, you
need to change the slot address for the Asanté card by set-
ting the JP1 and JP2 jumpers on the Asanté controller
card. Refer to the instructions on page 2-14.
5
Plug the Radius video card into the expansion slot on the
motherboard.
6
Attach the MacCon3 IIsi controller card (at a right angle to
the video card) to the Radius pass-through PDS slot.
7
Attach the Radius video ribbon cable to the Radius card.
8
Connect the MacCon3 IIsi ribbon cable from the daughter
card to the controller card.
Caution
Make sure the white dot on the ribbon cable aligns with the
white dot on the connector. See the revised Release Note
for details.
9
Connect the Macintosh to the network as described on
page 2-24 in “Connecting the Macintosh to the network.”
!
!

