


E-29
E-28
English
settings menu
The Settings menus allow you to configure
all aspects of your Solo. The next few
pages will go through the menu items and
explain their function. The Settings menus
may look daunting if you are new to
setting up home cinema, but the majority
of them need only be configured once
when you first install the system.
The best way to view the Settings
menus is on your display device (TV or
projector), using the on-screen display
(OSD) capability of the Solo. This is highly
recommended when setting up the Solo
movie. To view the OSD for the system
setup, connect the video output to your
display device. However, setting up the
Solo music may be performed using the
Solo front panel display only, should an
external display device is not available. The
diagrams in this section will aid you with
navigating through the settings menu and
all the available options
Entering the settings menu
The SETTINGS icon is shown on the screen
when the Solo is first switched
on.
If the main menu is not
currently displayed, press
on the remote control to display it.
Note that during the playback of
music, video or JPEG files, further button
presses may be required to exit the folder
structure.
With the
SETTINGS
icon highlighted,
press
O
to enter the Settings menu
Navigating the menus
The Solo menus can be navigated by using
the cursor (arrow) keys on the remote
control.
1. Use the
'
and
,
keys to navigate
up and down the main headings in
the left-hand panel.
2. With the main section you require
highlighted, use the
E
key to enter
the middle column.
3. Use the
'
and
,
keys to navigate
up and down the options in the
middle column. Some options may
be greyed out because they are not
currently selectable.
4. Pressing
>
selects a setting: use the
'
and
,
keys to change the
setting.
5. Press
O
to confirm the setting. Go
back to step 4 to adjust any other
settings in the current section.
6. Press
<
or
RTN
to return to the
previous screen if you want to select
another section to adjust.
Press the
button to return to the home
screen at any time.
Display
With the
SETTINGS
icon highlighted on
your display, press
O
to show the ‘Display’
options.
Press
E
to move to the options in the
second column.
TV Aspect Ratio
– Set the aspect ratio
(shape) of your display. Press
E
to move to
the options in the third column.
<
16:9 Normal:
Use with widescreen
TVs. 4:3 material is zoomed to fit the
wide screen.
<
16:9 Full:
Use with widescreen TVs.
4:3 material is displayed in its original
aspect ratio, with vertical black bars at
the sides.
<
4:3 Pan&Scan:
Use with 4:3 non-
widescreen TVs. 16:9 widescreen
content is displayed with the left- and
right-hand sides of the image cropped
to fit the screen (no black bars). The
aspect ratio is maintained (the image
is not stretched).
<
4:3 Letterbox:
Use with 4:3 non-
widescreen TVs. 16:9 widescreen
content is displayed with black bars at
the top and bottom.
Resolution
– Set the video resolution of
the
HDMI
output (applies to the internal
disc player only):
<
Auto:
Sets the TV’s preferred
resolution.
<
4K2K:
Ultra HD video.
<
1080p:
Full HD progressive video.
<
1080i:
Interlaced HD video.
<
720p:
Progressive HD video.
<
480p/576p:
480 lines (NTSC) or 576
lines (PAL) progressive video
<
480i/576i:
480 lines (NTSC) or 576
lines (PAL) Standard Definition
interlaced video.
TV System
– Set the video signal format. If
the colour or picture quality of analogue
video appears incorrect, change this
setting. It should not need to be adjusted
in normal use. You can select NTSC (the
USA and Canada video standard), PAL
(the Europe, Australia and China video
standard) or AUTO which will output the
frame rate required by the TV.
HDMI Color Space
– ‘Colour Space’ refers
to the number of individual colors that
can be displayed on the screen. If you
know the color space capability for
the connected TV, you can match it
by selecting one of these options. We
recommend you select ‘Auto’.
HDMI Deep Color
– sets the level of Deep
Colour processing applied to the HDMI
video output. You can select ‘Auto’ or ‘Off’.
If this option is set to Auto and your TV
supports Deep Color, the screen displays
colours at 30-, 36- or 48-bit accuracy
(compared to the 24-bit accuracy of
standard colour).
Check the documentation that came with
your TV to see if your TV supports Deep
Colour. All system HDMI interconnect
cables must be Deep Colour compatible in
order to use Deep Colour signals.
HDMI 1080p 24Hz
– You can select ‘Auto’ or
‘Off’. Movies are recorded on film at a rate
of 24 pictures (frames) per second. Many
of the movies on Blu-ray Discs are placed
on the discs at this frame rate. If your TV
supports 24 frames per second, but you
would prefer to view the video at a higher
frame rate, you should turn off HDMI
1080p 24Hz.
NOTE
<
The connected equipment (AV
receiver, TV/projector) must be
1080/24p compatible
<
The output resolution must be set to
1080p
or
HDMI Auto
HDMI 3D
– To turn the 3D feature (if
available) on or off. You can select ‘Auto’
or ‘Off’
Audio
Audio DRC
– Selects the Audio Dynamic
Range Control mode to ‘Off’, ‘On’. or ‘Auto’
Dynamic Range is the range between the
loudest sounds and the quietest ones. If
set to ‘On’ you can listen to a movie at a
lower volume without losing sound clarity.
<
Off
– No dynamic range compression
<
On
– Dynamic range compression
<
Auto
– DRC is selected by the source
material
Speaker Setting
– sets the number of
speakers and the level, distance and size.
You can select:
<
2 Channels
–
L
(Left),
R
(Right)
<
3 Channels
–
L
(Left),
C
(Centre),
R
(Right)
<
4 Channels
–
L
(Left),
R
(Right),
LS
(Left Surround),
RS
(Right Surround)
<
5 Channels
–
L
(Left),
R
(Right),
C
Centre),
LS
(Left Surround),
RS
(Right
Surround)
Please refer to the “speakers” on page E-15
for speaker naming and placement.
For each of the speaker configuration you
can set the following:
<
Subwoofer presence (
On
or
Off
). If
the subwoofer presence is set to
On
,
then the following subwoofer settings
can be adjusted: level, distance and
crossover
<
Size - Large (capable of full frequence
range reproduction) or Small (not
capable of full frequency range
reproduction at the low frequency
end). Note that most of the home
cinema speakers are small.
<
Level - calibration settings for the
test noise signal level through the
loudspeakers and measured at the
listening position
<
Distance - calibration settings for the
distances between the loudspeakers
and the listening position
<
Crossover - set the frequency at which
the Solo starts to redirect bass signals
to the subwoofer
Prologic II
Dolby Pro Logic II decoding is designed to
produce five-channel output from two-
channel source material.
There are three different options available
for this setting:
Off
,
Movie
or
Music
. The
Movie
and
Music
modes are intended
for use as their names suggest. Due to
the different recording methods used for
movies and music it is recommended that
the correct decoding mode for your source
material is used to obtain best results.
<
Movie mode:
This mode provide a
surround sound effect from a stereo
input.
<
Music mode:
This mode is similar
to the movie mode, but with less
emphasis on the surround channels,
in order to preserve the original stereo
image.
SACD Priority
– Selects the SACD track
used. (Solo movie only). You can select:
<
Multi-ch
– Multi-channel track
<
2-ch
– Stereo track
Subwoofer
– Specify whether or not a
subwoofer is connected to the unit. If the
subwoofer presence is set to
On
, then
the following subwoofer settings can be
adjusted:
<
Level - calibration settings for the
test noise signal level through the
loudspeakers and measured at the
listening position
<
Crossover - set the frequency at which
the Solo starts to redirect bass signals
to the subwoofer
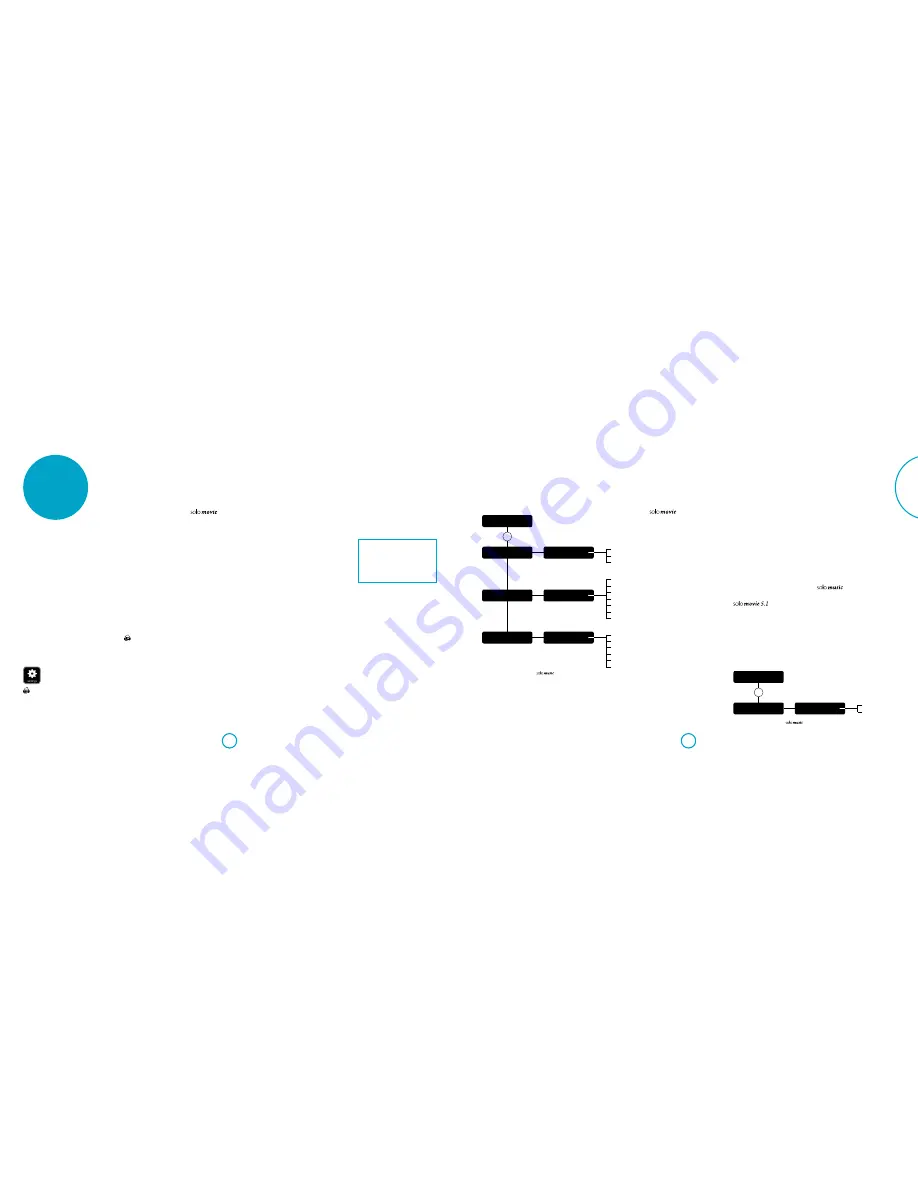
Settings Menu
Display
Display
TV System
TV System
[select option]
B C
B C
B
C
B
C
B
C
OK
E
D
Display
Resolution
Display
HDMI Colourspace
Resolution
[select option]
HDMI Colourspace
[select option]
E
D
E
D
Auto
YCbCr
YCbCr422
Full RGB
RGB
xvYCC
NTSC
PAL
Auto
Auto
4K2K
1080p
1080i
720p
480p/576p
480i/576i
Settings Menu
Audio
Audio
Subwoofer Out
Subwoofer Out
[select option]
B
C
OK
E
D
Off
On
Audio settings diagram applies to
Display settings diagram applies to
Summary of Contents for SOLO MUSIC
Page 2: ......
Page 3: ...Handbook Solo movie music English ...
Page 24: ...E 42 ...


