background image

1

En

gl

is

h

mo

vie 

5.1

so

l

o

Balance

Balance allows you to increase the volume of one 
channel (left or right) relative to the other. Altering 
the balance may help to restore the stereo image for 
an off-centre listening position.

Bass

This setting boosts the lower frequency components 
of your music. If your music is not ‘warm’ enough, 
increase this setting; if your music is ‘boomy’, 
decreasing this setting may help. See also ‘Bass 
correction’, below.

Treble

This setting changes the relative volume of the higher 
frequency components of your music. If you feel that 
percussion items in the music (for example) are being 
lost, increasing this setting may help. If high frequency 
sounds are too dominant, decrease this setting.

Bass Correction

This setting should normally be left on minimum. 
Bass correction may be used if Solo Movie 5.1 is 
connected to limited-frequency-range (‘Small’) 
speakers, that cannot reproduce very low frequency 
sounds. Increasing this setting progressively increases 
very low frequency bass. This control should not be 
used at high volumes as it may damage your speakers.

Sub Level *

This adjusts the level of the 

SUB

 (subwoofer, or LFE 

speaker) pre-amp output relative to the other five 
channels. Sub level does not apply to headphone 
output.

Decoding Mode *

This cycles through the high quality decoding methods 
available on Solo Movie 5.1
The decoding mode is remembered separately for 
each input source (including separate modes for DVD 
and CD discs). 
Dolby Pro Logic II decoding is designed to produce a 
5-channel analogue output from two-channel source 
material. Due to the different recording methods used 
for movies and music, it is recommended that the 
correct decoding mode for your source material is 
used to obtain the best results.
Note that Decoding Mode does not apply to 
headphone output.

Choose the decoding method for the stereo source 
selected from the options below:

Off

Stereo with crossover to subwoofer (if ‘Small’ 

front speakers are selected in the Set-up 

menu).

Dolby PLII 

Movie

Movie mode should be used with material 

marked as ‘Dolby Surround’ encoded.

Dolby PLII 

Music

Music mode is for use with any stereo music 

recording. As the optimum decoding method 

varies according to the recording, Music mode 

allows user adjustment of the processing 

characteristics; information about adjusting 

the Music mode by using ‘Dimension’, ‘Centre 

Width’ and ‘Panorama’ controls can be found 

below.

Dolby PLII 

Matrix

The Matrix mode is the same as the 

Music mode except that the directional 

enhancement logic is turned off. Matrix mode 

may be used to enhance mono signals by 

making them seem ‘larger’.

Dolby 

Pro Logic

Dolby Pro Logic decoding is performed. Dolby 

Pro Logic decoding is a legacy mode, and we 

recommend using one of the Dolby Pro Logic 

II decoding options instead.

Stereo 

Direct

By-passes all digital processing for analogue 

inputs. (This option is not suitable for use with 

‘Small’ speakers, as bass will not be redirected 

to a subwoofer.)

Dimension *

(This setting can be adjusted only when 

Dolby Pro 

Logic II Music

 mode is selected.)

‘Dimension’ allows you to adjust gradually the sound 
field either towards the front or towards the rear. 
If a recording is too spacious or strong from the 
surrounds, it can be adjusted ‘forward’ to get a better 
balance. Likewise, if a stereo recording is somewhat 
too ‘narrow’ sounding, it can be adjusted toward the 
rear to get a more enveloping, immersive result. We 
recommend ‘Dimension’ is set to 0 for normal use.

Centre Width *

(This setting can be adjusted only when 

Dolby Pro 

Logic II Music

 mode is selected.)

With Dolby Pro Logic II decoding, dominant centre 
signals come only from the centre speaker. If no 
centre speaker is present, the decoder splits the 

centre signal equally to the left and right speakers to 
create a ‘phantom’ centre image. The Centre Width 
control allows variable adjustment of the centre image 
so it may be heard only from the centre speaker; only 
from the left/right speakers as a phantom image; or 
from all three front speakers to varying degrees. We 
recommend ‘Centre Width’ is set to 3 for normal use.

Panorama Mode *

(This setting can be adjusted only when 

Dolby Pro 

Logic II Music

 mode is selected.)

Extends the front centre image to include the 
surround speakers for an exciting ‘wrap-around’ effect 
with side wall imaging.

Sleep Timer

This timer allows you to specify a listening period, 
after which Solo Movie 5.1 will switch automatically 
into stand-by. The period can be set in 5-minute 
intervals, up to 120 minutes (2 hours).

iPod Option

(This menu item is shown only when the selected 
source is 

AUX

.) 

The default setting is ‘Disabled’, but if you intend 
to use Arcam’s 

rDock

 or 

rLead

 accessories to 

integrate an iPod

®

 with your system, you should 

set the appropriate option. Connect the 

rDock

 or 

rLead

 to the rear of the unit (full details are given in 

the quick start guides supplied with the accessory 
units) and Solo Movie 5.1 will test for the presence 
of a connected iPod. Solo Movie 5.1 takes over the 
control and amplification of the source, with iPod text 
displayed on the front panel of the system unit. 
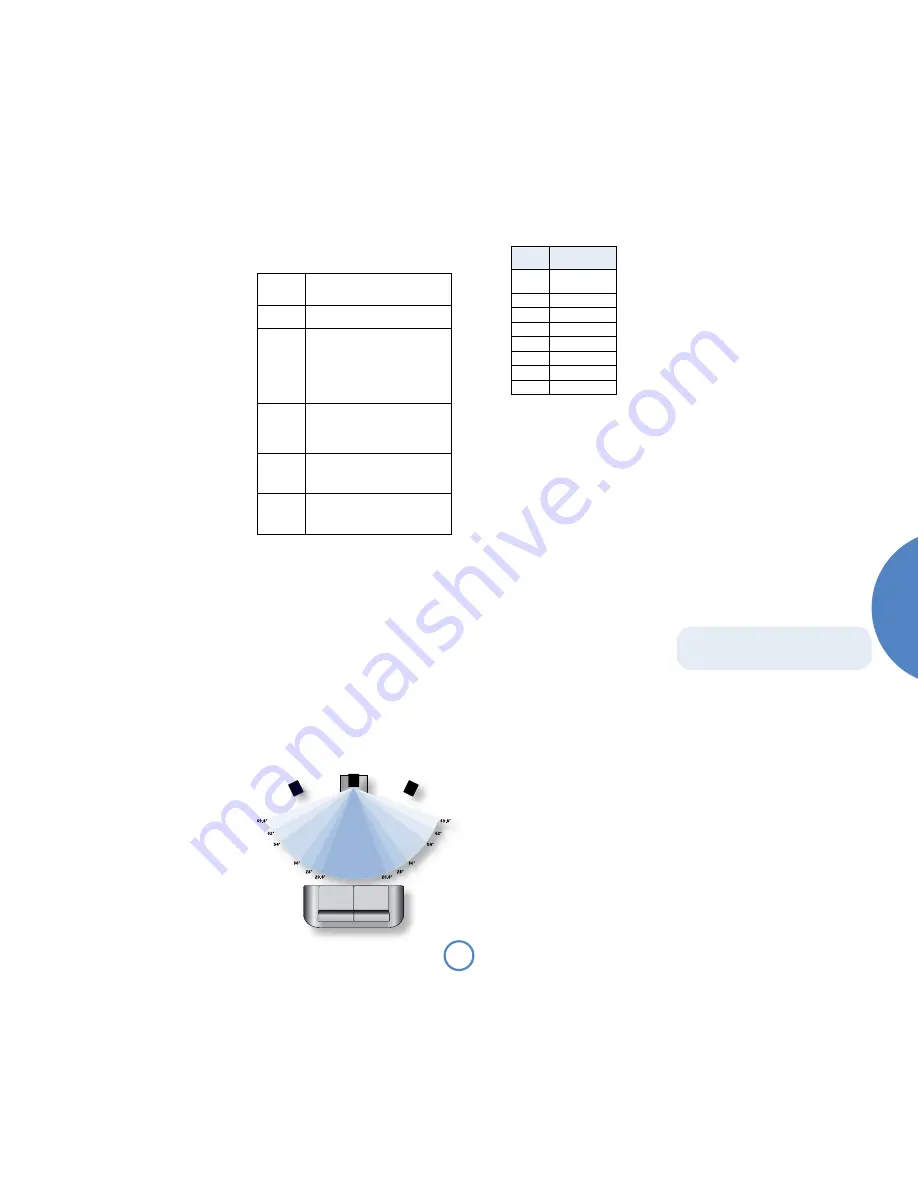
C

L

R

Display

Centre spreading 

effect

0

No centre 

spreading

1

20.8°

2

28°

3

36°

4

54°

5

62°

6

69.8°

Phantom centre

The ‘Centre Width’ setting for 

Dolby Pro Logic II Music Mode

 Items marked with an asterisk do not 

appear when a headphone jack is inserted as they 

do not apply to headphone listening.

FM Mode

(This menu item is shown only when the selected 
source is 

FM

.)

In some weak signal areas, it can be beneficial to force 
the FM tuner to mono output, as mono requires a 
much lower signal strength to produce acceptable 
results. If the signal strength in your area is good, leave 
this as ‘stereo’.

DAB Setup

(This menu item is shown only when the selected 
source is 

DAB

.)

There are two options under this menu item – ‘Scan’ 
and ‘Erase settings’. Selecting ‘Scan’ causes Solo Movie 
5.1 to search for new DAB stations. If any are found, 
then they will be added automatically to the list of 
available stations.
Scanning for new stations does not erase old stations 
that are no longer transmitted – over time, or if you 
change location, this may lead to you having a number 
of stations in your list that cannot actually be received. 
In this case, select ‘Erase settings’, then perform a new 
scan; when the scan is complete, only stations that are 
available currently in your area will be shown.

Set Preset

(This menu item is shown only when the selected 
source is 

DAB

FM

 or 

AM

.)

See the section ‘Setting station presets’ on page 25 for 
more information.

Summary of Contents for Solo movie 5.1

Page 1: ...Handbook Manuel Handbuch Handleiding Manual m o v i e 5 1 s o l o ...

Page 2: ...installed in a manner that makes disconnection possible 10 Power cord protection Power supply cords should be routed so that they are not likely to be walked on or pinched by items placed upon or against them paying particular attention to cords and plugs and the point where they exit from the appliance 11 Power lines Locate any outdoor antenna aerial away from power lines 12 Non use periods If th...

Page 3: ... page 2 of this handbook Many of these items are common sense precautions but for your own safety and to ensure that you do not damage the unit we recommend that you read them This product is a Class II or double insulated electrical appliance It has been designed in such a way that it does not require a safety connection to electrical earth U S ground Licensing information This product incorporat...

Page 4: ...ictures from iPod can be seamlessly integrated using Arcam s rDock or rLead Solo Movie 5 1 takes over the control and amplification with all iPod text appearing on the front panel display of the unit MENU SOURCE INFO OK POWER VOLUME TAPE Arcam has brought all its experience to bear to deliver stunning surround sound decoding and amplification from Dolby Digital DTS or Dolby Pro Logic II decoding m...

Page 5: ...n the front panel display for the current source OK Press the OK button to confirm a selection a DVD menu choice for example 1 Stop Eject Press the 1 button once to stop a disc playing this is a resume stop Pressing the button twice is a complete stop see page 21 Press and hold the button for more than one second to open the disc tray Headphone output This 3 5mm stereo jack socket is for attaching...

Page 6: ...of the power cable into the socket on the back of Solo Movie 5 1 making sure that it is pushed in firmly Plug the other end of the cable into your mains socket and if necessary switch the socket on Solo Movie 5 1 is fitted with a power switch on the rear panel above the power inlet make sure that this is switched on Solo Movie 5 1 is fitted with a transformer designed to accept the mains voltage i...

Page 7: ...d in firmly We advise you to use high quality interconnect cables wherever possible to ensure the best possible sound quality Connecting a record deck Solo Movie 5 1 is not fitted with a phono pre amplifier If you wish to connect a record deck to Solo Movie 5 1 then you will need an external pre amplifier Please contact your dealer for further information and recommendations on the best option for...

Page 8: ...5 1 check the table if the component inputs of your display device are not labelled Y Pb Pr SCART output The SCART connector is common on European A V equipment and provides a convenient connection method between Solo Movie 5 1 and display device carrying both video and stereo audio If you are using a SCART connection and you do not wish to listen to the audio through yourTV then it is best to mut...

Page 9: ...ble or the product casing Failure to ensure this can cause a short circuit and damage your Solo Movie 5 1 Do not over tighten the loudspeaker terminals or use a wrench pliers etc as this could damage the terminals and this would not be covered under warranty Speaker cables The speakers should be connected to the amplifier using good quality high purity copper cables Solid core cables or those with...

Page 10: ...nd room is always muted when Solo Movie 5 1 is switched on it must be unmuted explicitly when required This is to avoid unexpected output in the remote location The Zone 2 volume can be controlled from the main room by using the front panel controls or the remote control Front panel control 1 Press and hold the Info button to turn the Zone 2 Volume display on 2 Unmute or change the previous volume...

Page 11: ... ribbon aerial is supplied as an accessory to Solo Movie 5 1 FM AM equipped units for optimal FM radio reception a roof or loft mounted aerial is advised as this will give superior reception In some areas cable radio may be available or in an apartment building a distributed aerial system may be installed In either of these cases you should have sockets in your home marked FM orVHF do not use thos...

Page 12: ...VCRs and third party CD players See the CR100 Handbook for a list of these The CR100 is a learning remote so you can teach it almost any function from an old single device remote You can also program the CR100 to issue a sequence of commands macros from a single button press See the CR100 Handbook for details As the CR100 is a system remote controller some of the keys are not used with the Solo Mo...

Page 13: ...ode for the same manufacturer Full details are given in the CR100 Handbook Maintaining reliability Please keep in mind the following when using the remote control Make sure there are no obstacles between the remote control and the remote sensor on Solo Movie 5 1 The remote has a range of about seven meters If the remote sensor is obscured the remote control input jack on the rear panel is availabl...

Page 14: ...se various features to match your system Switch on the unit then use the adjacent diagram to navigate through the available settings Making adjustments In normal use the display shows information on the current volume the source being listened to and any source relevant information such as the playback time on a CD To adjust the listening settings press Menu on the front panel or Amp then Menu on ...

Page 15: ...e rear If a recording is too spacious or strong from the surrounds it can be adjusted forward to get a better balance Likewise if a stereo recording is somewhat too narrow sounding it can be adjusted toward the rear to get a more enveloping immersive result We recommend Dimension is set to 0 for normal use Centre Width This setting can be adjusted only when Dolby Pro Logic II Music mode is selecte...

Page 16: ... their potential values are described on the following pages The Display set up menu is a series of video test patterns with instructions that help you to optimize your display for Solo Movie 5 1 Remember that to use the CR100 remote control for advanced set up you first have to set it to AMP or DVD mode by pressing the Amp or DVD button The Set up menus To enter the Set up menus 1 Press and hold ...

Page 17: ...you have a wide screen 16 9 display device Material in 16 9 format is displayed so as to fill the screen If you have a 4 3 display device and you have set a preference for 4 3 Panscan it does not mean you will always see movies in this format since Panscan display must be supported by the disc being played HDMI colour space This setting controls the type of video the colour space given out over th...

Page 18: ...ur external audio decoder is able to process digital audio with a sample rate of up to 96kHz or if you are not using the digital audio outputs This is the maximum sample rate present on DVD video discs Max 48K Choose this option if your external audio decoder is unable to process digital audio with a sample rate of up to 96kHz This is the normal setting for this menu item Note that this setting is...

Page 19: ...ne 2 L R Send the Zone 2 audio signal to the surround amplifier Delay set up The delay set up menu page allows two different types of delay to be configured those due to speaker positioning and those due to video post processing Delay settings only apply to DVD sources Measurement Units Before entering any values choose the measurement units that you feel most comfortable with centimetres 0 01m or...

Page 20: ...the menu to prevent the next source selected being too loud Note that Test Noise is set to Off on leaving the Trims set up page Trims Trims for all the speakers can be set in steps of 1dB using the associated sliders These settings are useful if the speakers have different sensitivities and so have different volumes for the same input levels Subwoofer Sub with stereo trims Both the Subwoofer and t...

Page 21: ...e Search menu A jump can be performed using different specifiers jump to a particular time or to a specified chapter track on the disc Track Applies toVCDs only To jump to a specified track on aVCD enter the track number in the Track field then press OK Note that manyVCDs have only one track Closing the Search menu When displayed this menu screen can be closed again by pressing the SRCH button whi...

Page 22: ...r with the track time that remains to be played and volume setting 3 Large character display this shows the current track number and volume setting as a double height display CD DVD A playback commands summary 4 Play starts playback of a disc Stop for CDs press once to stop play For DVD A press once for a resume stop press again for a complete stop Pause press to pause disc playback Press again or...

Page 23: ...hat is currently selected Browser View Shows the number of tracks in a Program List or previews JPEG photographic images See page 28 for details of the range of discs supported by Solo Movie 5 1 Control window The following advanced functions can be accessed from here Filter You can use this to allow only certain types of file to be displayed audio photo or video View Program The track list now sh...

Page 24: ... a combined FM DAB digital radio receiver module in the USA and the Far East an AM FM receiver module is usually supplied In order to use either of these modules you must connect an aerial to the unit a suitable aerial is supplied as an accessory If your Solo Movie 5 1 is supplied with the AM FM module the AM aerial should be assembled and connected as described on page 11 Solo Movie 5 1 provides ...

Page 25: ...ally to the list of available stations when the scan is completed To select a DAB radio station press the B or C buttons on the remote control until the name of the station you want to listen to is displayed The station is tuned in automatically after a delay of about two seconds Setting station presets You can store your favourite radio station in one of the radio presets giving quick access to t...

Page 26: ...ase note that you must be in Amp DVD or Tun mode on the CR100 to stop or pause an alarm from the remote control To cancel snooze mode press the power button Sleep timer This timer allows you to specify a listening period after which Solo switches automatically into stand by The period can be set in 5 minute intervals up to 120 minutes 2 hours a count down timer is displayed on the front panel To s...

Page 27: ... 50Ω Audio data rate maximum 256kbits s MPEG layer II protection level 3 Number stored services maximum 128 FM receiver RF tuning range 87 5 108MHz Sensitivity typical 2µV Signal noise ratio at 200mV 58dB Distortion THD at 200mV 0 5 AM receiver where fitted RF tuning range 522 1611kHz Signal noise ratio at 200mV 40dB Distortion THD at 30 modulation 1 5 General Supply voltage 115V or 230V AC depend...

Page 28: ...or DVDs containing JPEG images Only files with the jpg or jpeg extension will be recognised names are not case sensitive Kodak picture discs are supported only the files in the JPEG directory will be shown on the screen Fuji picture discs are supported select the JPEG files in the clips menu Konica and QSS picture discs are not supported PC created disc compatibility If you record a disc using a p...

Page 29: ...for both parts and labour costs The warranty does not cover transportation costs at any time Claims under guarantee This equipment should be packed in the original packing and returned to the dealer from whom it was purchased or failing this directly to the Arcam distributor in the country of residence It should be sent carriage prepaid by a reputable carrier not by post No responsibility can be a...

Page 30: ...SH184E Issue 1 A R Cambridge Ltd Pembroke Avenue Waterbeach CAMBRIDGE CB25 9QR England ...

Reviews: