background image

User’s Manual 

24

y

 Network bandwidth limit

: Check the box to limit the network bandwidth and set the desired maximum 

bandwidth.

NOTES:  

y

  If you want to use the time synchronization, DVRNS and Email sending functions, the IP addresses 

of the time server, DVRNS server and the SMTP server must be allowed when you allow or block 
connection to the transmitter in the 

Allow List

 or 

Deny List

.

y

  Any connection to the transmitter from the IP address in 

Deny List 

will NOT be allowed.

4.4  Video 

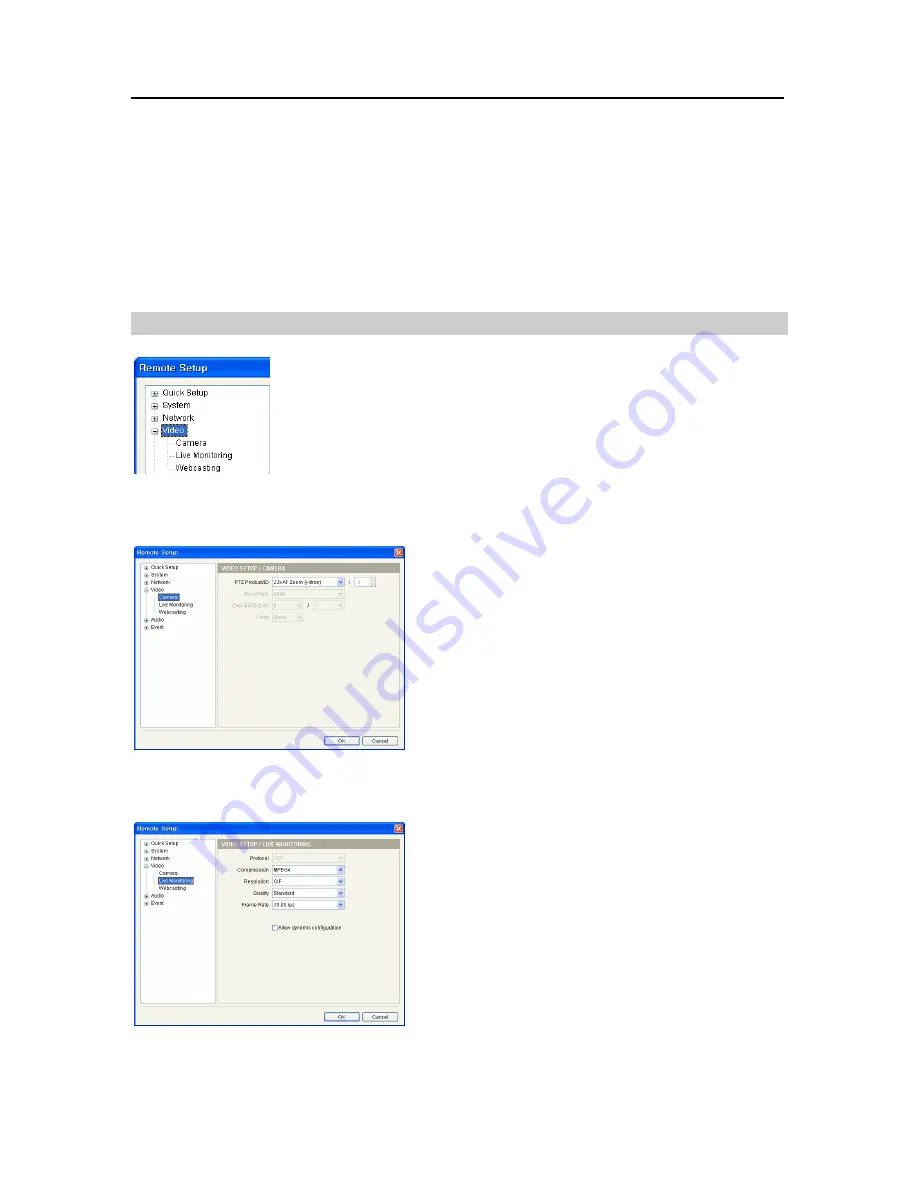
You can set camera features and image transfer parameters for both remote 
monitoring and webcasting. When you click the 

Video

 menu on the Remote 

Setup screen, the current Video settings are displayed on the right side of the 
screen. 

Camera 

y

 PTZ Product / ID

: Select a PTZ camera connected to 

the transmitter and assign an ID to the PTZ camera. 

y

 Baud Rate

,

Data Bit

,

 Stop Bit

,

Parity

: Set up baud 

rate, data bit, stop bit and parity by referring to the PTZ 
camera manufacturer’s instructions. 

NOTE:

 You will not be able to control a PTZ camera if it is 

not connected to the RS485 port properly.  See Chapter 2 – 
Installation; 2.3 Rear Panel Connectors, RS485 Port and 
the PTZ camera manufacturer’s manual for configuring the 
RS485 connection.

Live Monitoring 

Select the desired Compression, Resolution, Quality and 
Frame Rate for transferring images to a remote site. 

y

 Allow dynamic configuration

: Check the box to allow 

the image transfer settings to be changed dynamically 
based on the settings of the other device that is receiving 
images from the transmitter. 

NOTE:

 Simultaneous connections to the transmitter might 

cause the frame rate to decrease.

Summary of Contents for CTINT1000

Page 1: ......

Page 2: ......

Page 3: ...OF THE CANADIAN INTERFERENCE CAUSING EQUIPMENT REGULATIONS The information in this manual is believed to be accurate as of the date of publication IDIS Co Ltd is not responsible for any problems resulting from the use thereof The information contained herein is subject to change without notice Revisions or new editions to this publication may be issued to incorporate such changes WEEE Waste Electr...

Page 4: ...batteries according to the instructions 18 Tmra A manufacturer s maximum recommended ambient temperature Tmra for the equipment must be specified so that the customer and installer may determine a suitable maximum operating environment for the equipment 19 Elevated Operating Ambient Temperature If installed in a closed or multi unit rack assembly the operating ambient temperature of the rack envir...

Page 5: ...Basic Configuration 10 3 1 Lookup 11 Look Up Devices LAN 11 Manual Connect WAN 11 3 2 Setup 12 IP Address Setup 12 Video Setup 12 Camera Audio Setup 14 Remote Setup 15 Apply Setup File 15 Make Setup File 15 3 3 Test 16 Alarm In Out Test 16 3 4 Reset 16 Soft Reset 16 Factory Reset 17 3 5 Management 17 Upgrade 17 System Log 18 Chapter 4 Remote Setup 19 4 1 Quick Setup 19 4 2 System 20 General 20 Dat...

Page 6: ...25 4 5 Audio 25 Input Output 25 4 6 Event 26 Alarm In 26 Motion Detection 26 Video Loss 27 Video Blind 28 System Event 28 Event Action 29 Chapter 5 Web Monitoring 30 Appendix 33 LED Indicators 33 Troubleshooting 33 Connector Pin Outs 33 Map of Screens 34 Specifications 36 ...

Page 7: ...ing for monitoring and recording y M MPEG 4 and M JPEG compression y Four levels of video compression and various video compression resolutions y Two way audio communication y Pre and post event buffering and video stream buffering to enhance reliability of network recording y Remote monitoring via web browser or remote software y Automatic HTML code generation for webcasting on a user s website y...

Page 8: ...User s Manual 2 1 3 Typical Applications Remote Monitoring I Remote Monitoring II ...

Page 9: ...One Channel Video Transmitter 3 Remote Recording Webcasting ...

Page 10: ...User s Manual 4 Control Center ...

Page 11: ...tch will only be used on the rare occasions that you want to return all the settings to the original factory settings CAUTION When performing a Factory Reset you will lose any settings you have saved Disconnect the power adapter from the transmitter ĺ Poke a straightened paperclip into the factory reset switch hole ĺ Connect the power while holding the reset switch ĺ Release the switch when the Ne...

Page 12: ...d respectively of the transmitter y Alarm Output Connect an alarm out device to the NO Normally Open and C Common connectors NO is a relay output which sinks 0 5mA 125 VAC and 1A 30 VDC y GND Connect to the ground side of the alarm inputs y Alarm Input Connect alarm in devices Mechanical or electrical switches can be wired to the AI Alarm In and GND Ground connectors The maximum voltage should not...

Page 13: ...er Computer system requirements for installing the INIT program are y Operating System Microsoft Windows XP or Microsoft Windows Vista y CPU Intel Pentium IV Celeron 2 4GHz or faster y RAM 512 MB or more y VGA AGP Video RAM 8MB or more 1024x768 24bpp or higher CAUTION If an older version of INIT software is installed on your computer you should uninstall the older version first 1 Insert the instal...

Page 14: ...xt The progress bar shows the installation progress 8 After the software is installed set the language option by selecting either Select language when starting or Always start using the language below NOTES y To properly display the selected language your PC s operating system should be set to support the selected language y In order to change the language after selecting the Always start using th...

Page 15: ...One Channel Video Transmitter 9 9 Clicking Close completes the installation ...

Page 16: ... You will need the RASplus program for integrated remote management and monitoring of multiple transmitters Refer to the RASplus user s manual for installing and operating the program y Do not change the IP address of your computer manually while running the INIT program If you do the network connection between the transmitter and your computer will be cut off NOTES y The Multiselection option is ...

Page 17: ...reen Manual Connect WAN Select Manual Connect WAN in the Lookup menu Enter the IP address or name of the transmitter to find in the IP Address field and click the Connect button The transmitter information is displayed on the Main screen Selecting the Use DVRNS box allows you to enter the name registered on the DVRNS server instead of the IP address You must enter the DVRNS server address and port...

Page 18: ...he type of network configuration from Manual DHCP and ADSL with PPPoE Enter the proper settings for network connection Refer to Chapter 4 Remote Setup 4 3 Network IP Address for details y DNS Server Enter the IP address of the DNS server If you set up the DNS server the domain name can be used instead of the IP address of the server during the DVRNS server time server and SMTP server setup y Setup...

Page 19: ...uality Frame Rate You can set up the compression resolution quality and frame rate for transferring images to a remote site Clicking the Apply button after setting up the image transfer conditions will apply the settings and transfer video based on the preset conditions Clicking the Close button closes the setup screen y Network Bandwidth Test You can check if enough bandwidth is available to tran...

Page 20: ... test Otherwise the test might be interrupted Camera Audio Setup You can adjust image color control audio in out and control a PTZ camera Select a transmitter from the Main screen and select Camera Audio Setup from the Setup menu y Drawing Mode Setup Click to select the drawing mode for the monitoring screen of the setup screen Refer to the Video Setup section for details y Color Control Click the...

Page 21: ... from the Main screen and select Apply Setup File from the Setup menu y Include Network Setup You can select whether or not network settings IP address port number DVRNS will be included when the settings are applied y Select File Click the button and select the desired setup file to apply to other transmitters Clicking the OK button displays the next setup screen A list of selected transmitters i...

Page 22: ... click the Test icon on the Main screen The Test menu appears Alarm In Out Test y Alarm In Select to test whether or not the alarm in device is working properly Select the proper alarm in type Click the Start button and then trigger the connected alarm in device within five seconds The system displays whether or not the alarm in detection has succeeded y Alarm Out Select to test whether or not the...

Page 23: ...VRNS will be included when the factory reset is done A list of selected transmitters is displayed Clicking the Start button starts the factory reset on the listed transmitters The Status field displays the result as Success or Fail after completing the procedure and the reason for the failure is displayed in the Remarks field The transmitters restart after completing the factory reset 3 5 Manageme...

Page 24: ...ing upgraded the Network LED and Power LED flicker sequentially CAUTIONS y Do NOT alter the upgrade file or else the transmitter might not work properly y Do NOT disconnect the power while the transmitter is being upgraded Doing so might damage the transmitters System Log You can display the system log of a transmitter Select the transmitter and click System Log in the Management menu y From Click...

Page 25: ...for the remote setup Clicking a menu in the left of the Remote Setup screen displays the current settings for that menu on the right side of the screen Clicking submenus under each menu allows you to change the settings Clicking the OK button closes the Remote Setup screen and applies the changes 4 1 Quick Setup The Quick Setup allows you to change a transmitter s basic system network video and au...

Page 26: ...ter A setup screen appears allowing you to select the setup file You can select whether or not network settings IP address port number DVRNS will be included when the setup is applied í Export Setup Click to save the current transmitter settings as a dat file format A setup screen appears allowing you to name the setup file Date Time y Date Time Change the system date time date time format and tim...

Page 27: ...n Check the box to use the webcasting feature Refer to 4 4 Video Webcasting for details y Allow Anonymous PTZ Control Check the box to allow remote control of a PTZ camera on a website by using the webcasting feature NOTES y The User Group changes are permitted only to the users in the Administrator group y The authority levels that can be assigned are Upgrade The user can upgrade the software Set...

Page 28: ...ter is configured for a DHCP or ADSL network it is best to use the DVRNS function because the transmitter s IP address might change frequently Ask your Internet service provider for information about the IP Address of the DNS Server DVRNS Check the DVR Name Service box to use the DVR Name Service function y DVRNS Server Enter the IP address or domain name of the DVRNS server y Port Set up the port...

Page 29: ...n or else the transmitter cannot be connected with RASplus or WebGuard CAUTION When changing the port settings you must change the port settings on RASplus too Filtering Bandwidth y IP Filtering Check the box to use the IP filtering function You can allow or block connections to the transmitter by designating IP addresses í Allow List Check the box to add or remove IP addresses allowed to connect ...

Page 30: ... screen Camera y PTZ Product ID Select a PTZ camera connected to the transmitter and assign an ID to the PTZ camera y Baud Rate Data Bit Stop Bit Parity Set up baud rate data bit stop bit and parity by referring to the PTZ camera manufacturer s instructions NOTE You will not be able to control a PTZ camera if it is not connected to the RS485 port properly See Chapter 2 Installation 2 3 Rear Panel ...

Page 31: ...roup setup 4 5 Audio You can set up audio in and out When you click the Audio menu in the Remote Setup screen the current Audio settings are displayed on the right side of the screen Input Output y Audio In Check the box to enable audio in and select the proper audio in device You can also adjust the volume y Audio Out Check the box to enable audio out You can also adjust the volume NOTE The trans...

Page 32: ...le JPG when sending an Email í Remote Callback Select to send a message to remote sites and select the desired remote sites í Move PTZ to Select the desired preset number to move a PTZ camera to the previously saved preset location You must set up preset locations of PTZ cameras during 3 2 Setup Camera Audio Setup NOTE You must properly configure the settings related to each event action during th...

Page 33: ...otion detection event í Alarm Out Select to trigger an alarm output signal í Send Email Select to send an Email Selecting a camera in the Image Attachment field attaches the event detected image file JPG when sending an Email í Remote Callback Select to send a message to remote sites and select the desired remote sites í Move PTZ to Select the desired preset number to move a PTZ camera to the prev...

Page 34: ...taches the event detected image file JPG when sending an Email í Remote Callback Select to send a message to remote sites and select the desired remote sites í Move PTZ to Select the desired preset number to move a PTZ camera to the previously saved preset location You must set up preset locations of PTZ cameras during 3 2 Setup Camera Audio Setup NOTES y Video blind events might NOT be detected f...

Page 35: ...LS if the SMTP server requires SSL Secure Sockets Layer authentication í Authentication ID Password Enter the ID and password if the SMTP server requires user authentication í Sender Recipient Enter the sender s and recipients email address Up to 10 recipients can be added y Remote Callback Check the box to send a callback message to remote sites í Retry Select the number of times to try sending a...

Page 36: ...tom level button ĺ Set the setting of Reset custom settings to Medium high default or Medium Go to Tools then Internet Options and then the Advanced tab ĺ Check the Use TLS 1 0 box under the Security option y You do not need to enter the WebGuard port number if the WebGuard port number is set to 80 443 when entering https when running the WebGuard program by entering the IP address and port number...

Page 37: ...pability again enter netsh int tcp set global autotuninglevel normal after running the Command Prompt with elevated administrator permissions Restart your computer to apply the changes y When running the updated WebGuard for the first time Internet Explorer might occasionally load the information from the previous version In this case delete the temporary Internet files by selecting Tools ĺ Intern...

Page 38: ...nication Clicking the button disables audio communication í Aspect Ratio Select to change the image aspect ratio displayed on the screen and the option menu appears Selecting Fit to Screen displays images by fitting them to the screen size Selecting Original Ratio displays images by fitting them to the screen size while maintaining their original ratio Selecting Half Size x0 5 to Quadruple Size x4...

Page 39: ...ra lens settings y Check network connections on your PC and a transmitter Live Video Very Bright Check if a video termination resistance switch is set to ON downward Connection to the INIT program is not available because of wrong ID and password If you lost the administrator ID and password do a factory reset The factory reset returns all the settings including network settings to the original fa...

Page 40: ...User s Manual 34 RS485 Connector Master Unit Slave Unit ĺ To ĺ TX RX ĺ To ĺ TX RX Map of Screens INIT Program ...

Page 41: ...One Channel Video Transmitter 35 Remote Setup ...

Page 42: ...y out NO only 0 5mA 125 VAC 1A 30 VDC Network Connectivity 10 100 Mbps Ethernet Audio Input 1 line in or Microphone Audio Output 1 line out CONNECTORS Video Input BNC Audio In Out Stereo Alarm In Out Terminal block Ethernet Port RJ 45 RS 485 Serial Port Terminal block DC 12V Out Terminal block USB Port 1 on front panel 2 0 GENERAL Dimensions W x H x D 4 7 x 1 1 x 4 3 119mm x 29mm x 108mm Shipping ...

Reviews: