39
5. MENU SETUP
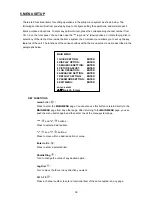
There are 9 functional items for setting operations in the setup menu system as shown below. The
following sections will instruct you step by step to configure setting the operations, and will state each
item’s purpose and options. To enter any particular item, press the corresponding channel number from
CH 1~9 on the front panel. You can also use the “
^
” (up) and “
v
” (down) buttons, or rotate the jog dial, to
select any of the items. Once inside the item’s system, the on-screen menu allows you to set up the key
features of the unit. The functions of the various buttons within the menu-setup mode are described in the
paragraphs below.
KEY FUNCTIONS
menu
button
:
Press to enter the
MAIN MENU
page. You can also use this button to return directly to the
MAIN MENU
page from any other page. After returning to the
MAIN MENU
page, you can
push the menu button again and then enter to exit the menu system page.
“
^
”
and
“v”
buttons
:
Press to select a desired item.
“<”
and
“>”
buttons
:
Press to move within a desired option or value.
Enter
button
:
Press to enter a selected item.
Shuttle Ring
:
Turn to change the value of any desired option.
Jog Dial
:
Turn to move the focus in any direction you want.
CH 1~16
:
Press a channel number to enter a functional item of the same number on any page.
MAIN MENU
1 QUICK SETTING:
ENTER
2 DISPLAY OPTION:
ENTER
3 SEQUENCE SETTING: ENTER
4 PICTURE ADJUST:
ENTER
5 LOG OPERATION:
ENTER
6 ADVANCED SETTING: ENTER
7 DEFAULT SETTING:
ENTER
8 PASSWORD SETTING: ENTER
9 EXIT MENU:
ENTER
enter: select
▲
/
▼
/jog/ch1~9: item
Summary of Contents for DVR-3016, DVR-3016D
Page 2: ......
Page 100: ...98 Figure 7 RMN040200255 V5 2 ...


