9
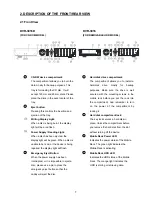
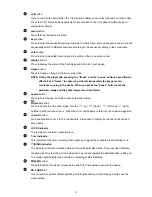
15
call
button:
If you connect to the call monitor, the "Call" button enables you to select channels on this monitor.
Press the "Call" button and any particular channel button on the front panel simultaneously to
display that channel.
16
menu
button:
Press this to enter the setup menu.
17
seq.
button:
Press to enter the sequential jumping mode, each multi-screen, and one sequence; the picture will
sequentially switch to different channels according to the sequencer setting in the setup menu.
18
enter
button:
Press to enter a selected item and save the setting in the menu setup mode.
19
display
button:
Press to display the status of the hard disks and SD card in your device.
20
freeze
button:
Press to freeze an image in the live or play mode.
NOTE: During the play mode, pressing the “freeze” and the “pause” buttons have different
effects. Push “freeze” to capture a particular image while the image record
continues running in the device. When you press the “pause” button, both the
particular image and the entire image record are halted.
21
search
button:
Press to enter the search mode to access recorded video.
22
(zoom)
button:
Press to double the size of an image. Use the "^" ( up ), "V" ( down ) , "<" ( left ) and ">" ( right )
buttons to shift your zoom focus . Press the zoom button again to return to the original image size.
23
channel
button:
All channel buttons from 1 to 16 are sited here. Press each to display its channel in the live and
play modes.
24
LOCK
Indicator
:
The red signal denotes an operation lock.
25
T-rec
Indicator:
This indicator of the timer recording mode lights up to signal the scheduled record setting is on.
26
(DISK)
Indicator:
The indicator shows the operation status of the unit’s hard-disk drives. The green light indicates
the hard-disk drive is storing or retrieving data. The red light signals the hard-disk drive is filling up.
The orange light indicates the hard-disk is retrieving at disk-full status.
27
POWER
button:
Press this
button for at least 3 seconds to switch off. Press again to activate the device.
28
SD
CARD
Slot
:
This is used for system software updating, archiving/accessing critical images, and to save the
whole setting.
Summary of Contents for DVR-3016, DVR-3016D
Page 2: ......
Page 100: ...98 Figure 7 RMN040200255 V5 2 ...


