


RMS Resource Management Suite
6
RMS - Administrator’s Guide
The RMS services will automatically detect if the RMS web application is configured for Integrated Windows
Authentication and apply the following behavior:
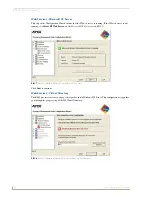
Administrative Web Pages:
In the RMS administrative web pages, the web application will auto detect the integrated windows
username and attempt to authenticate this user account to a user account in the RMS database. If
the username is defined in the RMS database, the user is automatically logged on and the user's
security permissions are applied to the user's session. If the integrated windows username is not
found in the RMS database, a login prompt will be provided to manually log on to the RMS
administrative pages.
If using Integrated Windows Authentication, the user's password in the RMS database need not be
synchronized with the actual domain account, this password will not be used in the authentication
process.
User Scheduling Web Pages:
In the RMS user scheduling web pages, the web application will auto detect the integrated windows
username and only allow appointment record modification to appointment records that the user
created. Attempting to access or modify an appointment created by another user is restricted.
The integrated Windows usernames need not be defined in the RMS database. The web application
will simply restrict access to appointments based on the appointment's organizer username.
Enabling Integrated Windows Authentication
1.
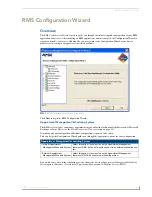
To enable Integrated Windows Authentication, after the RMS product installation and completion of the
RMS Configuration Wizard, open the IIS manager from
Control Panel > Administrative Tools >
Internet Information Services
. Expand the Web Sites and navigate to the
RMS
web application.
2.
Next, right-click on the
RMS
web application and select
Properties
.
3.
Select the
Directory Security
tab and click the
Edit
button under
Anonymous access and authentication
control
.
4.
Ensure the
Anonymous access
option is disabled and the
Integrated Windows authentication
option is
enabled.
5.
When done, press
OK
to save the configuration.
6.
Next, expand the RMS web application virtual directory and find the folder named "
dynamicResources
"
7.
Next, right-click on the "
dynamicResources
" folder and select
Properties
.
8.
Select the
Directory Security
tab and click the
Edit
button under
Anonymous access and authentication
control
.
9.
Ensure the
Anonymous access
option is enabled allowing anonymous access. Anonymous access is
needed on this folder to allow a room's touch panels to access and display dynamic images associated
with meetings. The touch panels are not authenticated in the Windows domain and require
unauthenticated access to this folder and its sub folders.
10.
When done, press
OK
to save the configuration.
11.
After making these changes, you will need to reset the IIS web application to ensure the new settings are
applied. Select the
Run
option form the Windows start menu and type
IISRESET
and click
OK
.
Summary of Contents for RMS
Page 24: ...RMS Resource Management Suite 12 RMS Administrator s Guide ...
Page 58: ...RMS Configuration Wizard 46 RMS Administrator s Guide ...
Page 72: ...RMS Administration 60 RMS Administrator s Guide ...
Page 78: ...RMS Hotlist 66 RMS Administrator s Guide ...
Page 170: ...Reporting Page 158 RMS Administrator s Guide ...
Page 182: ...Configuration Page 170 RMS Administrator s Guide ...
Page 186: ...Help Page 174 RMS Administrator s Guide ...
Page 188: ...Sitemap Page 176 RMS Administrator s Guide ...
Page 211: ...RMS Touch Panel Pages 199 RMS Administrator s Guide ...


