background image

60549

107

Section 10 Wiring Diagrams

Failure to install, maintain, and/or operate this machine according to the manufacturer's 
instructions may result in conditions which can produce bodily injury and/or property damage.

W030

WARNING

© Copyright, Alliance Laundry Systems LLC – DO NOT COPY or TRANSMIT

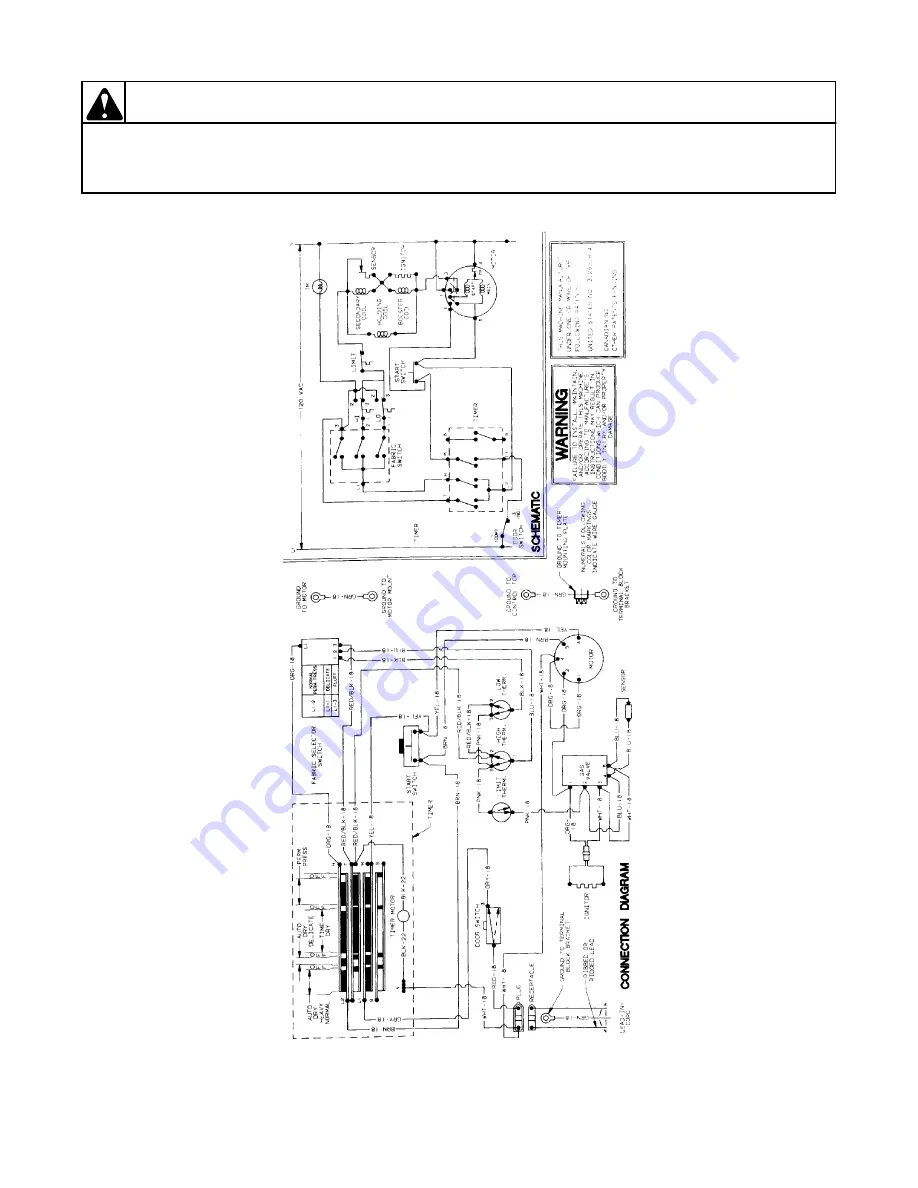
MODELS NG4519 AND NG4319

Through Serial No. S6242593XD

Summary of Contents for AE4113

Page 1: ...www comlaundry com Part No 60549R3 April 2002 Service Home Laundry Dryers AE AG NE and NG Models Refer to Page 6 for Model Numbers ...

Page 2: ...inal Block Bracket to Control Housing Electric Models Only 18 18 Power Cord to Terminal Block Bracket and from Terminal Block Bracket to Control Housing Wall Receptacle Polarity Check Gas Models Only 19 19 From Terminal Block Bracket to Timer Mounting Bracket to Dryer Cabinet Top Timer Mounting Bracket to Graphic Panel Mechanical Timer Model Dryers Only 20 20 From Terminal Block Bracket to Dryer C...

Page 3: ...rying Times 86 85 Symptom oP appears in Time display 87 86 Symptom SH appears in time Display 88 87 Control Replacement 89 Section 9 Internal Wiring of Dryer Motor Switch 91 Section 10 Wiring Diagrams 93 Models AG9139 NG8639 NG8539 NG8339 AG7139 NG6539 and NG6339 94 Models AE9133 NE8633 NE8533 NE8333 AE7133 NE6533 and NE6333 Through Serial No S6271975XG 95 Starting Serial No S6271976XG 96 Models N...

Page 4: ...TANT and NOTE are followed by specific instructions IMPORTANT The word IMPORTANT is used to inform the reader of specific procedures where minor machine damage will occur if the procedure is not followed NOTE The word NOTE is used to communicate installation operation maintenance or servicing information that is important but not hazard related In the interest of safety some general precautions re...

Page 5: ...ms also recommends contacting an authorized technician and using authorized factory parts To reduce the risk of electric shock fire explosion serious injury or death Disconnect electric power to the dryer s before servicing Close gas shut off valve to gas dryer s before servicing Never start the dryer s with any guards panels removed Whenever ground wires are removed during servicing these ground ...

Page 6: ...e from whom the machine was purchased or contact Alliance Laundry Systems at 920 748 3950 for the name and address of the nearest authorized parts distributor For technical assistance call 920 748 3121 Nameplate Location When calling or writing about your product be sure to mention model and serial numbers Model and serial numbers are located on nameplate s as shown NAMEPLATE ...

Page 7: ...ryers Electric Gas AE9133 NE8633 NE8533 NE8333 NE7513 NE7313 AE7133 NE6613 NE6533 NE6333 NE6513 NE6313 NE5513 NE5313 AE5113 VE5013 NE4713 NE4613 NE4513 NE4313 AE4113 NE3513 NE3313 VE3013 NE2113 AG9139 NG8639 NG8539 NG8339 NG7519 NG7319 AG7139 NG6619 NG6539 NG6339 NG6519 NG6319 NG5519 NG5319 AG5119 VG5019 NG4719 NG4619 NG4519 NG4319 AG4119 NG3519 NG3319 VG3019 NG2119 ...

Page 8: ...t fan pulls air in through louvers at the rear of the dryer and over the heat source burner flame for gas and heating element for electric The heated air moves through the heater duct and into the cylinder where it circulates through the wet load The air then passes through the lint filter air duct and exhaust fan where it is vented to the outdoors DRY14S CYLINDER EXHAUST FAN HEATER DUCT LINT FILT...

Page 9: ...8 60549 Section 2 Introduction Copyright Alliance Laundry Systems LLC DO NOT COPY or TRANSMIT Notes ...

Page 10: ...o fuses Make sure both are good and are tight Loading door not closed or inoperative door switch Close door or test switch and replace if inoperative Motor overload protector has cycled Wait two or three minutes for overload protector to reset If protector cycles repeatedly refer to Paragraph 2 Timer improperly set Reset timer or try another cycle Inoperative motor switch Test switch and replace i...

Page 11: ...of round condition Check front and rear bulkheads for warping Check support rollers for binding Check cylinder seals and glides for wear or damage Inoperative motor overload protector Replace drive motor POSSIBLE CAUSE TO CORRECT Motor drive pulley loose Tighten setscrew Figure 29 Belt not installed on pulley Install belt Broken cylinder belt Replace belt Clothes cylinder is binding Check cylinder...

Page 12: ...Electric Models Inoperative heater assembly Test heater assembly Replace heater assembly if cold Ohms do not read between 8 and 10 5 Ohms Gas Models Insufficient gas supply Check gas shut off valve in dryer and main gas line valve Open partially closed gas shut off valve or correct low gas pressure Inoperative drive motor switch Test switch and replace if inoperative Gas Models Inoperative gas val...

Page 13: ...trol operation POSSIBLE CAUSE TO CORRECT Improper or inadequate exhaust system Weather hood flapper restricted Refer to Installation Instructions supplied with dryer for electrical requirements Burner heat not holding sensor contacts open Replace sensor or correct gas supply problem Insufficient gas supply Check gas supply and pressure Is gas shut off valve turned on Cracked igniter Replace ignite...

Page 14: ...nect a jumper wire across thermostat terminals If heater assembly heats or burner ignites when jumper wire is connected refer to Paragraph 10 Gas models Sensor contact closing prematurely Burner flame improperly adjusted Replace sensor or adjust burner flame Refer to Paragraph 61 Inoperative cycling thermostat Test thermostat and replace if inoperative Inoperative timer Test timer and replace if i...

Page 15: ... heater assembly and check for short POSSIBLE CAUSE TO CORRECT Heater assembly does not heat or burner does not ignite Refer to Paragraph 5 Too much water in articles being dried Remove excess water Clothes load too large Remove part of load A normal washer load is a normal dryer load Maximum load Dryer cylinder one half full of wet clothes Excessive lint on lint filter Clean lint filter Load too ...

Page 16: ...or burner does not ignite Refer to Paragraph 5 Heater assembly or burner cycles off prematurely Refer to Paragraph 9 Improper or inadequate exhaust system Refer to Installation Instructions supplied with dryer for exhaust requirements Drying large load Timer will not advance until the load is almost dry Broken loose or incorrect wiring Refer to appropriate wiring diagram POSSIBLE CAUSE TO CORRECT ...

Page 17: ...16 60549 Section 3 Troubleshooting Copyright Alliance Laundry Systems LLC DO NOT COPY or TRANSMIT Notes ...

Page 18: ... are removed during servicing these ground wires must be reconnected to ensure that the dryer is properly grounded W001R1 WARNING Copyright Alliance Laundry Systems LLC DO NOT COPY or TRANSMIT Section 4 Grounding 15 MOTOR MOUNTING BRACKET TO MOTOR Figure 1 16 MOTOR MOUNTING BRACKET TO EXHAUST FAN COVER Gas and Electric Models with painted exhaust fan cover ground wire not used on unpainted covers ...

Page 19: ...removed Whenever ground wires are removed during servicing these ground wires must be reconnected to ensure that the dryer is properly grounded W001R1 WARNING Copyright Alliance Laundry Systems LLC DO NOT COPY or TRANSMIT 17 NEUTRAL AT TERMINAL BLOCK TO TERMINAL BLOCK BRACKET AND FRONT TERMINAL BLOCK BRACKET TO CONTROL HOUSING Electric Models Only Figure 3 THROUGH SERIAL NO S6271975XG STARTING SER...

Page 20: ...e removed during servicing these ground wires must be reconnected to ensure that the dryer is properly grounded W001R1 WARNING Copyright Alliance Laundry Systems LLC DO NOT COPY or TRANSMIT 18 POWER CORD TO TERMINAL BLOCK BRACKET AND FROM TERMINAL BLOCK BRACKET TO CONTROL HOUSING WALL RECEPTACLE POLARITY CHECK Gas Models Only Figure 4 Figure 4 DRY1052S 120 V A C 120 V A C 0 V A C NEUTRAL SIDE GROU...

Page 21: ...vicing these ground wires must be reconnected to ensure that the dryer is properly grounded W001R1 WARNING Copyright Alliance Laundry Systems LLC DO NOT COPY or TRANSMIT 19 FROM TERMINAL BLOCK BRACKET TO TIMER MOUNTING BRACKET TO DRYER CABINET TOP TIMER MOUNTING BRACKET TO GRAPHIC PANEL Mechanical Timer Model Dryers Only Figure 5 20 FROM TERMINAL BLOCK BRACKET TO DRYER CABINET TOP TO ELECTRONIC CO...

Page 22: ...arts and carefully remove the components from the control hood assembly NOTE Refer to the appropriate wiring diagram when rewiring the component parts TO REMOVE CONTROL HOOD END CAPS OR INSERTS Remove end caps by carefully prying caps out of slots in ends of hood Refer to Figures 7 8 or 9 Remove inserts by carefully peeling insert off ends of hood Refer to Figures 7 8 or 9 22 ELECTRONIC CONTROL Re...

Page 23: ...5019 VE5013 NG4719 NE4713 NG4619 NE4613 NG4519 NE4513 NG4319 and NE4313 Figure 8 DRY1794S CONTROL HOOD ASSEMBLY END CAP Right END CAP Left GRAPHIC PANEL SCREW SCREW TIMER KNOB SLOT 4 TABS TIMER TEMPERATURE SELECTOR SWITCH SLIDE SIGNAL CONTROL LOCKING TABS DRY1795S CONTROL HOOD ASSEMBLY GRAPHIC PANEL SCREW SCREW TIMER KNOB SLOT 4 TABS TIMER TEMPERATURE SWITCH SIGNAL CONTROL FIXED LOCKING TABS SCREW...

Page 24: ...013 GRAPHIC PANEL CONTROL HOOD AND CONTROLS Models NG2119 and NE2113 Figure 9 DRY1075S END CAP OR INSERT Right END CAP OR INSERT Left GRAPHIC PANEL SCREW SCREW TIMER KNOB SLOT 4 TIMER LOCKING TABS PUSH TO START SWITCH PUSH TO START BUTTON ASSEMBLY CONTROL HOOD ASSEMBLY TABS DRY1796S END CAP Right END CAP Left GRAPHIC PANEL SCREW SCREW TIMER KNOB SLOT 4 TIMER LOCKING TABS CONTROL HOOD ASSEMBLY TABS...

Page 25: ...riate wiring diagram when rewiring timer 3 Set test meter to read OHMS and put meter probes to terminals indicated in table below 4 Starting with timer knob indicator in OFF position at top of timer slowly turn timer knob clockwise until indicator is again pointing toward OFF position at top of timer Meter should register zero reading when circuit being tested is completed by timer Refer to approp...

Page 26: ...ear of hood d Carefully remove the graphics panel off the front of the control hood To Test Temperature Switch 1 Remove six screws three on top and three at lower front holding the hood assembly to the control hood rear panel and to the cabinet top Refer to Figures 8 or 9 2 Disconnect all wires from switch NOTE Refer to appropriate wiring diagram when rewiring switch 3 Set test meter to read OHMS ...

Page 27: ...cing these ground wires must be reconnected to ensure that the dryer is properly grounded W001R1 WARNING Copyright Alliance Laundry Systems LLC DO NOT COPY or TRANSMIT 28 LINT FILTER Refer to Figure 10 Open loading door and lift filter out of front air duct IMPORTANT When installing the filter be sure to place the filter into the front air duct with the word Front facing the front of the dryer 29 ...

Page 28: ...efer to Figure 10 b Remove screws holding handle to door and separate panels Refer to Figure 11 IMPORTANT Do not over tighten screws when reinstalling door handle and avoid scratching inner door panel 31 DOOR STRIKER Refer to Figure 11 a Remove two screws holding handle to door b Spread door panels just far enough to depress tabs on top and bottom of striker and push out of inner panel 32 DOOR SEA...

Page 29: ...de lugs from cabinet top c Disconnect wires from door switch Refer to Figure 13 NOTE Refer to the appropriate wiring diagram when rewiring the switch d Remove front panel seal from flange around inside of door opening NOTE Be sure seal is properly positioned when installing on front panel 34 DOOR SWITCH a Remove two screws from the bottom edge of the front panel Refer to Figure 12 b Swing the bott...

Page 30: ... Figure 12 c Swing the bottom of the panel away from the dryer to disengage hold down clips and guide lugs from cabinet top Refer to Figure 12 d Disconnect wires from door switch Refer to Figure 13 NOTE Refer to the appropriate wiring diagram when rewiring the switch e Remove four screws and locknuts holding hinges to front panel Refer to Figure 12 37 HOLD DOWN CLIPS AND GUIDE LUGS a Remove two sc...

Page 31: ... has attained ignition temperature b Pre Ignition Circuits When the dryer thermostat calls for heat circuits are completed through the holding coil sensor booster coil and igniter Both coils must be energized to open split coil valve Once opened the holding coil can hold the valve open without assistance from the booster coil The current shunted around the secondary coil by the sensor passes throu...

Page 32: ...r with the secondary coil in the circuit the booster coil cannot draw enough current to open the split coil valve When sensor contacts do reclose the secondary valve will close and the burner system will be in the normal pre ignition circuit b Flame Failure In case of flame failure the sensor contacts will reclose in about 45 seconds This will close the secondary valve and the burner system will b...

Page 33: ...mounting bracket from base Refer to Figure 14 To Test Electrical Circuit To Ignition System Gas Models 1 Remove valve wire harness disconnect block from the holding and booster coil Refer to Figure 15 2 Plug dryer power cord into wall receptacle start the dryer in a heat setting refer to the Operating Instructions supplied with dryer 3 Set test meter to read AC voltage and apply meter probes into ...

Page 34: ...as not to damage or break igniter as it is very fragile IMPORTANT Handle igniter by grasping the white ceramic portion or bracket only DO NOT handle silicon carbide portion of igniter with hands or allow any oil grease or other foreign material to contaminate it Oil grease and other impurities or hairline cracks will cause the igniter to burn out c Sensor 1 Remove two screws from the bottom edge o...

Page 35: ...Copyright Alliance Laundry Systems LLC DO NOT COPY or TRANSMIT To Test Sensor Gas Models 1 Remove wires from sensor terminals Refer to Figure 18 2 Set test meter to read OHMS and put meter probes on sensor terminals Meter should read zero Ohms If meter registers an Ohm reading of any amount replace sensor NOTE Test procedure can be performed on workbench if gas valve igniter burner tube and burner...

Page 36: ...is very fragile Be careful not to damage it during removal i Remove screw holding burner housing to heat shroud Refer to Figure 18 j Remove screw holding front of burner housing to dryer base and remove housing out through front of dryer Refer to Figure 14 k Remove two screws holding shroud to heater box and remove shroud out through front of dryer 42 LIMIT THERMOSTAT a Remove two screws from the ...

Page 37: ...fer to Figure 13 NOTE Refer to the appropriate wiring diagram when rewiring the switch d Remove two screws holding element and plate to heater box and pull element down and away from heater box Refer to Figure 19 e Disconnect wires from element and plate f Remove screws holding thermostat and thermal fuse if present to element and plate Refer to Figure 19 NOTE When reassembling be sure all wire co...

Page 38: ...iring diagram when rewiring the switch d Disconnect wires remove attaching screws and remove thermostat or thermostat and heater or thermistor Refer to Figure 20 NOTE Refer to the appropriate wiring diagram when rewiring thermostat thermostat and heater or thermistor Figure 20 DRY1058S DRY853S THERMOSTAT OR THERMOSTAT AND HEATER OR THERMISTOR FELT SEAL Through Serial No S6271975XG Starting Serial ...

Page 39: ...t wires from door switch Refer to Figure 13 NOTE Refer to the appropriate wiring diagram when rewiring the switch d Remove lint filter out of front air duct Refer to Figure 10 NOTE When installing lint filter be sure to install the filter with the words FRONT facing the front of the dryer e Remove four screws holding air duct to front bulkhead and remove air duct Refer to Figure 21 NOTE When reass...

Page 40: ...anel Refer to Figure 12 b Swing the bottom of the panel away from the dryer to disengage hold down clips and guide lugs from cabinet top Refer to Figure 12 c Disconnect wires from door switch Refer to Figure 13 NOTE Refer to the appropriate wiring diagram when rewiring the switch d Remove lint filter Refer to Figure 10 NOTE When installing lint filter be sure to install the filter with the words F...

Page 41: ...r pulleys Refer to Figure 24 h Remove two screws holding motor mounting bracket to dryer base Refer to Figure 23 Then pull complete assembly out thorough front of dryer IMPORTANT When reinstalling motor and exhaust assembly be sure wire harness on right side is clipped to motor mounting bracket and is routed along dryer base between motor mounting bracket and right side of cabinet Refer to Figure ...

Page 42: ...switch NOTE Refer to appropriate wiring diagram when rewiring motor switch 3 Put test meter probes on terminals 4 and 5 Meter should read approximately one on Ohm scale 4 Put test meter probes on terminal 4 and motor frame Meter should register no reading or infinite 5 Put test meter probes on terminal 5 and motor frame Meter should register no reading or infinite 6 Put test meter probes on termin...

Page 43: ... motor shaft right hand thread Use a 7 8 inch 6 point socket to aid in the removal of the impeller 4 Remove three screws and washers holding the exhaust housing to the motor mounting bracket Refer to Figure 27 k Motor 1 Disconnect wires from motor switch Refer to Figure 26 NOTE Refer to appropriate wiring diagram when rewiring motor switch 2 Disconnect ground wire from motor Refer to Figure 26 3 P...

Page 44: ...he switch d Disconnect wires from the light receptacle terminals e Remove two screws holding receptacle to front bulkhead Refer to Figure 28 50 CABINET TOP a Remove two screws from the bottom edge of the front panel Refer to Figure 12 b Swing the bottom of the panel away from the dryer to disengage hold down clips and guide lugs from cabinet top Refer to Figure 12 c Disconnect wires from door swit...

Page 45: ...engage hold down clips and guide lugs from cabinet top Refer to Figure 12 c Disconnect wires from door switch Refer to Figure 13 NOTE Refer to the appropriate wiring diagram when rewiring the switch d Disengage belt from motor and idler pulleys Refer to Figure 24 e If present disconnect cylinder light wires f Remove four screws holding bulkhead to front flange of cabinet and lift complete bulkhead...

Page 46: ... diagram when rewiring the switch d Disengage belt from motor and idler pulleys Figure 24 e If present disconnect cylinder light wires f Remove four screws holding bulkhead to front flange of cabinet Lift complete bulkhead assembly out of slots in cabinet Refer to Figure 30 IMPORTANT During reinstallation of front bulkhead be sure that air duct is properly positioned with the flange inside of the ...

Page 47: ...d e If present disconnect cylinder light wires f Remove four screws holding bulkhead to front flange of cabinet Lift complete bulkhead assembly out of slots in cabinet Refer to Figure 30 IMPORTANT During reinstallation of front bulkhead be sure that air duct is properly positioned with the flange inside of the felt seal on the exhaust fan cover g Loosen two cabinet top hold down screws Refer to Fi...

Page 48: ...e bulkhead assembly out of slots in cabinet Refer to Figure 30 IMPORTANT During reinstallation of front bulkhead be sure that air duct is properly positioned with the flange inside of the felt seal on the exhaust fan cover i Manually rotate cylinder until one of the baffles is at the 6 o clock position and carefully remove cylinder out through front of dryer NOTE On models using unpainted corrosio...

Page 49: ...y from the dryer to disengage hold down clips and guide lugs from cabinet top Refer to Figure 12 c Disconnect wires from door switch Refer to Figure 13 NOTE Refer to the appropriate wiring diagram when rewiring the switch d Disengage belt from motor and idler pulleys Refer to Figure 24 NOTE When reinstalling belt be sure belt is properly installed on motor and idler pulleys and is on the correct s...

Page 50: ...on 5 Move air shutter end of burner tube slightly to right and CAREFULLY remove burner tube and igniter assembly out through front of dryer IMPORTANT The igniter is very fragile Be careful not to damage it during removal 6 Remove screw holding burner housing to heat shroud Refer to Figure 18 7 Remove screw holding front of burner housing to dryer base and remove housing out through front of dryer ...

Page 51: ...k 3 Remove screws holding terminal block to bracket NOTE Do not let terminal block insulation drop when removing the block Insulation must be in place when reinstalling block Starting Serial No S6271976XG 1 Remove two screws from the bottom edge of the front panel Refer to Figure 12 2 Swing the bottom of the panel away from the dryer to disengage hold down clips and guide lugs from cabinet top Ref...

Page 52: ...ation drop when removing the block Insulation must be in place when reinstalling block b Power Cord Gas Models 1 Remove access plate on rear of cabinet 2 Remove strain relief 3 Remove screw holding power cord ground wire to terminal block bracket NOTE Reconnect ground wire into same hole in bracket when reinstalling power cord 4 Disengage strain relief holding power cord in dryer cabinet 5 Disconn...

Page 53: ...mbly off the hold down brackets and set to the side Refer to Figure 36 j Disengage belt from motor and idler pulleys Refer to Figure 24 NOTE When reinstalling belt be sure belt is properly installed on motor and idler pulleys and is on the correct side of the idler lever Figure 24 Belt must be positioned around cylinder between center and rear baffle screws with the ribbed surface against the cyli...

Page 54: ...nd remove plate Refer to Figure 22 u Remove two screws holding terminal block bracket to cabinet Refer to Figure 36 v Remove wire harness clips w Remove guide lugs and screws x Remove two screws from front edge at each side of cabinet Refer to Figure 30 Then remove remaining screws from around the bottom of cabinet and lift cabinet off base 59 BASE a Remove two screws from the bottom edge of the f...

Page 55: ... cover makes air tight seal on flange of air duct Refer to Figure 20 i Disconnect wires from thermistor and or thermostat or thermostat and heater Refer to Figure 20 NOTE Refer to appropriate wiring diagram when rewiring thermistor and or thermostat or thermostat and heater j Remove cylinder belt from idler and motor pulleys Refer to Figure 24 k Remove two screws holding motor mounting bracket to ...

Page 56: ...r spongy floor a Place dryer in position loosen locknuts and adjust the legs until dryer is level b Keep dryer as close to the floor as possible All four legs must rest firmly on the floor so weight of the dryer is evenly distributed The dryer MUST NOT rock c After the dryer has been leveled tighten the locknuts securely against the bottom of the dryer base NOTE If these locknuts are not tight the...

Page 57: ... with the dryer the dryer will start the igniter will glow red and the main burner will ignite b Allow dryer to operate for approximately five minutes then open the access door and loosen the air shutter lockscrew c Turn air shutter to the right or left to obtain a soft uniform blue flame A lazy orange tipped flame indicates lack of air A harsh roaring very blue flame indicates too much air d Afte...

Page 58: ...head of the dryer that will maintain the gas supply to the dryer at 10 1 5 inches 25 4 3 81 cm water column pressure and a vent to the outdoors must be provided Remove pressure tap pipe plug and check gas pressure by connecting a U tube manometer or similar pressure gauge to the pressure tap Refer to Figure 39 WARNING This conversion kit is to be installed by AUTHORIZED DEALERS or DISTRIBUTORS on ...

Page 59: ... f Reinstall burner tube tighten hex head screw firmly and reconnect igniter leads g Remove vent screw and install No 58754 Block Open Plug Refer to Figure 41 h Install No 60517 Valve Converted to L P Gas Sticker to top side of gas valve so it covers the gas valve part number i Sign and date each of the two No 60520 L P Gas Stickers Install one of the No 60520 L P Gas Stickers over the top three l...

Page 60: ...Recheck the following 1 Installed correct orifice spud 55 see step e 2 Installed block open plug see step g 3 Gas valve pressure must be 10 1 5 inches 25 4 3 8 cm see step l 4 Installed four stickers see steps h i and j o Start dryer and observe burner flame Adjust air shutter to obtain a soft uniform flame A lazy orange tipped flame indicates lack of air A harsh roaring very blue flame indicates ...

Page 61: ...ance Laundry Systems LLC DO NOT COPY or TRANSMIT 1 Loosen air shutter lockscrew Refer to Figure 44 2 Turn air shutter to the right or left as necessary to obtain proper flame intensity Refer to Figure 44 3 After air shutter is adjusted for proper flame tighten air shutter lockscrew firmly p Be sure and observe at least two complete ignition and burn cycles before reinstalling access door q Reinsta...

Page 62: ...ead of the dryer that will maintain the gas supply to the dryer at 6 5 1 5 inches 16 5 3 81 cm water column pressure and a vent to the outdoors must be provided Remove pressure tap pipe plug and check gas pressure by connecting a U tube manometer or similar pressure gauge to the pressure tap Refer to Figure 45 WARNING This conversion kit is to be installed by AUTHORIZED DEALERS or DISTRIBUTORS on ...

Page 63: ...Refer to Figure 47 c Remove hex head screw holding burner tube and igniter in place Refer to Figure 47 d Carefully move burner tube toward rear of dryer far enough to permit removal of burner orifice spud from gas valve NOTE Tab on burner tube may have to be removed from slot in burner housing to obtain enough clearance Figure 46 To reduce the risk of electrical shock disconnect electrical power t...

Page 64: ... Converted to Natural Gas Sticker to top side of gas valve so it covers the gas valve part number Refer to Figure 47 i Sign and date each of the two No 60521 Natural Gas Stickers Install one of the No 60521 Natural Gas Stickers over the top three lines of the old sticker on rear of cabinet Refer to Figure 48 Then place the second sticker over the top three lines of the old sticker located on backs...

Page 65: ... g 3 Gas valve pressure must be 3 5 2 inches 8 89 508 cm see step l 4 Installed four stickers see steps h i and j o Start dryer and observe burner flame Adjust air shutter to obtain a soft uniform flame A lazy orange tipped flame indicates lack of air A harsh roaring very blue flame indicates too much air Adjust air shutter to obtain a soft uniform blue flame as follows 1 Loosen air shutter locksc...

Page 66: ...ring servicing these ground wires must be reconnected to ensure that the dryer is properly grounded W001R1 WARNING Copyright Alliance Laundry Systems LLC DO NOT COPY or TRANSMIT Section 8 Service Procedures Unique to Electronic Control Model Dryers LEVEL I REGULAR MEMORY RECALL PERM PRESS DELICATES KNITS NO HEAT GO STOP RESET CLEAN FILTER DRYING COOL DOWN WRINKLE FREE ON SELECT STATUS VERY DRY AUT...

Page 67: ...e removed during servicing these ground wires must be reconnected to ensure that the dryer is properly grounded W001R1 WARNING Copyright Alliance Laundry Systems LLC DO NOT COPY or TRANSMIT LEVEL II Model Level Part No AG9139 AE9133 NG8639 NE8633 NG8539 and NE8533 I 59608 NG8339 and NE8333 1 59610 AG7139 AE7133 NG6539 and NE6533 II 59609 NG6339 and NE6333 II 59611 REGULAR PERM PRESS KNITS DELICATE...

Page 68: ...l the GO pad is pressed STOP Press the STOP pad to stop the dryer at any point in the cycle The dryer will remain at that portion of the cycle until the GO pad is again pressed At that time the cycle will continue where it left off Pressing the STOP pad two times in succession will completely turn the control off RESET Press the RESET pad two times in succession to cancel any cycle or completely t...

Page 69: ...work together to provide you with up to nine different drying temperatures 70 TIME DRYING NOTE The DRYNESS level pads will not work in the TIME drying cycle If you prefer you can set your dryer to dry the load for a specific period of time The dryer will dry with heat for the number of minutes you have selected then tumble the load with room temperature air for an additional period of cool down ti...

Page 70: ...and NO HEAT can have one additional memory cycle for a total of five memories or favorite cycles in addition to the preprogrammed cycles To save a favorite cycle first select a program cycle then make changes you want for that cycle When all selections have been made press the MEMORY SAVE pad Your favorite cycle is now saved This cycle will be stored until you either change the cycle of until ther...

Page 71: ...line ELECTRICAL SERVICE FOR DRYER SHOULD BE OF MAXIMUM RATED VOLTAGE LISTED ON NAMEPLATE DO NOT CONNECT DRYER TO 110 115 OR 120 VOLT CIRCUIT Heating elements are available for field installation in dryers which are to be connected to electrical service of different voltage than that listed on nameplate such as 208 Volt To reduce the risk of fire electric shock or personal injury all wiring and gro...

Page 72: ...r is installed in a mobile home or if local codes do not permit grounding through the neutral proceed as shown on Pages 76 and 77 1 Remove the screw and terminal block access cover from the rear of dryer cabinet 2 Insert ends of wires through power supply hole containing proper strain relief in rear of dryer cabinet Refer to page 75 Connect the power cord or direct wiring to the appropriate termin...

Page 73: ...ONNECTION DETAIL POWER CORD WIRING DIRECT WIRING GROUND SCREW GROUND TO NEUTRAL WIRE GREEN WHITE OR CENTER WIRE DRY1800S DRY1064S TERMINAL BLOCK L2 TERMINAL NEUTRAL TERMINAL GROUND WIRE GREEN ACCESS COVER SEE WARNING BELOW L1 TERMINAL WIRE CONNECTION DETAIL POWER CORD WIRING DIRECT WIRING GROUND SCREW GROUND TO NEUTRAL WIRE GREEN NEUTRAL White or Center wire TERMINAL BRACKET GROUND SCREW TERMINAL ...

Page 74: ...No S6271976XG Remove three screws holding the three wires to terminal block terminals Save these screws 3 Loosen the strain relief screw and pull the cord or wires out through the rear of the dryer 4 Remove the terminal bracket ground screw holding the green ground wire to the terminal block mounting bracket Save the screw NOTE ON NEW DRYERS This is the green ground wire that goes from the neutral...

Page 75: ...es pack if the cord is being installed for the first time Starting Serial No S6271976XG Using the three wire binding 10 32x3 8 screws from the accessories envelope located inside the cylinder unless the screws were previously removed in Step 2 attach the power cord wires to the terminal block terminals as follows a Red to Red b Black to Black c White to White see NOTE below NOTE When installing th...

Page 76: ...s cover removed for illustration purposes only To reduce the risk of an electric shock NEVER operate the dryer with the access cover removed W136 WARNING Dryer is shown with the access cover removed for illustration purposes only To reduce the risk of an electric shock NEVER operate the dryer with the access cover removed W136 WARNING DRY1803S ACCESS COVER SEE WARNING BELOW WHITE WIRES NEUTRAL TER...

Page 77: ...tacle rated 110 120 Volts AC alternating current 15 Amps Refer to Figure 57 for determining correct polarity of the wall receptacle c DO NOT OPERATE OTHER APPLIANCES ON THE SAME CIRCUIT DO NOT OVERLOAD CIRCUITS Refer to Figure 58 Figure 57 To reduce the risk of fire electric shock or personal injury all wiring and grounding MUST conform with the latest edition of the National Electrical Code ANSI ...

Page 78: ...es not meet the above specifications and or if you are not sure your home has an effective ground have a qualified electrician or your local electrical utility company check it and correct any problems e Gas Dryers Equipped with Electronic Control After connecting the dryer to the electrical supply start the dryer refer to the Operating Instructions supplied with the dryer If the electronic contro...

Page 79: ...g diagram sticker inside of the control hood Refer to Figure 60 To begin the diagnostic cycle follow the flow chart on Page 82 NOTE If the symptom or problems corresponds to one of the symptoms detailed on the following pages proceed to that flow chart The diagnostic cycle chart check does not have to be made c Self Diagnostic Routine Entry Follow the sequence given below 1 Make sure dryer loading...

Page 80: ...aining to the hardware model selected 2 When the last step in the table is finished the routine sequence will repeat 3 East output is on for two seconds LED Display Illuminated LED Motor Relay Heat Relay Signal Volume 99 None All Off On Off Off 88 Wrinkle Free Status Off Off Off 77 Cool Down Off Off Off 66 Drying Off Off Off 55 Clean Filter Off Off Off 44 Memory Off Off Off 33 Damp Off Off Off 22 ...

Page 81: ...OM FAILURE SYMPTOM NOTE The DIAGNOSTIC cycle follows the Diagnostic Routine located behind the control hood All numbers should match with the correct LED s Refer to Figure 60 Troubleshooting NOTE Refer to Figure 59 If the symptom or problem corresponds to one of the symptoms detailed on the following pages proceed to that flow chart The diagnostic cycle check does not have to be made Diagnostic Cy...

Page 82: ...o Figure 59 to aid in this Troubleshooting section Was door open or was the STOP pad pressed after dryer was running NO YES Normal operation Refer to Operating Instructions Unplug power cord and check outlet for proper polarity and grounding Refer to NO Polarity and grounding okay YES NO Contact electrician Remove control hood and check for loose or incorrect wiring to terminals P2 and P3 on the c...

Page 83: ...KER Fuse blown or tripped breaker NO YES Unplug power cord and disconnect wires from terminals P3 and COM Take resistance reading between terminals Reset breaker or replace fuse Does fuse or breaker blow immediately upon plugging in power cord Does fuse or breaker blow immediately after motor starts YES NO 166 Ohms 30 between P3 and COM terminals Replace control YES NO Check for broken loose or in...

Page 84: ...t AFTER SELECT PAD IS PRESSED Power cord plugged in YES NO Plug in Proper voltage polarity and grounding at outlet Refer to Figure 57 YES NO Go to Symptom Blown Fuse Or Tripped Circuit Breaker Paragraph 80 Check to see that voltage is being applied to control Approximately 120 Volts between terminals P3 neutral and COM on heat relay K2 YES NO Check for broken loose or incorrect wiring from outlet ...

Page 85: ...essing GO NO YES Check outlet for proper polarity and grounding Refer to Figure 57 With door closed motor does not start after GO is pressed YES YES Check outlet for proper polarity and grounding Refer to Figure 57 Recheck from beginning If problem persists replace control Polarity and grounding okay NO YES Polarity and grounding okay NO Contact electrician Contact electrician Remove control hood ...

Page 86: ... a NO HEAT cycle NO YES Normal operation Remove control hood and verify that voltage is being applied to control between terminals COM on heat relay K2 and P3 neutral Approximately 120 Volts between COM and P3 YES NO Check for broken loose or incorrect wiring Unplug power cord Disconnect wire from terminal P5 on control This will simulate a call for heat Disconnect wire from terminal P1 to elimina...

Page 87: ...tween COM and N O terminals Replace control YES Infinite Ohms between COM and N O terminals NO Replace control Reconnect wires to COM and N O terminals on heat relay K2 Open loading door Tape temperature probe or thermometer on the inside of the dryer s front bulkhead Close loading door YES Unplug power cord Disconnect wires from terminals P5 and P6 control thermistor Plug in power cord and press ...

Page 88: ...se or incorrect wiring between thermistor and control NO Refer to wiring diagram and correct Wiring between terminals P5 and P6 on control and the thermistor terminals okay YES Remove wires from thermistor and take resistance reading across the thermistor terminals YES Replace thermistor Did you read infinite Ohms NO NO Was temperature near thermistor below 30 F For safety purposes the control wil...

Page 89: ...TRANSMIT 86 SYMPTOM SH APPEARS IN TIME DISPLAY Unplug power cord remove front panel and control hood NO YES Refer to wiring diagram and correct Check shorted wiring between terminals P5 and P6 on control and thermistor Wiring between control and thermistor okay Remove wires from thermistor and take a resistance reading across thermistor terminals YES NO Replace thermistor Is zero Ohms read Was tem...

Page 90: ...ace the control first unplug the washer Remove all of the wires connected to the control and take out the four screws securing the control to the control hood When removing wires from the control hold down on the board near the appropriate terminal and disconnect the wires using a pliers Do not pull on wires The new control is supplied in a special anti static wrapping and protected by anti static...

Page 91: ...90 60549 Section 8 Service Procedures Unique to Electronic Control Model Dryers Copyright Alliance Laundry Systems LLC DO NOT COPY or TRANSMIT Notes ...

Page 92: ... removed during servicing these ground wires must be reconnected to ensure that the dryer is properly grounded W001R1 WARNING Copyright Alliance Laundry Systems LLC DO NOT COPY or TRANSMIT Section 9 Internal Wiring of Dryer Motor Switch GENERAL ELECTRIC MOTOR WITH INTERNAL SWITCH GENERAL ELECTRIC MOTOR WITH EXTERNAL SWITCH DRY1070S 9 8 7 6 5 3 1 5 4 6 1 2 BLUE ORANGE BLACK 4PM 4PS RED O L OVERLOAD...

Page 93: ...ng Never start the dryer s with any guards panels removed Whenever ground wires are removed during servicing these ground wires must be reconnected to ensure that the dryer is properly grounded W001R1 WARNING Copyright Alliance Laundry Systems LLC DO NOT COPY or TRANSMIT EMERSON MOTOR WITH EXTERNAL SWITCH OVERLOAD PROTECTOR MAIN WINDING START WINDING YEL BRN 4 BLU BLK 7 BLK 5 YEL S S R R 4 1 2 6 5...

Page 94: ... s instructions may result in conditions which can produce bodily injury and or property damage W030 WARNING Copyright Alliance Laundry Systems LLC DO NOT COPY or TRANSMIT Section 10 Wiring Diagrams WIRING DIAGRAMS AND SCHEMATICS FOUND ON THE FOLLOWING PAGES ARE FOR MODELS COVERED IN THIS MANUAL ...

Page 95: ...ate this machine according to the manufacturer s instructions may result in conditions which can produce bodily injury and or property damage W030 WARNING Copyright Alliance Laundry Systems LLC DO NOT COPY or TRANSMIT MODELS AG9139 NG8639 NG8539 NG8339 AG7139 NG6539 AND NG6339 ...

Page 96: ...e according to the manufacturer s instructions may result in conditions which can produce bodily injury and or property damage W030 WARNING Copyright Alliance Laundry Systems LLC DO NOT COPY or TRANSMIT MODELS AE9133 NE8633 NE8533 NE8333 AE7133 NE6533 AND NE6333 Through Serial No S6271975XG ...

Page 97: ...e according to the manufacturer s instructions may result in conditions which can produce bodily injury and or property damage W030 WARNING Copyright Alliance Laundry Systems LLC DO NOT COPY or TRANSMIT MODELS AE9133 NE8633 NE8533 NE8333 AE7133 NE6533 AND NE6333 Starting Serial No S6271976XG ...

Page 98: ...ntain and or operate this machine according to the manufacturer s instructions may result in conditions which can produce bodily injury and or property damage W030 WARNING Copyright Alliance Laundry Systems LLC DO NOT COPY or TRANSMIT MODELS NG7519 AND NG7319 ...

Page 99: ...ntain and or operate this machine according to the manufacturer s instructions may result in conditions which can produce bodily injury and or property damage W030 WARNING Copyright Alliance Laundry Systems LLC DO NOT COPY or TRANSMIT MODELS NE7513 AND NE7313 ...

Page 100: ...this machine according to the manufacturer s instructions may result in conditions which can produce bodily injury and or property damage W030 WARNING Copyright Alliance Laundry Systems LLC DO NOT COPY or TRANSMIT MODELS NG6619 NG5519 NG5319 AND AG5119 Through Serial No S6271975XG ...

Page 101: ...this machine according to the manufacturer s instructions may result in conditions which can produce bodily injury and or property damage W030 WARNING Copyright Alliance Laundry Systems LLC DO NOT COPY or TRANSMIT MODELS NG6619 NG5519 NG5319 AND AG5119 Starting Serial No S6271976XG ...

Page 102: ...this machine according to the manufacturer s instructions may result in conditions which can produce bodily injury and or property damage W030 WARNING Copyright Alliance Laundry Systems LLC DO NOT COPY or TRANSMIT MODELS NE6613 NE5513 NE5313 AND AE5113 Through Serial No S6271975XG ...

Page 103: ...this machine according to the manufacturer s instructions may result in conditions which can produce bodily injury and or property damage W030 WARNING Copyright Alliance Laundry Systems LLC DO NOT COPY or TRANSMIT MODELS NE6613 NE5513 NE5313 AND AE5113 Starting Serial No S6271976XG ...

Page 104: ...perate this machine according to the manufacturer s instructions may result in conditions which can produce bodily injury and or property damage W030 WARNING Copyright Alliance Laundry Systems LLC DO NOT COPY or TRANSMIT MODELS NG6519 AND NG6319 Through Serial No S6271975XG ...

Page 105: ...perate this machine according to the manufacturer s instructions may result in conditions which can produce bodily injury and or property damage W030 WARNING Copyright Alliance Laundry Systems LLC DO NOT COPY or TRANSMIT MODELS NG6519 AND NG6319 Starting Serial No S6271976XG ...

Page 106: ...perate this machine according to the manufacturer s instructions may result in conditions which can produce bodily injury and or property damage W030 WARNING Copyright Alliance Laundry Systems LLC DO NOT COPY or TRANSMIT MODELS NE6513 AND NE6313 Through Serial No S6271975XG ...

Page 107: ...perate this machine according to the manufacturer s instructions may result in conditions which can produce bodily injury and or property damage W030 WARNING Copyright Alliance Laundry Systems LLC DO NOT COPY or TRANSMIT MODEL NE6513 AND NE6313 Starting Serial No S6271976XG ...

Page 108: ...perate this machine according to the manufacturer s instructions may result in conditions which can produce bodily injury and or property damage W030 WARNING Copyright Alliance Laundry Systems LLC DO NOT COPY or TRANSMIT MODELS NG4519 AND NG4319 Through Serial No S6242593XD ...

Page 109: ...ding to the manufacturer s instructions may result in conditions which can produce bodily injury and or property damage W030 WARNING Copyright Alliance Laundry Systems LLC DO NOT COPY or TRANSMIT MODEL VG5019 NG4519 AND NG4319 Starting Serial No S6242594XD and continuing through Serial No S6271975XG ...

Page 110: ...ate this machine according to the manufacturer s instructions may result in conditions which can produce bodily injury and or property damage W030 WARNING Copyright Alliance Laundry Systems LLC DO NOT COPY or TRANSMIT MODEL VG5019 NG4519 AND NG4319 Starting Serial No S6271976XG ...

Page 111: ...all maintain and or operate this machine according to the manufacturer s instructions may result in conditions which can produce bodily injury and or property damage W030 WARNING Copyright Alliance Laundry Systems LLC DO NOT COPY or TRANSMIT MODEL VE5013 ...

Page 112: ...operate this machine according to the manufacturer s instructions may result in conditions which can produce bodily injury and or property damage W030 WARNING Copyright Alliance Laundry Systems LLC DO NOT COPY or TRANSMIT MODEL NG4719 AND NG4619 Through Serial No S6242593XD ...

Page 113: ...perate this machine according to the manufacturer s instructions may result in conditions which can produce bodily injury and or property damage W030 WARNING Copyright Alliance Laundry Systems LLC DO NOT COPY or TRANSMIT MODEL NG4719 AND NG4619 Starting Serial No S6271976XG ...

Page 114: ...operate this machine according to the manufacturer s instructions may result in conditions which can produce bodily injury and or property damage W030 WARNING Copyright Alliance Laundry Systems LLC DO NOT COPY or TRANSMIT MODEL NE4713 AND NE4613 Through Serial No S6242593XD ...

Page 115: ...perate this machine according to the manufacturer s instructions may result in conditions which can produce bodily injury and or property damage W030 WARNING Copyright Alliance Laundry Systems LLC DO NOT COPY or TRANSMIT MODEL NE4713 AND NE4613 Starting Serial No S6271976XG ...

Page 116: ...operate this machine according to the manufacturer s instructions may result in conditions which can produce bodily injury and or property damage W030 WARNING Copyright Alliance Laundry Systems LLC DO NOT COPY or TRANSMIT MODEL NE4513 AND NE4313 Through Serial No S6242593XD ...
Page 117: ...cording to the manufacturer s instructions may result in conditions which can produce bodily injury and or property damage W030 WARNING Copyright Alliance Laundry Systems LLC DO NOT COPY or TRANSMIT MODEL NE4513 AND NE4313 Starting Serial No S6242594XD and continuing through Serial No S6271975XG ...

Page 118: ...perate this machine according to the manufacturer s instructions may result in conditions which can produce bodily injury and or property damage W030 WARNING Copyright Alliance Laundry Systems LLC DO NOT COPY or TRANSMIT MODEL NE4513 AND NE4313 Starting Serial No S6271976XG ...

Page 119: ...and or operate this machine according to the manufacturer s instructions may result in conditions which can produce bodily injury and or property damage W030 WARNING Copyright Alliance Laundry Systems LLC DO NOT COPY or TRANSMIT MODELS AG4119 NG3519 NG3319 AND VG3019 ...

Page 120: ...ate this machine according to the manufacturer s instructions may result in conditions which can produce bodily injury and or property damage W030 WARNING Copyright Alliance Laundry Systems LLC DO NOT COPY or TRANSMIT MODELS AE4113 NE3513 AND NE3313 Through Serial No S6242593XD ...

Page 121: ...te this machine according to the manufacturer s instructions may result in conditions which can produce bodily injury and or property damage W030 WARNING Copyright Alliance Laundry Systems LLC DO NOT COPY or TRANSMIT MODELS AE4113 NE3513 AND NE3313 Starting Serial No S6271976XG ...

Page 122: ...ll maintain and or operate this machine according to the manufacturer s instructions may result in conditions which can produce bodily injury and or property damage W030 WARNING Copyright Alliance Laundry Systems LLC DO NOT COPY or TRANSMIT MODELS NG2119 ...

Page 123: ...d or operate this machine according to the manufacturer s instructions may result in conditions which can produce bodily injury and or property damage W030 WARNING Copyright Alliance Laundry Systems LLC DO NOT COPY or TRANSMIT MODELS NE2113 Through Serial No S6271975XG ...

Page 124: ... or operate this machine according to the manufacturer s instructions may result in conditions which can produce bodily injury and or property damage W030 WARNING Copyright Alliance Laundry Systems LLC DO NOT COPY or TRANSMIT MODELS NE2113 Starting Serial No S6271976XG ...

Page 125: ...124 60549 Section 10 Wiring Diagrams Copyright Alliance Laundry Systems LLC DO NOT COPY or TRANSMIT Notes ...

Reviews: