background image

HERA LS Series CD/DVD Duplication System / User Manual 

35 

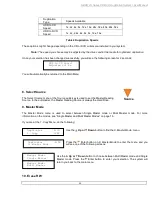
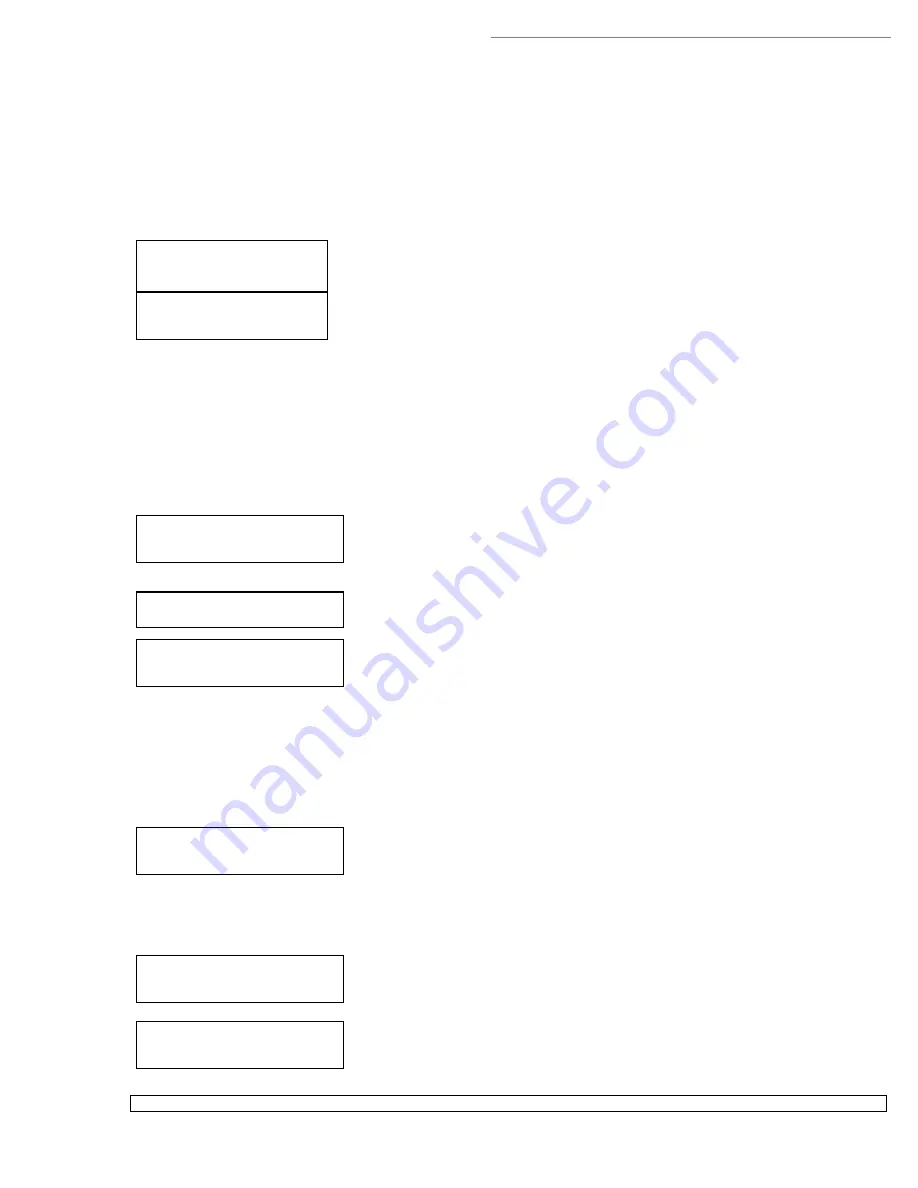
Duplicator     2.20 
1. Copy        (SM) 


Duplicator     2.20 
12. Print Setup 


Print Setup 
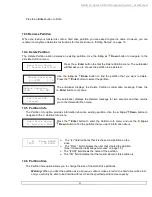
1. Load Label 


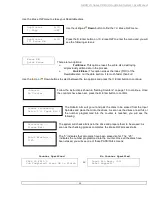
Loading Master 


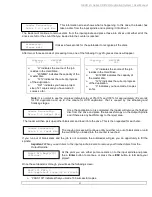
Please Select Label 
1.[Load All Labels] 


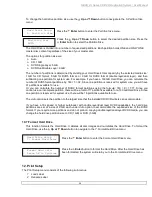
Loading...      25MB 
FUN.lsi    12%   3MB 


Unloading Master 


Load Label Success! 
Press OK to Continue 


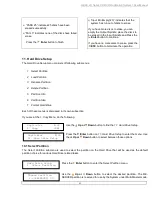
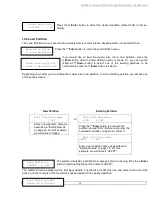
Delete Label 

Print Surface Info  

Label Info 

 
Each of these menus is discussed in its own subsection.  
 

If you are starting from the 

1. Copy

 Menu, do the following: 

 
Use the 

Up or Down

 button to find 

Print Setup

.  


Press the 

ENT/Enter

 button at 

Print Setup

 to enter the menu. Use the 

Up 

or Down

 button to select between the following options. 


12.1 Load Label


This function allows you to load your LightScribe Label file (.lsi file) from the Label Disc onto the 
system’s internal hard drive. 
 
For instructions on how to generate the LightScribe Label, please refer to “Design and Create a Label 
File” on page 54. 


Press the 

ENT/Enter

 button to enter the 

Load Label

 menu. 


The autoloader will pick up a disc that contains your LightScribe label file 
and place it into a drive for analyzing. 
 
Upon successfully analyzing your label disc, you have the following 
options: 


Load all labels found in the disc – The system can load all LightScribe Label file(s) (.lsi file) 
detected in the disc into the hard drive. If you choose to do so, please use the 

Up or Down

 button 

to select [Load All Labels] and press the 

ENT/Enter

 button to continue. 


Select any single label –The system can also load any single LightScribe Label file (.lsi file) 
detected in the disc into the hard drive. If you choose to do so, please use the 

Up or Down

 button 

to select the LightScribe label file you wish to load and press the 

ENT/Enter

 button to continue 

 
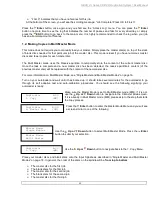
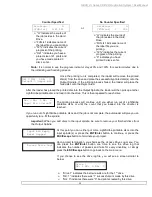
During the loading process, you shall see the screen on the left.  


 “FUN.lsi” indicates name of the label file you are loading. 


“12%”/”3MB” indicates the current progress of loading.  


“25MB” indicates the size of the label file you are loading.  

 
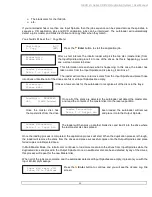
Upon completion of the loading process, the autoloader will pick up the 
label disc and place it into the output spindle. 
 
 
The system will then show a result screen, at which point you can press 
the 

ENT/Enter

 button to return to the “Print Setup” menu. 


Summary of Contents for HERA-3

Page 1: ...ndalone fully automated CD DVD BD Duplication System with LightScribe printing capabilities User Manual 1351 East Black Street Rock Hill SC 29730 Tel 803 980 4141 Fax 803 980 4145 www allprosolutions...

Page 2: ...tions shall not have liability for any hardware used with this product including the costs of repairing replacing or recovering such hardware DAMAGE____________________________________________________...

Page 3: ...counts 16 6 Single Master and Multi Master Mode 17 7 Setting Counters and Assigning Names 18 Operation 20 1 Copy 20 1 1 Making Copies in Single Master Mode 20 1 2 Making Copies in Multi Master Mode 22...

Page 4: ...ISRC 42 13 11 DVD R High Compatibility Mode 42 13 12 Disable Drives 42 13 13 CD Overburn 43 13 14 Max Failure per Job 43 13 15 Max Failure per Drive 44 14 System Utilities 44 14 1 Disc Info 45 14 2 S...

Page 5: ...formats Load Copy Compare Verify Emulate Editing etc Track selection available for copying music tracks On the fly direct copy or through hard drive loading User friendly LCD display Important Note Ma...

Page 6: ...c capacity depends on your model configuration Tower populated with drives Two Power cords 1 for autoloader and 1 for tower Serial Cable User Manual 5 64 hex head key Allen wrench and a bottle with oi...

Page 7: ...and 22x certified DVD media From time to time the drives have to be cleaned using a CD Lens cleaning Kit or blowing air using a compressed gas duster The 2 shafts used by the Picker to travel up and d...

Page 8: ...HERA LS Series CD DVD Duplication System User Manual 4 Fig 1 System unassembled Fig 2 Fig 3 Tower alignment Side view...

Page 9: ...of vibration and excessive lighting Allow at least four 4 inches of clearance around the sides and back of the system for ventilation Connecting power Plug one power cable into the tower system and th...

Page 10: ...LS Series CD DVD Duplication System User Manual 6 Fig 4a System assembled HERA 3 330 disc capacity HERA 6 630 disc capacity HERA 9 900 disc capacity Fig 4b Back View Cables configuration same on all m...

Page 11: ...re contain Copy Protection In addition to the copy protection limitation the autoloader will only copy a single layer 4 7 GB disc to another single layer recordable media If your autoloader has double...

Page 12: ...ues The most common problems when using an autoloader are the disc static and sticky media issues These static charge problems cause multiple discs to stick together resulting in improper operation an...

Page 13: ...to the bins as well as this may cause errors in placement and loading The figure below shows the proper and incorrect disc placements when loading media into the bins 2 The Robotic Platform The autolo...

Page 14: ...up through the menu or list Down Scroll down through the menu or list Enter Execute the function Also called OK in the Menus ESC Go back to the previous function Copy Copy Quick key to make a copy Pre...

Page 15: ...u start a printing process please make sure you have successfully loaded your LightScirbe label file s into the Hard Drive via the Load Label function under Print Setup See page 35 for details For add...

Page 16: ...isc formats For additional information see Select Burn Speed on page 28 8 Select Source page 29 Use the Select Source menu or the Source quick key to tell the system where the content of the master di...

Page 17: ...utoloader to skip any read errors that it encounters It is ON by default Important This function does not fix the error it only skips it to continue copying the rest of the readable data This function...

Page 18: ...only found in commercial Audio CDs and rarely seen on home made Audio CDs By enabling this feature the duplication performance will be lowered 12 Disable Drives Use this utility to allow the system to...

Page 19: ...he mechanical alignment between the drives and the robotic arm See Drive Alignment on page 46 for more information 2 Alignment Protection Enabling Alignment Protection makes each drive tray quickly sl...

Page 20: ...artitions loaded by USER 1 which includes partition A To take advantage of this feature follow these instructions Change the Administrator password Refer to Edit User Info on page 49 for additional in...

Page 21: ...rm will pick up discs from the Input Bin and place them into the drives If any of the discs in the drives contains data in this case that would be the first disc the Master Disc for job A the autoload...

Page 22: ...will be skipped Examples of four digit numbers are 0234 two hundred and thirty four or 0010 ten To enter the number you need to use the Up or Down button to select the number for each digit and use th...

Page 23: ...through the alphabet Press the Enter button once to move the cursor to the next position Press the Down button repeatedly until U is displayed Press the Enter button once to move the cursor to the nex...

Page 24: ...ns on how to do this Turn on your autoloader and wait until it has booted up It should take several minutes for the autoloader to go through its self adaptive test and auto calibration procedures You...

Page 25: ...e master disc 12 indicates the current progress of the duplication 0 indicates you have made 0 copies so far Note It is normal to see the progress indicator stay at 0 10 and 100 for approximately 30 s...

Page 26: ...sc has been detected the reserve partition s content of the previous master disc will be replaced with the content of the new master disc For more information on Multi Master Mode see Single Master an...

Page 27: ...le and place those into drives until either all of the drives are full or all Input Spindles are empty It takes a few seconds for the autoloader to recognize all of the discs in the trays Once all of...

Page 28: ...l it has booted up You should see the following signifying your autoloader is ready To start the printing process place your LightScribe printable discs in to the Input Spindle with the label side fac...

Page 29: ...ced the printed disc into the Output Spindle the loader will then pick up another LightScribe printable disc and load it into the drive This is then repeated for each drive The printing process will c...

Page 30: ...r media during the simulation the content on those discs will be permanently erased Operation in Test mode is identical to operation in Copy mode See Copy on page 20 for instructions 4 Compare Use the...

Page 31: ...ontent of the master disc residing in the Hard Drive partition you specified When the comparison job is complete the autoloader will place the good discs and failed discs into corresponding areas and...

Page 32: ...However under some circumstances you might want to lower down the duplication speed Those circumstances are Poor Blank Media Quality When your media quality is sub par lowering the duplication speed i...

Page 33: ...lly be returned to the Main Menu 8 Select Source The Select Source menu or the Source quick key is used to set the Master Reading Source In the autoloader the Master Reading Source is always the Hard...

Page 34: ...o select between the two options and press the Enter button to continue Follow the instructions shown in Setting Counters on page 18 to continue Once the counters have been set press the Enter button...

Page 35: ...up The Hard Drive Setup menu consists of following sub menus 1 Select Partition 2 Load Partition 3 Rename Partition 4 Delete Partition 5 Partition Info 6 Partition Size 7 Format Hard Drive Each of the...

Page 36: ...select it Depending on whether you are loading the master into a new partition or into an existing partition you will see one of these two screens New Partition Existing Partition Edit Partition Name...

Page 37: ...ition confirmation message Press the Enter button to continue The autoloader displays the Deleted message for two seconds and then returns you to the Delete Partition menu 10 5 Partition Info The Part...

Page 38: ...ill have 31 partitions available for use Or you can calculate the number of DVD9 format partitions using the formula 160 9 17 77 Since you cannot use an incomplete partition there will be a total of 1...

Page 39: ...ontains your LightScribe label file and place it into a drive for analyzing Upon successfully analyzing your label disc you have the following options Load all labels found in the disc The system can...

Page 40: ...autoloader Delete Label confirmation message display press the ENT Enter button to continue The autoloader displays the Deleted message for two seconds and then returns you to the Delete Label menu 1...

Page 41: ...ip Normally when the autoloader encounters a read error while reading your master disc the duplication is aborted and all the recordable media in the writers are ruined However if you believe that you...

Page 42: ...lect the Max Audio VCD CDG Speed menu and press the Enter button to enter that menu Use the Up or Down button to select the desired maximum writing speed for Audio VCD and CDG and press the Enter butt...

Page 43: ...be displayed when your autoloader has been idle for a long period of time Use the Up or Down buttons to select the Screen Saver menu and press the Enter button to enter that menu Use the Up or Down b...

Page 44: ...bled function is on or off and press the Enter button to select that option Once you get back to the main menu use the Up or Down button to navigate to the following screen Fill the input spindle s wi...

Page 45: ...until you run out of blank discs At this point you can either load more discs on to the input spindle s and press the Enter button to continue or press the ESC button to terminate your project 13 10 I...

Page 46: ...e the asterisk in front of Enable or Disable Use the Up or Down button until you see the Save Changes screen and press the Enter button to save the changes you made Once the changes are saved you shal...

Page 47: ...xt position Press the Down button repeatedly until 2 is displayed Press ENT Enter button once to move the cursor to the next position Press the Down button repeatedly until 1 is displayed Now 021 is d...

Page 48: ...dia you are using the Disc Info function can help you identify the type of disc and provide information about the data encoded on the disc For blank recordable discs it will tell you the media s forma...

Page 49: ...function will update the software of your autoloader To update you need to insert the manufacturer s Certified Update CD into the 1 st tray and select this function by pressing the Enter button We st...

Page 50: ...rocess When you have finished checking the alignment of the drive s the robotic arm will move the disc to the arms top position and hold it there You will see the Alignment Next menu Drive Alignment A...

Page 51: ...ssword and press the Enter button to submit the current digit You will automatically move to the next digit Repeat these steps until you ve selected all four digits for your password After you have en...

Page 52: ...d During this process you will be asked to select the existing account and then you will be prompted to enter the new user name and new user password for this account Note User Admin is the administra...

Page 53: ...5 Password on Bootup This menu allows you to enable or disable the Password on Bootup feature During this process you will be asked to select Yes or No enable or disable Press the Enter button to ent...

Page 54: ...message Press the power button to power off the system LightScribe Software Setup Instruction Minimum Hardware Requirements 1 Pentium 3 Class microprocessor or better 2 CD RW Recorder 3 32Mbytes of RA...

Page 55: ...lation Disc Where is the icon for this statement 6 You will then be asked to choose the LightScribe writer model that was installed in your duplication system The default writer that comes with your s...

Page 56: ...Duplication System User Manual 52 LightScribe System Software Template Labeler 8 Upon successful installation of the above software click the Finish button to complete the installation Where is the ic...

Page 57: ...stalling the software please contact Tech Support for assistance Section 1 Design your labels with LightScribe Template Labeler and create a LightScribe Label CD Step 1 Launch the LightScribe Template...

Page 58: ...may appear in multiple categories 2 Click on your Template choice to activate 3 If you prefer more advanced design capabilities instead of the pre designed templates you can do following a Design you...

Page 59: ...dedicated area to select the picture you d like to use 4 Use the Zoom button or the scroll wheel of your mouse to size the picture and then drag it to position where you want it within the selection...

Page 60: ...sked for the location the name of the label file s you wish to generate In addition due to the system display limitation make sure the file name does not contain any foreign characters other than thos...

Page 61: ...VD Check the master CD DVD itself for damage Your master disc may be copy protected Normally most of the DVDs and some of the CDs you purchase from stores have been copy protected Buttons do not funct...

Page 62: ...comes with a lifespan After a period of time they do tend to wear out Please contact Tech Support Service for assistance F Y I Replacing any component of the autoloader without Tech Support Service s...

Reviews: