5
6. Montaje e instalación
6.1 Montaje de las Patas
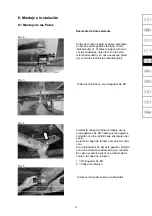
Desmontar la Pata existente
Fig. 2
Fig. 3
Fig. 4
Fig. 5
Colocar el casquillo sobre el cubrejuntas
Soltar los tornillos en el prolongador AL-KO
Insertar la chapa de refuerzo debajo de los
prolongadores AL-KO hasta que los agujeros
coincidan con los tornillos que sobresalen del
suelo.
Apretar la chapa de refuerzo al suelo del vehí-
culo.
Si el prolongador AL-KO está pegado, soltarlo
con una herramienta adecuada (p.e. cuchillo).
En caso necesario aplicar un producto desli-
zante a la chapa de refuerzo
1 = Prolongador AL-KO
2 = Chapa de refuerzo
Antes de montar la pata se debe comprobar
en ambos prolongadores la altura 10 mm
indicada (fig. 2). Si hubiere lugar a ello mar-
car las cavidades, dejar libre con la herra-
mienta adecuada y en caso necesario prote-
ger contra las influencias climatológicas.
10mm
25mm
2
1
Summary of Contents for E.C.S12
Page 1: ...Montage und Bedienungsanleitung f r Elektrisches Comfort St tzensystem E C S 1361478 _...
Page 24: ......
Page 25: ...Assembly and Operating Instructions for the Electric Comfort Steady System E C S 1361478 _...
Page 48: ......
Page 49: ...Notice de montage et d utilisation du syst me de v rins r glage lectronique E C S 1361478 _...
Page 72: ......
Page 96: ......
Page 97: ...Manual de instrucciones y de montaje para Sistema de patas Comfort el ctrico E C S 1361478 _...
Page 120: ......
Page 121: ...Montage en bedieningshandleiding voor Elektric Comfort Steunsysteem E C S 1361478 _...
Page 145: ...Monterings og betjeningsvejledning til Elektrisk komfortst ttesystem E C S 1361478 _...
Page 168: ......
Page 169: ...Monterings og bruksanvisning for elektrisk comfort st ttebensystem E C S 1361478 _...
Page 192: ......
Page 193: ...Monterings och bruksanvisning f r elektriskt komfort st dbenssystem E C S 1361478 _...
Page 216: ......
Page 217: ...Asennus ja k ytt ohjeet S hk k ytt inen Comfort tukij rjestelm E C S 1361478 _...
Page 240: ......


