background image

98

Chapter 5

Dual Arbitrary Waveform Generator

Arbitrary (ARB) Waveform File Headers

Playing a Waveform File that Contains a Header

After a waveform file (AUTOGEN_WAVEFORM) is generated in a modulation format and the format is 
turned off, the file becomes accessible to and can be played back in only the dual ARB player. This is also 
true for downloaded waveform files (downloading files is described in the Programming Guide). When the 
waveform is selected for playback, the saved header information is used by the signal generator. Some of 
these settings appear as part of the labels of the softkeys used to set the parameters, and also appear on the 
dual ARB summary display (see 

Figure 5-8

).

NOTE

The signal generator used to play back a stored waveform file must have the same options 
as are required to generate the file.

For details on applying file header settings and playing back a waveform, see 

“Playing a Waveform” on 

page 102

.

To properly set up the instrument:

1. Select the waveform.
2. Modify the signal generator settings as desired.
3. Turn on the dual ARB.

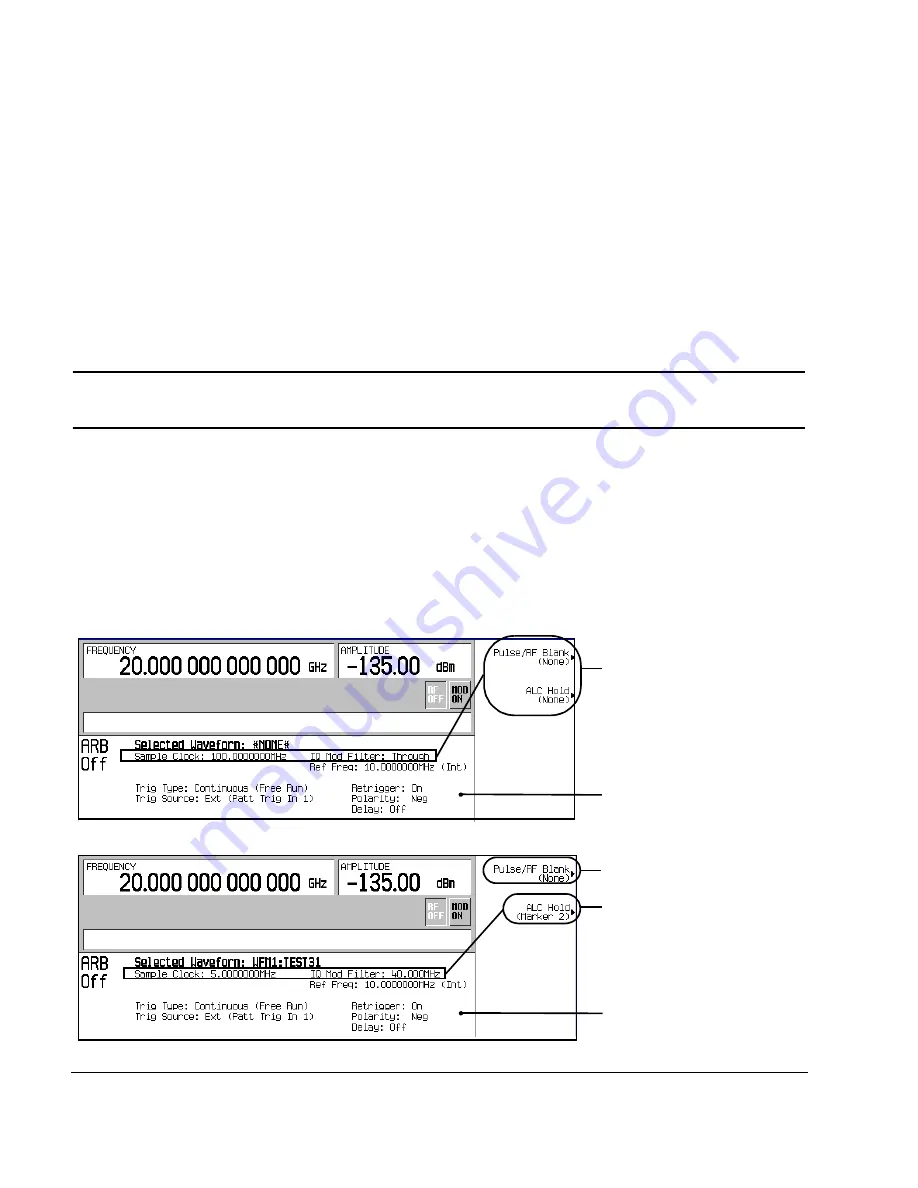
Figure 5-8

File Header Settings

Header setting same as 
preset setting

Header setting applied

Summary Display

The waveform is selected; 

saved header settings are 

applied.

Can change when a 
waveform is selected

Summary Display

The waveform is not selected; 

preset settings are applied.

Summary of Contents for E8247C

Page 1: ...ware and hardware revisions signal generator design and operation may vary from descriptions in this guide We recommend that you use the latest revision of this guide to ensure you have up to date product information Compare the print date of this guide see bottom of page with the latest revision which can be downloaded from the following website www agilent com find psg Manufacturing Part Number ...

Page 2: ... merchantability and fitness for a particular purpose Agilent shall not be liable for errors or for incidental or consequential damages in connection with the furnishing use or performance of this document or any of the Agilent products to which it pertains Should Agilent have a written contract with the User and should any of the contract terms conflict with these terms the contract terms shall c...

Page 3: ... 5 Front Panel 6 1 Display 7 2 Softkeys 7 3 Knob 7 4 Amplitude 7 5 Frequency 7 6 Save 7 7 Recall 7 8 Trigger 8 9 MENUS 8 10 Help 8 11 EXT 1 INPUT 8 12 EXT 2 INPUT 9 13 LF OUTPUT 9 14 Mod On Off 9 15 ALC INPUT 9 16 RF On Off 9 17 Numeric Keypad 9 18 RF OUTPUT 10 19 SYNC OUT 10 20 VIDEO OUT 10 21 Line Power LED 10 22 Power Switch 10 23 Standby LED 10 24 Incr Set 10 25 GATE PULSE TRIGGER INPUT 10 26 ...

Page 4: ...Area 16 6 Error Message Area 16 7 Text Area 16 8 Softkey Label Area 16 Rear Panel 17 1 AC Power Receptacle 18 2 GPIB 18 3 AUXILIARY INTERFACE 18 4 LAN 18 5 STOP SWEEP IN OUT 19 6 Z AXIS BLANK MKRS 19 7 SWEEP OUT 19 8 TRIGGER OUT 19 9 TRIGGER IN 19 10 SOURCE SETTLED 19 11 EVENT 1 20 12 EVENT 2 20 13 PATTERN TRIG IN 20 14 BURST GATE IN 20 15 AUXILIARY I O 21 16 Digital Bus 22 17 WIDEBAND I INPUT 22 ...

Page 5: ...ng a Modulation Format to the RF Output 51 Using Data Storage Functions 52 Using the Memory Catalog 52 Using the Instrument State Register 54 Enabling Options 57 Enabling a Software Option 57 3 Optimizing Performance 59 Selecting ALC Bandwidth 59 To Select an ALC Bandwidth 59 Using External Leveling 60 To Level with Detectors and Couplers Splitters 60 To Level with a mm Wave Source Module 63 Creat...

Page 6: ...mplitude 82 To Set the Pulse Period and Width 82 To Activate Pulse Modulation 82 Configuring the LF Output 83 To Configure the LF Output with an Internal Modulation Source 84 To Configure the LF Output with a Function Generator Source 85 5 Dual Arbitrary Waveform Generator 87 Arbitrary ARB Waveform File Headers 88 Creating a File Header for a Modulation Format Waveform 89 Modifying Header Informat...

Page 7: ...r Clipping 112 To Configure Rectangular Clipping 112 Waveform Clipping Concepts 113 6 Custom Arb Waveform Generator 119 Overview 120 Working with Predefined Setups Modes 121 Selecting a Custom ARB Setup or a Custom Digital Modulation State 121 Working with User Defined Setups Modes Custom Arb Only 122 Modifying a Single Carrier NADC Setup 122 Customizing a Multicarrier Setup 123 Recalling a User D...

Page 8: ...External DATA CLOCK to Receive Input as Either Normal or Symbol 159 To Set the BBG DATA CLOCK to External or Internal 159 To Adjust the I Q Scaling 159 Working with Phase Polarity 160 To Set Phase Polarity to Normal or Inverted 160 Working with Differential Data Encoding 160 Understanding Differential Encoding 160 Using Differential Encoding 165 8 Multitone Waveform Generator 169 Overview 170 Crea...

Page 9: ...eep Problems 194 Sweep Appears to be Stalled 194 Cannot Turn Off Sweep Mode 194 Incorrect List Sweep Dwell Time 195 List Sweep Information is Missing from a Recalled Register 195 Data Storage Problems 196 Registers With Previously Stored Instrument States are Empty 196 Saved Instrument State but Register is Empty or Contains Wrong State 196 Cannot Turn Off Help Mode 197 Signal Generator Locks Up 1...

Page 10: ...Contents x ...

Page 11: ...t PSG signal generators The modes of operation front panel user interface as well as front and rear panel connectors are also described Signal Generator Models and Features on page 2 Options on page 4 Firmware Upgrades on page 4 Modes of Operation on page 5 Front Panel on page 6 Front Panel Display on page 13 Rear Panel on page 17 ...

Page 12: ...rces user flatness correction external diode detector leveling automatic leveling control ALC on and off modes power calibration in ALC off mode is available even without power search 10 MHz reference oscillator with external output RS 232 GPIB and 10Base T LAN I O interfaces a millimeter head interface that is compatible with Agilent 83550 Series millimeter heads for frequency extension up to 110...

Page 13: ...t includes the following selectable pulse modes internal square internal free run internal triggered internal doublet internal gated and external pulse internal triggered internal doublet and internal gated require an external trigger source adjustable pulse rate adjustable pulse period adjustable pulse width adjustable pulse delay selectable external pulse triggering positive or negative dual fun...

Page 14: ...ipped with your signal generator provides an overview of available options For details refer to the Agilent Technologies website 1 Open www agilent com find psg 2 Select the desired model 3 Click View complete price list Firmware Upgrades The firmware in your signal generator may be upgraded when new firmware is released New firmware releases may contain signal generator features and functionality...

Page 15: ...ables repeatable playback of test signals To learn more refer to Custom Arb Waveform Generator on page 119 Custom Real Time I Q Baseband mode produces a single carrier but it can be modulated with real time data that allows real time control over all of the parameters that affect the signal The single carrier signal that is produced can be modified by applying various data patterns filters symbol ...

Page 16: ... list of items that your particular signal generator has is dependent on its model and options Figure 1 1 Front Panel Diagram E8267C PSG Vector Signal Generator 11 EXT 1 INPUT 12 EXT 2 INPUT 10 Help 8 Trigger 13 LF OUTPUT 15 ALC INPUT 1 Display 27 Hold 2 Softkeys 3 Knob 4 Amplitude 5 Frequency 6 Save 9 MENUS 24 Incr Set 7 Recall 18 RF OUTPUT 17 Numeric Keypad 26 Arrows 28 Return 29 Display Contras...

Page 17: ...on You can change the output frequency or use the menus to configure frequency attributes such as frequency multiplier offset and reference 6 Save Pressing this hardkey accesses a menu of choices enabling you to save data in the instrument state register The instrument state register is a section of memory divided into 10 sequences numbered 0 through 9 each containing 100 registers numbered 00 thr...

Page 18: ...r the next key you press without activating the key s function Any key pressed afterward exits the help mode and its function is activated In continuous mode help text is provided for each subsequent key press until you press the Help hardkey again or change to single mode In addition each key is active meaning that the key function is executed except for the Preset key 11 EXT 1 INPUT This female ...

Page 19: ...ation format must still be set up and activated for example AM AM On or nothing is applied to the output carrier signal when the Mod On Off hardkey is enabled The MOD ON OFF annunciator which is always present on the display indicates whether active modulation formats have been enabled or disabled with the Mod On Off hardkey 15 ALC INPUT This female BNC input connector is used for negative externa...

Page 20: ...r panel 21 Line Power LED This green LED indicates when the signal generator power switch is set to the on position 22 Power Switch In the on position this switch activates full power to the signal generator in standby it deactivates all signal generator functions In standby the signal generator remains connected to the line power and power is supplied to some internal circuits 23 Standby LED This...

Page 21: ...bel area and text areas on the display Softkeys arrow hardkeys the knob the numeric keypad and the Incr Set hardkey have no effect once this hardkey is pressed 28 Return Pressing this hardkey will return the signal generator one level back from its current softkey menu level to the previous softkey menu level It enables you to step back through the menus until you reach the first menu you selected...

Page 22: ...tor E8267C only is CMOS compatible and accepts an externally supplied data clock input signal to synchronize serial data for use with the internal baseband generator Option 002 602 The expected input is a 3 3 V CMOS bit clock signal which is also TTL compatible where the rising edge is aligned with the beginning data bit The falling edge is used to clock the DATA and SYMBOL SYNC signals The maximu...

Page 23: ...example if frequency is the active function the current frequency setting will be displayed here If the current active function has an increment value associated with it that value is also displayed 2 Frequency Area The current frequency setting is shown in this portion of the display Indicators are also displayed in this area when the frequency offset or multiplier is used the frequency reference...

Page 24: ...and the internal oven reference oscillator is not cold they appear in the same location ENVLP This annunciator appears if a burst condition exists such as when marker 2 is set to enable RF blanking in the Dual ARB format ERR This annunciator appears when an error message is in the error queue This annunciator does not turn off until you either view all the error messages or cleared the error queue...

Page 25: ...RF ON OFF This annunciator indicates when the RF and microwave signal is present RF ON at the RF OUTPUT or if the RF and microwave signal is not present RF OFF at the RF OUTPUT Either condition of this annunciator is always visible in the display S This annunciator appears when the signal generator has generated a service request SRQ over the RS 232 GPIB or VXI 11 LAN interface SWEEP This annuncia...

Page 26: ...ule is enabled and when user flatness is enabled 6 Error Message Area Abbreviated error messages are reported in this space When multiple error messages occur only the most recent message remains displayed Reported error messages with details can be viewed by pressing Utility Error Info 7 Text Area This text area of the display show signal generator status information such as the modulation status...

Page 27: ...r a description of these connectors see Front Panel on page 6 Figure 1 3 Rear Panel Diagram 3 AUXILIARY INTERFACE 2 GPIB 13 PATTERN TRIG 27 10 MHz IN 26 10 MHz OUT 12 EVENT 2 11 EVENT 1 4 LAN 1 AC Power Receptacle 28 10 MHz EFC Option UNR 14 BURST GATE IN 15 AUXILIARY I O 16 Digital Bus 17 WIDEBAND I INPUT 18 WIDEBAND Q INPUT 20 I OUT 21 I bar OUT 22 Q OUT 23 Q bar OUT 24 BASEBAND GEN 8 TRIGGER OU...

Page 28: ...munication and Master Slave source synchronization Figure 1 4 4 LAN This LAN interface allows ethernet local area network communication through a 10Base T LAN cable The yellow LED on the interface illuminates when data transmission transfer receive is present The green LED illuminates when there is a delay in data transmission or no data transmission is present Table 1 3 Auxiliary Interface Connec...

Page 29: ...dless of sweep width The output impedance is less than 1Ω and can drive a 2 kΩ load When connected to an Agilent Technologies 8757D network analyzer it generates a selectable number of equally spaced 1 ms 10 V pulses nominal across a ramp analog sweep The number of pulses can be set from 101 to 1601 by remote control through the 8757D 8 TRIGGER OUT This female BNC connector in step list sweep mode...

Page 30: ...lots Data is enabled when the signal is low In arbitrary waveform mode the EVENT 2 connector outputs a timing signal generated by Marker 2 A marker 3 3V CMOS high when positive polarity is selected 3 3V CMOS low when negative polarity is selected is output on the EVENT 2 connector whenever a Marker 2 is turned on in the waveform The damage levels for this connector are 8V and 4V 13 PATTERN TRIG IN...

Page 31: ...l data generator or the externally supplied signal at data input Used with an internal baseband generator In arbitrary waveform mode this pin output a timing signal generated by Marker 3 A marker 3 3V CMOS high when positive polarity is selected 3 3V CMOS low when negative polarity is selected is output on this pin when a Marker 3 is turned on in the waveform Reverse damage levels 8V and 4V Accept...

Page 32: ...ale BNC connector allows direct high bandwidth analog inputs to the I Q modulator in the 3 2 to 20 GHz frequency range This input is not calibrated and accepts a 0 dBm maximum power 19 COH COHERENT CARRIER OUTPUT This female SMA connector E8267C only outputs an RF signal that is phase coherent with the signal generator carrier The coherent carrier connector outputs RF that is not modulated with AM...

Page 33: ...602 to output the complement of the analog quadrature phase component of I Q modulation on signal generators without Option 002 602 this female BNC connector can be used to output the complement of the quadrature phase component of an external I Q modulation that has been fed into the Q input connector Q bar OUT is used in conjunction with Q OUT to provide a balanced baseband stimulus Balanced sig...

Page 34: ...his connector and automatically switches from internal to external reference operation The nominal input impedance is 50Ω For Option UNR this BNC connector accepts a signal with a nominal input level of 5 5 dBm The external frequency reference must be 10 MHz within 1 ppm The nominal input impedance is 50Ω with a damage level of 10 dBm 28 10 MHz EFC Option UNR This female BNC input connector accept...

Page 35: ...guring a Continuous Wave RF Output on page 28 Configuring a Swept RF Output on page 31 Using Ramp Sweep Option 007 on page 37 Extending the Frequency Range with a mm Wave Source Module on page 47 Turning On a Modulation Format on page 50 Applying a Modulation Format to the RF Output on page 51 Using Data Storage Functions on page 52 Enabling Options on page 57 ...

Page 36: ...t Mode Values table editor as shown below Figure 2 1 Active Function Area displays the active table item while its value is edited Cursor an inverse video identifier used to highlight specific table items for selection and editing Table Softkeys select table items preset table values and modify table structures Table Items values arranged in numbered rows and titled columns The columns are also kn...

Page 37: ...ge Down displays table items that occupy rows outside the limits of the ten row table display area More 1 of 2 accesses Load Store and its associated softkeys Load Store opens a menu of softkeys Load From Selected File Store To File Delete File Goto Row Page Up and Page Down used to load table items from a file in the memory catalog or to store the current table items as a file in the memory catal...

Page 38: ...e factory defined state Press Preset NOTE You can change the preset condition of the signal generator to a user defined state For these examples however use the factory defined preset state set the Preset Normal User softkey in the Utility menu to Normal 2 Observe the FREQUENCY area of the display in the upper left hand corner The value displayed is the maximum specified frequency of the signal ge...

Page 39: ...wn as incremental or decremental to 0 Hz 1 Preset the signal generator Press Preset 2 Set the frequency reference to 700 MHz Press Frequency 700 MHz More 1 of 3 Freq Ref Set This activates the frequency reference mode and sets the current output frequency 700 MHz as the reference value The FREQUENCY area displays 0 000 Hz which is the frequency output by the hardware 700 MHz minus the reference va...

Page 40: ...though the display changes the output power does not change Any subsequent power changes are shown as incremental or decremental to 0 dB 1 Press Preset 2 Set the amplitude to 20 dBm Press Amplitude 20 dBm 3 Activate the amplitude reference mode and set the current output power 20 dBm as the reference value Press More 1 of 2 Ampl Ref Set The AMPLITUDE area displays 0 00 dB which is the power output...

Page 41: ...NCY and AMPLITUDE areas of the signal generator s display are deactivated depending on what is being swept Step sweep see page 32 and ramp sweep see page 34 provide a linear progression through the start to stop frequency and or amplitude values while list sweep enables you to create a list of arbitrary frequency amplitude and dwell time values and sweep the RF output based on that list The list s...

Page 42: ...he RF output will sweep from the start amplitude frequency to the stop amplitude frequency dwelling at equally spaced intervals defined by the Points softkey value To Configure a Single Step Sweep In this procedure you create a step sweep with nine equally spaced points and the following parameters frequency range from 500 MHz to 600 MHz amplitude from 20 dBm to 0 dBm dwell time 500 ms at each poi...

Page 43: ... the display the SWEEP annunciator appears for the duration of the sweep and a progress bar shows the progression of the sweep The Single Sweep softkey can also be used to abort a sweep in progress To see the frequencies sweep again press Single Sweep to trigger the sweep To Configure a Continuous Step Sweep Press Sweep Repeat Single Cont This toggles the sweep from single to continuous A continuo...

Page 44: ...a Single List Sweep Using Step Sweep Data In this procedure you will leverage the step sweep points and change the sweep information by editing several points in the List Mode Values table For information on using tables see Using Table Editors on page 26 1 Press Sweep Repeat Single Cont This toggles the sweep repeat from continuous to single The SWEEP annunciator is turned off The sweep will not ...

Page 45: ... This changes the frequency value in row 4 to 545 MHz 8 Highlight any column in the point 7 row and press Insert Row This adds a new point between points 7 and 8 A copy of the point 7 row is placed between points 7 and 8 creating a new point 8 and renumbering the successive points 9 Highlight the frequency item for point 8 then press Insert Item Pressing Insert Item shifts frequency values down on...

Page 46: ...when you press the Trigger hardkey 4 Press More 2 of 2 Single Sweep This arms the sweep The ARMED annunciator is activated 5 Press the Trigger hardkey The signal generator will single sweep the points in your list and the SWEEP annunciator will be activated during the sweep To Configure a Continuous List Sweep Press Sweep Repeat Single Cont This toggles the sweep from single to continuous A contin...

Page 47: ...basic ramp sweep and how to configure a ramp sweep for a master slave setup see page 45 Refer to the Programming Guide for an example program that uses pass thru commands in a ramp sweep system pass thru commands enable you to temporarily interrupt ramp sweep system interaction so that you can send operating instructions to the PSG Using Basic Ramp Sweep Functions This procedure demonstrates the f...

Page 48: ...e 8757A C E documentation instead of this procedure Figure 2 2 Equipment Setup 2 Turn on both the 8757D and the PSG 3 On the 8757D press SYSTEM MORE SWEEP MODE and verify that the SYSINTF softkey is set to ON This ensures that the system interface mode is activated on the 8757D The system interface mode enables the instruments to work as a system 4 Press Utility GPIB RS 232 LAN to view the PSG s G...

Page 49: ...AMPLITUDE areas of the signal generator s display are deactivated depending on what is being swept In this case since frequency is being swept nothing appears in the FREQUENCY area of the display 7 Press Frequency Freq CW The current continuous wave frequency setting now controls the RF output and ramp sweep is turned off 8 Press Freq Start The ramp sweep settings once again control the RF output ...

Page 50: ...automatically turns on The marker also appears on the 8757D display 3 Use the arrow keys to move the cursor in the table editor to marker 1 and select a frequency value within the range of your sweep but different from marker 0 Notice that marker 1 is activated and is the currently selected marker indicated by the marker arrow pointing down As you switch between markers using the arrow keys you wi...

Page 51: ...er 0 Ref appears in the far right column also labeled Ref to indicate which marker is the reference Refer to Figure 2 4 Figure 2 4 Marker Table Editor 5 Move the cursor back to marker 1 and press Marker Freq Turn the front panel knob while observing marker 1 on the 8757D On the 8757D notice that the displayed amplitude and frequency values for marker 1 are relative to marker 0 as the marker moves ...

Page 52: ...Sweep List This opens a menu of sweep control softkeys and displays a status screen summarizing all the current sweep settings 2 Press Configure Ramp Step Sweep Since ramp is the current sweep type softkeys in this menu specifically control ramp sweep settings When step is the selected sweep type the softkeys control step sweep settings Notice that the Freq Start and Freq Stop softkeys appear in t...

Page 53: ...strument State Register on page 54 2 Turn the front panel knob until you find an available register and press SAVE Remember this saved register number If no registers are available you can write over an in use register by pressing Re SAVE NOTE When you are using the PSG in a system with an 8757 network analyzer you are limited to using registers 1 through 9 in sequence 0 for saving and recalling s...

Page 54: ...rns off both the current sweep and the alternate sweep from the previous task The current CW settings now control the RF output 2 Press Configure Ramp Step Sweep 3 Using the Ampl Start and Ampl Stop softkeys set an amplitude range to be swept 4 Press Return Sweep Ampl The new amplitude ramp sweep settings control the RF output and the CW mode is turned off ...

Page 55: ... 2 7 Use a 9 pin D subminiature male RS 232 cable with the pin configuration shown in Figure 2 8 on page 46 to connect the auxiliary interfaces of the two PSGs You can also order the cable part number 8120 8806 from Agilent Technologies By connecting the master PSG s 10 MHz reference standard to the slave PSG s 10 MHz reference input the master s timebase supplies the frequency reference for both ...

Page 56: ...requency and power settings for ramp sweep 4 Set the slave PSG s sweep time to match that of the master Sweep times must be the same for both PSGs 5 Set the slave PSG to continuous triggering The slave must be set to continuous triggering but the master can be set to any triggering mode 6 On the slave PSG press Sweep List Sweep Type Sweep Control Slave This sets the PSG to operate in slave mode 7 ...

Page 57: ...e source module s RF input should be less than 1 5 dB Required Equipment Agilent 83550 Series millimeter wave source module Agilent 8349B microwave amplifier Signal generators without Option 1EA E8247C PSG and E8257C PSG require an Agilent 8349B microwave amplifier Signal generators with Option 1EA can drive the output of millimeter wave source modules to maximum specified power without a microwav...

Page 58: ... automatically senses the mm wave source module switches the signal generator s leveling mode to external source module power is leveled at the mm wave source module output sets the mm wave source module frequency and amplitude to the source module s preset values and in the FREQUENCY and AMPLITUDE areas of the signal generator displays the RF output frequency and amplitude values available at the...

Page 59: ...e signal generator s display indicate that the mm wave source module is active NOTE Refer to the mm wave source module specifications for the specific frequency and amplitude ranges 2 If the RF OFF annunciator is displayed press RF On Off Leveled power should be available at the output of the millimeter wave source module To obtain flatness corrected power refer to Creating and Applying User Flatn...

Page 60: ...he state of the modulation format as well as the active modulation format annunciator The modulation format generates but the carrier signal is not modulated until you apply it to the RF output see page 51 Depending on the modulation format the signal generator may require a few seconds to build the signal Within the digital formats E8267C PSG with Option 002 602 only you may see a BaseBand Reconf...

Page 61: ...dulation format is turned on To Turn RF Output Modulation On Press the Mod On Off key until the MOD ON annunciator appears in the display The carrier signal should be modulated with all active modulation formats This is the factory default To Turn RF Output Modulation Off Press the Mod On Off key until the MOD OFF annunciator appears in the display The carrier signal is no longer modulated or capa...

Page 62: ... parameters such as frequency amplitude and mode LIST sweep data from the List Mode Values table including frequency amplitude and dwell time User Flatness user flatness calibration correction pair data user defined frequency and corresponding amplitude correction values FIR Finite Impulse Response FIR filter coefficients ARB Catalog Types E8267C PSG with Option 002 602 only user created files Wav...

Page 63: ... numbers 0 to 9 5 Press Enter The file should be displayed in the Catalog of List Files showing the file name file type file size and the date and time the file was modified Viewing Stored Files in the Memory Catalog 1 Press Utility Memory Catalog Catalog Type All files in the memory catalog are listed in alphabetical order regardless of which catalog type you select File information appears on th...

Page 64: ...m c Press AM AM Off On 2 Press Save Select Seq The sequence number becomes the active function The signal generator displays the last sequence used Using the arrow keys set the sequence to 1 3 Press Select Reg The register number in sequence 1 becomes the active function The signal generator displays either the last register used accompanied by the text in use or if no registers are in use registe...

Page 65: ... instrument state settings should have been recalled Deleting Registers and Sequences These procedures describe how to delete registers and sequences saved to an instrument state register Deleting a Specific Register within a Sequence 1 Press Preset 2 Press the Recall or Save hardkey Notice that the Select Seq softkey shows the last sequence that you used 3 Press Select Seq and enter the sequence ...

Page 66: ... the registers you want to delete 4 Press Delete all Regs in Seq n This deletes all registers in the selected sequence Deleting All Sequences CAUTION Be sure you want to delete the contents of all registers and all sequences in the instrument state register 1 Press Preset 2 Press the Recall or Save hardkey Notice that the Select Seq softkey shows the last sequence that you used 3 Press Delete All ...

Page 67: ...ware options and any software options that can be enabled 2 Verify that the host ID shown on the display matches the host ID on the license key certificate The host ID is a unique number for every instrument If the host ID on the license key certificate does not match your instrument the license key cannot enable the software option 3 Verify that any required hardware is installed Because some sof...

Page 68: ... the desired option b Press Modify License Key and enter the 12 character license key from the license key certificate c Verify that you want to reconfigure the signal generator with the new option Proceed With Reconfiguration Confirm Change The instrument enables the option and reboots ...

Page 69: ... output ALC bandwidth has five selections automatic 100 Hz 1 kHz 10 kHz and 100 kHz In automatic mode the preset selection the signal generator automatically adjusts the ALC bandwidth among three of the four possible settings depending on the active functions see Figure 3 1 Figure 3 1 Decision Tree for Automatic ALC Bandwidth Selection To Select an ALC Bandwidth Press Amplitude ALC BW 100 Hz 1 kHz...

Page 70: ...oupler power splitter setup or a millimeter wave source module To Level with Detectors and Couplers Splitters Figure 3 2 illustrates a typical external leveling setup The power level feedback to the ALC circuitry is taken from the external negative detector rather than the internal signal generator detector This feedback voltage controls the ALC system leveling the RF output power at the point of ...

Page 71: ...e ALC circuitry For more information see External Leveling with Option 1E1 Signal Generators on page 63 6 Observe the coupling factor printed on the directional coupler at the detector port Typically this value is 10 to 20 dB Enter the positive dB value of this coupling factor into the signal generator 7 Press More 1 of 2 Ext Detector Coupling Factor 16 or the positive representation of the value ...

Page 72: ...s for typical Agilent Technologies diode detectors Using this chart you can determine the leveled power at the diode detector input by measuring the external detector output voltage You must then add the coupling factor to determine the leveled output power The range of power adjustment is approximately 20 to 25 dBm Figure 3 3 Typical Diode Detector Response at 25 C ...

Page 73: ...modulator NOTE In the example above 55 dB is the preferred attenuation choice resulting in an ALC level of 15 dBm This provides adequate dynamic range for AM or other functions that vary the RF output amplitude To achieve the optimum ALC level at the signal generator RF output of 40 dBm for an unmodulated carrier follow these steps 1 Press Amplitude Set Atten 45 dB 2 Press Set ALC Level 5 dBm This...

Page 74: ...apply it to the signal generator s RF output Creating a User Flatness Correction Array In this example you create a user flatness correction array The flatness correction array contains ten frequency correction pairs amplitude correction values for specified frequencies from 1 to 10 GHz in 1 GHz intervals An Agilent E4416A 17A 18B 19B power meter controlled by the signal generator via GPIB and E44...

Page 75: ...s into the power meter as appropriate 4 Enable the power meter s cal factor array NOTE For operating information on a particular power meter sensor refer to its operating guide Connect the Equipment Connect the equipment as shown in Figure 3 4 NOTE During the process of creating the user flatness correction array the power meter is slaved to the signal generator via GPIB No other controllers are a...

Page 76: ...ting to communicate with the power meter 3 Press More 2 of 2 Configure Cal Array More 1 of 2 Preset List Confirm Preset This opens the User Flatness table editor and presets the cal array frequency correction list 4 Press Configure Step Array This opens a menu for entering the user flatness step array data 5 Press Freq Start 1 GHz 6 Press Freq Stop 10 GHz 7 Press of Points 10 Enter Steps 4 5 and 6...

Page 77: ... the User Flatness Correction Manually If you are not using an Agilent E4416A 17A 18B 19B power meter or if your power meter does not have a GPIB interface complete the steps in this section and then continue with the user flatness correction tutorial 1 Press More 1 of 2 User Flatness Configure Cal Array This opens the User Flatness table editor and places the cursor over the frequency value 1 GHz...

Page 78: ...n Return Flatness Off On This applies the user flatness correction array to the RF output The UF indicator is activated in the AMPLITUDE section of the signal generator s display and the frequency correction data contained in the correction array is applied to the RF output amplitude Recalling and Applying a User Flatness Correction Array Before performing the steps in this section complete Creati...

Page 79: ... interface 3 Recall your instrument state from the instrument state register For instructions see Saving an Instrument State on page 54 Creating a User Flatness Correction Array with a mm Wave Source Module In this example a user flatness correction array is created to provide flatness corrected power at the output of an Agilent 83554A millimeter wave source module driven by an E8247C signal gener...

Page 80: ...re 3 6 assume that the steps necessary to correctly level the RF output have been followed If you have questions about leveling with a millimeter wave source module refer to To Level with a mm Wave Source Module on page 63 Configure the Power Meter 1 Select SCPI as the remote language for the power meter 2 Zero and calibrate the power sensor to the power meter 3 Enter the appropriate power sensor ...

Page 81: ...terface connector 1 Turn off the line power to the signal generator 2 Connect the equipment For standard signal generators use the setup in Figure 3 5 For Option 1EA signal generators use the setup in Figure 3 6 NOTE During the process of creating the user flatness correction array the power meter is slaved to the signal generator via GPIB No other controllers are allowed on the GPIB interface Fig...

Page 82: ...gnal Generator 1 Turn on the signal generator s line power At power up the signal generator automatically does the following senses the mm wave source module switches the signal generator s leveling mode to external source module sets the mm wave source module frequency and amplitude to the source module s preset values displays the RF output frequency and amplitude available at the mm wave source...

Page 83: ...p array data 5 Press Freq Start 26 5 GHz 6 Press Freq Stop 40 GHz 7 Press of Points 28 Enter This enters the desired flatness corrected frequencies 26 5 GHz to 40 GHz in 500 MHz intervals into the step array 8 Press Return Load Cal Array From Step Array Confirm Load From Step Data This populates the user flatness correction array with the frequency settings defined in the step array 9 Press Amplit...

Page 84: ...atness correction tutorial 1 Press More 1 of 2 User Flatness Configure Cal Array This opens the User Flatness table editor and places the cursor over the frequency value 26 5 GHz for row 1 The RF output changes to the frequency value of the table row containing the cursor and 26 500 000 000 00 is displayed in the AMPLITUDE area of the display 2 Observe and record the measured value from the power ...

Page 85: ...es the user flatness correction array to the RF output The UF indicator is activated in the AMPLITUDE section of the signal generator s display and the frequency correction data contained in the correction array is applied to the RF output amplitude of the mm wave source module Recalling and Applying a User Flatness Correction Array Before performing the steps in this section complete the section ...

Page 86: ...e are governed by the synthesizer hardware within the PSG To optimize the overall phase noise performance of the signal generator for your particular application make this adjustment depending on your confidence in the stability and phase noise of the external or internal reference versus the synthesizer hardware for various frequency offsets from the carrier To Select the Reference Oscillator Ban...

Page 87: ...modulation capability in Agilent E8257C PSG Analog and E8267C PSG Vector Signal Generators Analog Modulation Waveforms on page 78 Configuring AM on page 79 Configuring FM on page 80 Configuring ΦM on page 81 Configuring Pulse Modulation on page 82 Configuring the LF Output on page 83 ...

Page 88: ...e frequencies and a percent of peak amplitude setting for the second tone available from function generator only Swept Sine swept sine wave with adjustable start and stop frequencies sweep rate and sweep trigger settings available from function generator only Triangle triangle wave with adjustable amplitude and frequency Ramp ramp with adjustable amplitude and frequency Square square wave with adj...

Page 89: ...a 0 dBm amplitude modulated carrier at 1340 kHz with the AM depth set to 90 and the AM rate set to 10 kHz The shape of the waveform is a sine wave Notice that sine is the default selection for the AM Waveform softkey which can be viewed by pressing More 1 of 2 To Turn on Amplitude Modulation Follow these remaining steps to output the amplitude modulated signal 1 Press the AM Off On softkey to On 2...

Page 90: ... 75 kHz 3 Press FM Rate 10 kHz The signal generator is now configured to output a 0 dBm frequency modulated carrier at 1 GHz with a 75 kHz deviation and a 10 kHz rate The shape of the waveform is a sine wave Notice that sine is the default for the FM Waveform softkey Press More 1 of 2 to see the softkey To Activate FM 1 Press FM Off On to On 2 Press RF On Off The FM and RF ON annunciators are now ...

Page 91: ...3 Press FM Dev 25 pi rad 4 Press FM Rate 10 kHz The signal generator is now configured to output a 0 dBm phase modulated carrier at 3 GHz with a 0 25 p radian deviation and 10 kHz rate The shape of the waveform is a sine wave Notice that sine is the default for the FM Waveform softkey Press More 1 of 2 to see the softkey To Activate FM 1 Press FM Off On 2 Press RF On Off The FM and RF ON annunciat...

Page 92: ... The signal generator is now configured to output a 0 dBm pulse modulated carrier at 2 GHz with a 100 microsecond pulse period and 24 microsecond pulse width The pulse source is set to Internal Free Run Notice that Internal Free Run is the default for the Pulse Source softkey To Activate Pulse Modulation Follow these remaining steps to output the pulse modulated signal 1 Press Pulse Off On to On 2...

Page 93: ...ing choices Sine sine wave with adjustable amplitude and frequency Dual Sine dual sine waves with individually adjustable frequencies and a percent of peak amplitude setting for the second tone available from function generator 1 only Swept Sine a swept sine wave with adjustable start and stop frequencies sweep rate and sweep trigger settings available from function generator 1 only Triangle trian...

Page 94: ...ess the FM ΦM hardkey 3 Press FM Dev 75 kHz 4 Press FM Rate 10 kHz 5 Press FM Off On You have set up the FM signal with a rate of 10 kHz and 75 kHz of deviation The FM annunciator is activated indicating that you have enabled frequency modulation Configuring the Low Frequency Output 1 Press the LF Out hardkey 2 Press LF Out Amplitude 3 Vp 3 Press LF Out Off On You have configured the LF output sig...

Page 95: ...e Function Generator 1 Configuring the Waveform 1 Press LF Out Waveform Swept Sine 2 Press LF Out Start Freq 100 Hz 3 Press LF Out Stop Freq 1 kHz 4 Press Return Return This returns you to the top LF Output menu Configuring the Low Frequency Output 1 Press LF Out Amplitude 3 Vp This sets the LF output amplitude to 3 Vp 2 Press LF Out Off On The LF output is now transmitting a signal using Function...

Page 96: ...86 Chapter 4 Analog Modulation Configuring the LF Output ...

Page 97: ...n E8267C PSG vector signal generators with Option 002 602 Arbitrary ARB Waveform File Headers on page 88 Using the Dual ARB Waveform Player on page 99 Using Waveform Clipping on page 112 Waveform Clipping Concepts on page 113 Using Waveform Markers on page 104 Waveform Marker Concepts on page 108 Using Waveform Triggers on page 111 ...

Page 98: ...ader is automatically created whenever a waveform is generated a waveform sequence is created or a waveform file is downloaded to the PSG for details on downloading files see the PSG Programming Guide The following signal generator settings are saved in a file header ARB sample clock rate Runtime scaling only in the dual ARB player Marker polarity markers 1 through 4 Marker routing functions marke...

Page 99: ... plays Figure 5 1 shows the PSG s display Figure 5 1 Custom Digital Modulation First Level Softkey Menu At this point a default file header has been created with default unspecified settings that do not reflect the current signal generator settings for the active modulation To save the settings for the active modulation you must modify the default settings before you save the header information wi...

Page 100: ...er for the Custom digital modulation waveform is displayed see Figure 5 2 In the Saved Header Settings column the signal generator settings for the active format are shown as Unspecified which means that no settings have been saved to the file header If a setting is unspecified in the file header the current value for that setting does not change when the waveform is selected for later use The Cur...

Page 101: ...iscontinued If the RF Blank Routing function is selected it automatically activates the ALC hold for the same marker Alt Ampl Routing Which marker if any triggers the PSG s alternate amplitude feature when the marker signal is low When the marker signal goes high the trigger is terminated disengaging alternate amplitude You must configure the alternate amplitude parameters accessed in the Amplitud...

Page 102: ...s Return Return Header Utilities Notice that the Current Inst Settings column now reflects the changes made to the current signal generator setup in steps 4 through 8 but that the saved header values have not changed as shown in Figure 5 4 on page 94 10 Save the current settings to the file header Press Save Setup To Header softkey The settings from the Current Inst Settings column now appear in t...

Page 103: ...Chapter 5 93 Dual Arbitrary Waveform Generator Arbitrary ARB Waveform File Headers Figure 5 3 ARB Setup Softkey Menu and Marker Utilities Dual ARB Player softkey it does not appear in the ARB formats ...

Page 104: ... Arbitrary ARB Waveform File Headers Figure 5 4 Differing Values between Header and Current Setting Columns Figure 5 5 Saved File Header Changes Values differ between the two columns Page 1 Page 2 Values differ between the two columns Page 1 Page 2 ...

Page 105: ...der information in the dual ARB player without playing the file You can reapply saved header settings by reselecting the waveform file for playback When you do this the values from the Saved Header Settings column are applied to the PSG Modifying Header Information All of the same header characteristics shown in Modifying Header Information in a Modulation Format on page 90 are valid in the dual A...

Page 106: ...ff perform the following steps 1 Select a waveform a Press Mode Dual ARB Select Waveform b Highlight the desired waveform file c Press the Select Waveform softkey 2 Access the file header Press ARB Setup Header Utilities The header information is now visible in the PSG display As shown in Figure 5 6 the header editing softkeys are grayed out meaning they are inactive Figure 5 6 Viewing Header Info...

Page 107: ...ory a Press the Catalog Type softkey As shown in Figure 5 7 you have a choice of three waveform file types that can be displayed in the table accessed in step one NVWFM displays all waveform segments stored in non volatile memory Seq displays all waveform sequence files WFM1 displays all waveform segments stored in volatile memory b Press the NVWFM softkey The table displays the waveform files in ...

Page 108: ... the labels of the softkeys used to set the parameters and also appear on the dual ARB summary display see Figure 5 8 NOTE The signal generator used to play back a stored waveform file must have the same options as are required to generate the file For details on applying file header settings and playing back a waveform see Playing a Waveform on page 102 To properly set up the instrument 1 Select ...

Page 109: ... ARB formats if the file is not renamed in the dual ARB player after turning the modulation format off it is overwritten when the same or another ARB format is turned on Waveform player features include waveform clipping markers and triggering Clipping allows you to reduce high power peaks which can cause adjacent channel noise Markers and triggering are useful for synchronizing the output of the ...

Page 110: ...one 3 Press Alignment Left Cent Right to Right 4 Press Two Tone Off On to On 5 Press Two Tone Off On to Off This generates a two tone waveform with the tone on the right placed at the carrier frequency During waveform generation the T TONE and I Q annunciators activate The waveform is stored in volatile memory with the default file name AUTOGEN_WAVEFORM as you will see in the next section The Two ...

Page 111: ... file name for example MTONE using the alpha keys and the numeric keypad 5 Press Enter Building and Storing a Waveform Sequence This example shows how to build and edit a waveform sequence using two waveform segments If you have not created the waveform segments complete the steps in Creating Waveform Segments on page 100 If you need to save or load waveform segments see Storing and Loading Wavefo...

Page 112: ...orm sequence created in the previous sections During the waveform sequence generation the ARB and I Q annunciators activate Editing a Waveform Sequence This procedure demonstrates how to edit waveform segments within a waveform sequence and then save the edited sequence under a new name Within the editing display you can change the number of times each segment plays the repetitions delete segments...

Page 113: ...hem Storing Waveform Segments to Non volatile Memory 1 Press Mode Dual ARB Waveform Segments 2 If necessary press Load Store to Store 3 Press Store All To NVWFM Memory Copies of all WFM1 waveform segment files have been stored in non volatile memory as NVWFM files You can also store files individually by highlighting the file and pressing Store Segment To NVWFM Memory Loading Waveform Segments fro...

Page 114: ...previous sections Generating the First Waveform on page 100 and Creating the First Waveform Segment on page 100 1 Press Mode Dual ARB Waveform Segments 2 Press Load Store 3 Highlight a waveform segment for example TTONE 4 Press Waveform Utilities Set Markers Set Marker On First Point This sets Marker 1 selected by default on the first point in the selected waveform segment To Place a Marker Across...

Page 115: ...is activates Marker 1 selected by default every three points from point 10 to point 163830 in the selected waveform segment To Use Marker 2 to Blank the RF Output If you have not created a waveform segment complete the steps in the previous sections Generating the First Waveform on page 100 and Creating the First Waveform Segment on page 100 NOTE RF blanking applies to Marker 2 only Marker 1 does ...

Page 116: ...ce on page 101 and To Place a Marker at the First Point within a Waveform Segment on page 104 1 Press Mode Dual ARB Waveform Sequences 2 Highlight the desired waveform sequence for example TTONE MTONE 3 Press Edit Selected Waveform Sequence 4 Highlight the desired waveform segment for example WFM1 TTONE 5 Press Toggle Markers Toggle Marker 1 or Toggle Marker 2 6 Highlight the next desired waveform...

Page 117: ...howing in the Mk column 8 Highlight the next waveform segment 9 Press Toggle Marker 1 and Toggle Marker 2 until both 1 and 2 are showing in the Mk column 10 Press Return You now have a waveform sequence that contains two TTONE waveform segments Marker 2 is on for the first waveform segment and markers 1 and 2 are on for the second waveform segment To Verify Marker Operation In this example you lea...

Page 118: ...O connector respectively You can construct these output signals as a trigger signal to synchronize another instrument to a given portion of a waveform The following timing diagrams describe the effects of Markers 1 and 2 on the state of the signal at the EVENT 1 and EVENT 2 rear panel connectors NOTE If marker polarity selection is not be available in your version of the firmware marker polarity i...

Page 119: ... n 1 point n 2 point n 3 Signal At EVENT 2 Connector For Marker Polarity Positive For Marker Polarity Negative RF Output RF Unblanked low Mkr 2 to RF Blank Off RF Unblanked RF Output RF Blanked RF Blanked Mkr 2 to RF Blank On Marker Polarity Positive RF Output RF Unblanked RF Unblanked Mkr 2 to RF blank On Marker Polarity Negative RF Blanked ...

Page 120: ... markers embedded in any one segment of that sequence are output only if the sequence marker for that segment is enabled toggled on This makes it possible to output markers for some segments in a sequence but not for others Marker File Bit 2 Marker Polarity Marker 2 to RF Blank Off On Marker 2 Blanks RF when Marker is Low EVENT 2 Negative Positive Marker File Bit 2 Marker 2 to RF Blank RF Blanking...

Page 121: ...reset 2 Press Mode Dual ARB Select Waveform 3 Highlight a waveform sequence file for example TTONE100 MTONE200 4 Press Select Waveform 5 Press Trigger Segment Advance 6 Press Trigger Trigger Setup Trigger Source Trigger Key 7 Press Return Return ARB Off On to On The first waveform segment in the sequence TTONE plays and modulates the RF carrier The waveform player has been programmed to stop the p...

Page 122: ...ess Mode Dual ARB Waveform Segments 2 Press Load Store to Store 3 Highlight the first waveform segment for example TTONE 4 Press Waveform Utilities Clipping 5 Press Clip I jQ To 80 Apply to Waveform The I and Q data are both clipped by 80 You will see 80 0 displayed below the Clip I jQ To softkey To Configure Rectangular Clipping 1 Press Mode Dual ARB Waveform Segments 2 Press Load Store to Store ...

Page 123: ...e peaks develop as the signal is constructed I Q waveforms can be the summation of multiple channels see Figure 5 11 Whenever most or all of the individual channel waveforms simultaneously contain a bit in the same state high or low an unusually high power peak negative or positive occurs in the summed waveform This does not happen frequently because the high and low states of the bits on these ch...

Page 124: ...m Generator Using Waveform Clipping As shown in Figure 5 12 simultaneous positive and negative peaks in the I and Q waveforms do not cancel each other but combine to create an even greater peak Figure 5 12 Combining the I and Q Waveforms ...

Page 125: ...peaks can cause the power amplifier to move toward saturation This causes intermodulation distortion which generates spectral regrowth Figure 5 13 Peak to Average Power Spectral regrowth is a range of frequencies that develops on each side of the carrier similar to sidebands and extends into the adjacent frequency bands see Figure 5 14 Consequently spectral regrowth interferes with communication i...

Page 126: ...therefore it appears as a rectangle in the vector representation With either method the objective is to clip the waveform to a level that effectively reduces spectral regrowth but does not compromise the integrity of the signal Figure 5 17 on page 118 uses two complementary cumulative distribution plots to show the reduction in peak to average power that occurs after applying circular clipping to ...

Page 127: ...Chapter 5 117 Dual Arbitrary Waveform Generator Using Waveform Clipping Figure 5 16 Rectangular Clipping ...

Page 128: ...118 Chapter 5 Dual Arbitrary Waveform Generator Using Waveform Clipping Figure 5 17 Reduction of Peak to Average Power ...

Page 129: ...rs This chapter includes the following major sections Overview on page 120 Working with Predefined Setups Modes on page 121 Working with Filters on page 125 Working with Symbol Rates on page 133 Working with Modulation Types on page 136 Configuring Hardware on page 143 See also Using Waveform Markers on page 104 Arbitrary ARB Waveform File Headers on page 88 ...

Page 130: ...aveform start by selecting a Digital Modulation Setup from a set of predefined modes setups Once a predefined mode is selected you can modify the Modulation Type the Filter being used the Symbol Rate and the type of Triggering the Data Pattern is random by default This modified setup can then be stored and reused If you want to create a multiple modulated carrier waveform start by selecting a Mult...

Page 131: ...de Custom Arb Waveform Generator Setup Select 3 Select either one of the predefined modulation setups NADC PDC PHS GSM DECT EDGE APCO 25 w C4FM APCO 25 w CQPSK CDPD PWT or TETRA This selects a predefined setup where filtering symbol rate and modulation type are defined by the predefined modulation setup mode that you selected and returns you to the top level custom modulation menu it does not incl...

Page 132: ...waveform generation the DIGMOD and I Q annunciators appear and the custom single carrier digital modulation state is stored in volatile memory 7 Set the RF output frequency to 835 MHz 8 Set the output amplitude to 0 dBm 9 Press RF On Off The user defined NADC signal is now available at the RF OUTPUT connector 10 Press Return Return This returns to the top level Digital Modulation menu where Digita...

Page 133: ...er Modified During waveform generation the DIGMOD and I Q annunciators appear and the new custom multicarrier EDGE state is stored in volatile memory 7 Set the RF output frequency to 890 01 MHz 8 Set the output amplitude to 10 dBm 9 Press RF On Off The custom multicarrier EDGE waveform is available at the RF OUTPUT connector it does not include bursting or channel coding 10 Press Mode Custom Arb W...

Page 134: ...ode Custom ARB Waveform Generator Setup Select 3 Press More 1 of 2 Custom Digital Mod State 4 Press Select File to select a custom modulation state from the Catalog of DMOD Files The user defined custom digital modulation state should now be recalled from non volatile memory Because the RF output amplitude frequency and operating state settings are not stored as part of a user defined digital modu...

Page 135: ...the square root of raised cosine function in the middle and total attenuation at high frequencies The width of the middle frequencies is defined by the roll off factor or Filter Alpha 0 Filter Alpha 1 Nyquist is a raised cosine pre modulation FIR filter You can use a Nyquist filter to reduce the bandwidth required by a signal without losing information The ideal raised cosine filter frequency resp...

Page 136: ...want is not in the first list press More 1 of 2 Adjusting the Filter Alpha of a Predefined Root Nyquist or Nyquist Filter 1 Preset the instrument Press Preset 2 Press Mode Custom ARB Waveform Generator Digital Mod Define Filter Filter Alpha or Mode Custom Real Time I Q Baseband Filter Filter Alpha 3 Enter a new Filter Alpha value and press Enter Adjusting the Bandwidth Bit Time BbT Product of a Pr...

Page 137: ...ients divided by the oversample ratio If you enter more than 64 symbols for real time or 512 symbols for arbitrary waveform generation the PSG cannot use the filter it will decimate the filter throw away coefficients until the required condition is met and then use the filter but fine resolution may be lost from the impulse response FIR filters stored in signal generator memory can easily be modif...

Page 138: ... The graphic display can provide a useful troubleshooting tool in this case it indicates that a coefficient value is set incorrectly resulting in an improper Gaussian response 12 Press Return 13 Highlight coefficient 15 14 Press 1 Enter 15 Press Load Store Store To File 16 Name the file NEWFIR2 and press Enter The contents of the current FIR Values editor are stored to a file in the Memory Catalog...

Page 139: ...arbitrary waveform generation and 64 symbols for real time waveform generation The number of symbols equals the number of coefficients divided by the oversample ratio If you enter more than the maximum number of symbols the PSG cannot use the filter it decimates the filter throws away coefficients until the required condition is met and then uses the filter but fine resolution may be lost from the...

Page 140: ...y duplicates the existing coefficient values in the reverse order coefficients 16 through 31 are automatically generated and the first of these coefficients number 16 highlights as shown in the following figure 8 For this example the desired OSR is 4 which is the default so no action is necessary The Oversample Ratio OSR is the number of filter coefficients per symbol Acceptable values range from ...

Page 141: ...e A graph shows the impulse response of the current set of FIR coefficients 11 Press Return Load Store Store To File The Catalog of FIR Files appears along with the amount of memory available 12 If there is already a file name occupying the active entry area press Edit Keys Clear Text 13 Using the alphabetic menu and the numeric keypad enter NEWFIR1 as the file name 14 Press Enter The NEWFIR1 file...

Page 142: ...132 Chapter 6 Custom Arb Waveform Generator Working with Filters ...

Page 143: ... Option 002 602 automatically streams the selected Data Pattern at the appropriate rate to accommodate the symbol rate setting Bit Rate Symbols s x Number of Bits Symbol Occupied Signal Bandwidth Symbol Rate x 1 Filter Alpha therefore the occupied signal bandwidth is dependent on the filter alpha of the Nyquist or Root Nyquist filter being used To change the filter alpha refer to the procedure Adj...

Page 144: ... bps 100 Mbps 45 sps 50 Msps 45 sps 25 Msps 8PSK eight phase state shift keying 3 135 bps 150 Mbps 45 sps 50 Msps 45 sps 16 67 Msps 16PSK sixteen phase state shift keying 4 180 sps 200 Mbps 45 sps 50 Msps 45 sps 12 5 Msps D8PSK eight phase state shift keying 3 135 bps 150 Mbps 45 sps 50 Msps 45 sps 16 67 Msps MSK Minimum Shift Keying MSK GSM Global System for Mobile Communications 1 45 bps 50 Mbps...

Page 145: ...45 sps 50 Msps 45 sps 10 Msps 64QAM 6 270 bps 300 Mbps 45 sps 50 Msps 45 sps 8 33 Msps 128QAM There is no preset value for this modulation it must be user defined 7 315 bps 350 Mbps 45 sps 50 Msps 45 sps 7 14 Msps 256QAM 8 360 bps 400 Mbps 45 sps 50 Msps 45 sps 6 25 Msps Modulation Type Bits Per Symbol Bit Rate Symbols s x Number of Bits Symbol Internal Symbol Rate Minimum Maximum Custom Real Time...

Page 146: ...ols based on the data pattern and modulation type that has been selected see Working with Data Patterns on page 147 for information on selecting a data pattern In Custom Real Time I Q you can also Create user defined modulation type see page 137 that can be used immediately or saved to the Memory Catalog Restore all modulation parameters to their default state To Select a Predefined Modulation Typ...

Page 147: ... of the I Q modulator s dynamic range This is because you begin with a 256QAM constellation and delete unwanted points The remaining points that make up the 128QAM constellation are closer together than if you had mapped each point specifically Additionally this approach does not enable you to define the bit pattern associated with each symbol point as you could if the 128QAM constellation had bee...

Page 148: ...ss More 1 of 2 Load Store Store To File If there is already a file name from the Catalog of IQ Files occupying the active entry area press the following keys Editing Keys Clear Text 9 Enter a file name for example 128QAM using the alpha keys and the numeric keypad 10 Press Enter The user defined I Q State Map should now be stored in the Catalog of IQ Files Goto Row Press the Delete Row softkey 011...

Page 149: ...vides a default value of 0 and an empty row of data appears below the first row As the Q value updates the highlight moves to the next I value As you press the numeric keys the numbers display in the active entry area If you make a mistake use the backspace key and retype Also note that 0 000000 appears as the first entry in the list of Distinct Values and that 0 500000 and 1 000000 are listed as ...

Page 150: ...tude Errors Phase Errors Use the following procedure to manipulate symbol locations which simulate magnitude and phase errors In this example you edit a 4QAM constellation to move one symbol closer to the origin 1 Press Preset 2 Press Mode Custom Real Time I Q Baseband Modulation Type Define User I Q More 1 of 2 Load Default I Q Map QAM 4QAM This loads a default 4QAM I Q modulation into the I Q Va...

Page 151: ...ears the previous values 3 Press 600 Hz 4 Press 1 8 kHz 5 Press 600 Hz 6 Press 1 8 kHz Each time you enter a value the Data column increments to the next binary number up to a total of 16 data values from 0000 to 1111 An unstored file of frequency deviation values is created for the custom 4 level FSK file 7 Press Load Store Store To File If there is already a file name from the Catalog of FSK Fil...

Page 152: ...d Default FSK 3 Press Freq Dev 1 8 kHz 4 Press 4 Lvl FSK This sets the frequency deviation and opens the Frequency Values editor with the 4 level FSK default values displayed The frequency value for data 0000 is highlighted 5 Press 1 81 kHz 6 Press 590 Hz 7 Press 1 805 kHz 8 Press 610 Hz As you modify the frequency deviation values the cursor moves to the next data row An unstored file of frequenc...

Page 153: ...6 1 Figure 6 1 2 On the signal generator press Preset 3 Press Mode Custom Arb Waveform Generator 4 Press Multicarrier Off On until On is highlighted 5 Press Trigger Single 6 Press Trigger Trigger Setup Trigger Source Ext 7 Press Ext Polarity Neg Pos until Pos is highlighted 8 Press Ext Delay Off On until On is highlighted 9 Press Ext Delay Time 100 msec The Custom Arb Waveform Generator has been c...

Page 154: ...ms after receiving a change in TTL state from low to high at the PATT TRIG IN To Set the ARB Reference Setting for an External or Internal Reference 1 Press Custom Arb Waveform Generator More 1 of 2 2 Press ARB Reference Ext Int to select either external or internal as the waveform sample clock reference If you select Ext you must enter the reference frequency 250 kHz to 100 MHz and apply the refe...

Page 155: ... sections Overview on page 146 Working with Predefined Setups Modes on page 146 Working with Data Patterns on page 147 Working with Burst Shapes on page 153 Configuring Hardware on page 158 Working with Phase Polarity on page 160 Working with Differential Data Encoding on page 160 See also Working with Filters on page 125 Working with Symbol Rates on page 133 Working with Modulation Types on page ...

Page 156: ...ng with Predefined Setups Modes When you select a predefined mode default values for components of the setup including the filter symbol rate and modulation type are automatically specified Selecting a Predefined Real Time Modulation Setup The following steps select a predefined mode where filtering symbol rate and modulation type are defined by the APCO 25 w C4FM digital modulation standard and r...

Page 157: ... of pseudorandom sequences pseudorandom noise sequences a pseudorandom noise sequence is a periodic binary sequence approximating in some sense a Bernoulli coin tossing process with equiprobable outcomes FIX4 0000 allows you to define a 4 bit repeating sequence data pattern and make it the active function The selected 4 bit pattern will be repeated as necessary to provide a continuous stream of da...

Page 158: ... one of the following PN9 PN11 PN15 PN20 PN23 Selecting a Predefined Fixed 4 bit Data Pattern 1 Press Preset 2 Press Mode Custom Real Time I Q Baseband Data FIX4 3 Press 1010 Enter Return Selecting a Predefined Data Pattern Containing an Equal Number of 1s 0s 1 Press Preset 2 Press Mode Custom Real Time I Q Baseband Data Other Patterns 3 Press one of the following 4 1 s 4 0 s 8 1 s 8 0 s 16 1 s 16...

Page 159: ... user defined data pattern files for use within the custom real time I Q baseband generator modulation For this example a user file is defined within a custom digital communication Creating a Data Pattern User File with the Bit File Editor This procedure uses the Bit File Editor to create a Data Pattern User File and stores the resulting file in the Memory Catalog described on page 52 1 Press Pres...

Page 160: ...r The user file should be renamed and stored to the Memory Catalog with the name USER1 Selecting a Data Pattern User File from the Catalog of Bit Files In this procedure you learn how to select a data pattern user file from the Catalog of Bit Files If you have not created and stored a user defined data file complete the steps in the previous section Creating a Data Pattern User File with the Bit F...

Page 161: ...ata pattern user file If you have not already created stored and recalled a data pattern user file complete the steps in the previous sections Creating a Data Pattern User File with the Bit File Editor on page 149 and Selecting a Data Pattern User File from the Catalog of Bit Files on page 150 Navigating the Bit Values of an Existing Data Pattern User File 1 Press Goto 4 C Enter This moves the cur...

Page 162: ...r file first complete the steps in the previous section Creating a Data Pattern User File with the Bit File Editor on page 149 1 Press Apply Bit Errors 2 Press Bit Errors 5 Enter 3 Press Apply Bit Errors Notice both Bit Errors softkeys change value as they are linked Using an Externally Supplied Data Pattern In this procedure an external real time data pattern is supplied through DATA DATA CLOCK a...

Page 163: ...t rise is delayed Rise delay can be either negative or positive Entering a delay other than zero shifts the full power point earlier or later than the beginning of the first useful symbol Fall delay the period of time specified in bits that the start of the burst fall is delayed Fall delay can be either negative or positive Entering a delay other than zero shifts the full power point earlier or la...

Page 164: ...r vector magnitude EVM or adjacent channel power ACP increases when you turn bursting on you can adjust the burst shape to assist with troubleshooting Configuring the Burst Rise and Fall Parameters 1 Press Preset 2 Press Mode Custom Real Time I Q Baseband Burst Shape 3 Press Rise Time 5 bits 4 Press Rise Delay 1 bits 5 Press Fall Time 5 bits 6 Press Fall Delay 1 bits This configures the burst shap...

Page 165: ...ion see the programming guide To Create and Store User Defined Burst Shape Curves Using this procedure you learn how to enter rise shape sample values and mirror them as fall shape values to create a symmetrical burst curve 1 Press Preset 2 Press Mode Custom Real Time I Q Baseband Burst Shape 3 Press Define User Burst Shape More 1 of 2 Delete All Rows Confirm Delete Of All Rows 4 Enter values simi...

Page 166: ...orm s rise and fall characteristics Figure 7 2 NOTE To return the burst shape to the default conditions press Return Return Confirm Exit From Table Without Saving Restore Default Burst Shape 6 Press Return Load Store Store To File If there is already a file name from the Catalog of SHAPE Files occupying the active entry area press the following keys Editing Keys Clear Text ...

Page 167: ...urst shape file stored in memory If you have not created and stored a user defined burst shape file complete the steps in the previous sections 1 Press Preset 2 Press Mode Custom Real Time I Q Baseband Burst Shape Burst Shape Type User File 3 Highlight the desired burst shape file for example NEWBURST 4 Press Select File The selected burst shape file is now applied to the current real time I Q bas...

Page 168: ...a menu where you can set the BBG Reference to External or Internal 2 Press BBG Ref Ext Int to select either external or internal as the bit clock reference for the data generator If external is selected apply the reference frequency to the rear panel BASEBAND GEN REF IN connector Setting the External Frequency The BBG reference external frequency is used only when the BBG Ref Ext Int softkey has b...

Page 169: ...me I Q Baseband More 1 of 3 Configure Hardware Configure Hardware allows you to access a menu from which you can set the BBG DATA CLOCK to receive input from External or Internal 2 Press BBG Data Clock Ext Int to select either external or internal When set to Ext external the DATA CLOCK connector is used to supply the BBG Data Clock When set to Int internal the internal data clock is used To Adjus...

Page 170: ...rential data encoding When set to Off data bits are not encoded prior to modulation When set to On data bits are encoded prior to modulation Differential encoding uses an exclusive OR function to generate a modulated bit Modulated bits will have a value of 1 if a data bit is different from the previous bit or they will have a value of 0 if a data bit is the same as the previous bit This section pr...

Page 171: ...umber of bits per symbol can be expressed using the following formula Because the equation is a ceiling function if the value of x contains a fraction x is rounded up to the next whole number Where x bits per symbol and y the number of differential states The following illustration shows a 4QAM modulation I Q State Map 1 2 3 4 1st Symbol Data 00000000 Distinct values 1 1 4th Symbol Data 00000011 D...

Page 172: ...is defined by changes in the digital state from 1 to 0 or from 0 to 1 of the raw data stream This differentially encoded data stream is then modulated and transmitted In differential data encoding a change in a raw data bit s digital state from 1 to 0 or from 0 to 1 produces a 1 in the encoded data stream No change in digital state from one bit to the next in other words a bit with a value of 1 fo...

Page 173: ...e I Q State Map in a direction and distance defined by the symbol table offset value Entering a value of 1 causes a 1 state forward transition through the I Q State Map As an example consider the following data symbol table offset values These symbol table offsets result in one of the transitions shown NOTE The following I Q State Map illustrations show all possible state transitions using a parti...

Page 174: ...u can see the 1st and 4th symbols having the same data value 00 produce the same state transition forward 1 state In differential encoding symbol values do not define location they define the direction and distance of a transition through the I Q State Map For instructions on configuring differential encoding see Understanding Differential Encoding on page 160 Data Value Symbol Table Offset 00 01 ...

Page 175: ...ntial encoding to the user defined modulation For more information see Understanding Differential Encoding on page 160 This section includes information on following Configuring User Defined I Q Modulation Accessing the Differential State Map Editor on page 166 Editing the Differential State Map on page 166 Configuring User Defined I Q Modulation 1 Press Preset 2 Press Mode Custom Real Time I Q Ba...

Page 176: ...l by adding a symbol table offset of 1 The symbol rotates forward through the state map by 1 value when a data value of 0 is modulated 2 Press 1 Enter This encodes the second symbol by adding a symbol table offset of 1 The symbol rotates backward through the state map by 1 value when a data value of 1 is modulated NOTE At this point the modulation has one bit per symbol For the first two data valu...

Page 177: ...and 11 respectively 5 Press Return Differential Encoding Off On This applies the custom differential encoding to a user defined modulation NOTE Notice that UNSTORED appears next to Differential State Map on the signal generator s display Differential state maps are associated with the user defined modulation for which they were created To save a custom differential state map you must store the use...

Page 178: ...168 Chapter 7 Custom Real Time I Q Baseband Working with Differential Data Encoding ...

Page 179: ...is chapter describes the Multitone mode which is available only in E8267C PSG vector signal generators This chapter includes the following major sections Overview on page 170 Creating Viewing and Optimizing Multitone Waveforms on page 171 ...

Page 180: ... test Multitone waveforms are created using the internal I Q baseband generator and stored in ARB memory for playback Although the multitone mode generates a high quality waveform a small amount of IMD carrier feedthrough and feedthrough related IMD occurs Carrier feedthrough may be observed when an even number of tones are generated since there are no tones at the center carrier frequency to mask...

Page 181: ...ing your signal connect the spectrum analyzer to the signal generator as shown in Figure 8 1 Figure 8 1 Spectrum Analyzer Setup To Create a Custom Multitone Waveform Using the Multitone Setup table editor you can define modify and store user defined multitone waveforms Multitone waveforms are generated by the dual arbitrary waveform generator 1 Preset the signal generator 2 Set the signal generato...

Page 182: ...e center tone is placed at the carrier frequency while the other eight tones are spaced in 1 MHz increments from the center tone If you create an even number of tones the carrier frequency will be centered between the two middle tones Figure 8 2 To View a Multitone Waveform This procedure describes how to configure the spectrum analyzer to view a multitone waveform and its IMD products Actual key ...

Page 183: ... the one shown in Figure 8 3 on page 173 You will also see IMD products at 1 MHz intervals above and below the highest and lowest tones Figure 8 3 To Edit the Multitone Setup Table This procedure builds upon the previous procedure 1 Press Initialize Table Number of Tones 10 Enter 2 Press Done 3 Highlight the value On in the State column for the tone in row 2 4 Press Toggle State 5 Highlight the va...

Page 184: ...ill be generated When you apply a change the baseband generator creates a multitone waveform using the new settings and replaces the existing waveform in ARB memory You have now changed the number of tones to 10 disabled tone 2 and changed the power and phase of tone 4 Figure 8 4 on page 174 shows what the multitone setup table display on the signal generator should look like after all steps have ...

Page 185: ...the previous procedure 1 On the spectrum analyzer set the resolution bandwidth for a sweep rate of about 100 200 ms This will allow you to dynamically view the carrier feedthrough spike as you make adjustments 2 On the signal generator press I Q I Q Adjustments I Q Adjustments Off On to On 3 Press I Offset and turn the rotary knob while observing the carrier feedthrough with the spectrum analyzer ...

Page 186: ... marker and place it on the peak of the adjacent intermodulation product which should be spaced 10 MHz from the marked tone 10 Measure the power difference between the tone and its distortion product You should now see a display that is similar to the one shown in Figure 8 6 on page 176 Your optimized multitone signal can now be used to measure the IMD products generated by a device under test Not...

Page 187: ...e Initialize Table Number of Tones 64 Enter 2 Press Freq Spacing 20 kHz 3 Press Initialize Phase Fixed Random to Fixed 4 Press Done 5 Press Apply Multitone 6 Press More 1 of 2 Waveform Statistics Plot CCDF You should now see a display that is similar to the one shown in Figure 8 7 The CCDF plot displays the peak to average characteristics of the waveform with all phases set to zero Figure 8 7 CCDF...

Page 188: ...lot displays the peak to average characteristics of the waveform with randomly generated phases and a random seed The random phase setup simulates the typically random nature of multitone waveforms Notice that randomly distributed phases result in a much lower peak to average ratio than fixed phases An increase in the number of tones with random phases will decrease the probability of a maximum pe...

Page 189: ...m Generator In the following sections this chapter describes the Two Tone mode which is available only in E8267C PSG vector signal generators Overview on page 180 Creating Viewing and Modifying Two Tone Waveforms on page 181 ...

Page 190: ...r and used as a reference when measuring the IMD generated by a device under test Two tone waveforms are created using the internal I Q baseband generator and stored in ARB memory for playback Although the two tone mode generates a high quality waveform a small amount of IMD occurs In addition to IMD a small amount of carrier feedthrough and feedthrough related IMD may be present when the spacing ...

Page 191: ...own in Figure 9 1 Figure 9 1 Spectrum Analyzer Setup To Create a Two Tone Waveform This procedure describes how to create and a basic center aligned two tone waveform 1 Preset the signal generator 2 Set the signal generator RF output frequency to 20 GHz 3 Set the signal generator RF output amplitude to 0 dBm 4 Press Mode Two Tone Freq Separation 10 MHz 5 Press Two Tone Off On to On 6 Turn on the R...

Page 192: ...h a 4 dBm reference 5 Adjust the resolution bandwidth to sufficiently reduce the noise floor to expose the IMD products A 9 1 kHz setting was used in our example 6 Turn on the peak detector 7 Set the attenuation to 14 dB so you re not overdriving the input mixer on the spectrum analyzer You should now see a two tone waveform with a 20 GHz center carrier frequency that is similar to the one shown i...

Page 193: ...Chapter 9 183 Two Tone Waveform Generator Creating Viewing and Modifying Two Tone Waveforms Figure 9 3 Carrier Feedthrough Intermodulation Distortion Two Tone Channels Carrier Feedthrough Distortion ...

Page 194: ...r direction will reduce the feedthrough level Adjust the level as low as possible 4 Press Q Offset and turn the rotary knob to further reduce the carrier feedthrough level 5 Repeat steps 3 and 4 until you have reached the lowest possible carrier feedthrough level 6 On the spectrum analyzer return the resolution bandwidth to its previous setting 7 Turn on waveform averaging 8 Create a marker and pl...

Page 195: ...Chapter 9 185 Two Tone Waveform Generator Creating Viewing and Modifying Two Tone Waveforms Figure 9 4 Minimized Delta Marker Main Marker Carrier Feedthrough ...

Page 196: ... Mode Setup Alignment Left Cent Right to Left 2 Press Apply Settings to regenerate the waveform NOTE Whenever a change is made to a setting while the two tone generator is operating Two Tone Off On set to On you must apply the change by pressing the Apply Settings softkey before the updated waveform will be generated When you apply a change the baseband generator creates a two tone waveform using ...

Page 197: ...erator displays an error always read the error message text by pressing Utility Error Info RF Output Power Problems on page 189 No Modulation at the RF Output on page 193 Sweep Problems on page 194 Data Storage Problems on page 196 Cannot Turn Off Help Mode on page 197 Signal Generator Locks Up on page 198 Error Messages on page 200 Returning a Signal Generator to Agilent Technologies on page 203 ...

Page 198: ...188 Chapter 10 Troubleshooting ...

Page 199: ...ls you that the amplitude reference mode is activated When this mode is on the displayed amplitude value is not the output power level It is the current power output by the signal generator hardware minus the reference value set by the Ampl Ref Set softkey To exit the reference mode follow these steps a Press Amplitude More 1 of 2 b Press Ampl Ref Off On until Off is highlighted You can then reset...

Page 200: ...the internal detector Depending on frequency it is possible for most of this LO feedthrough energy to enter the detector Since the detector responds to its total input power regardless of frequency this excess energy causes the ALC to reduce the RF output of the signal generator In this example the reverse power across the detector is actually greater than the ALC level which may result in loss of...

Page 201: ...ttenuated configuration the detector is exposed to a 2 dBm desired signal versus the 15 dBm undesired LO feedthrough This 17 dB difference between desired and undesired energy results in a maximum 0 1 dB shift in the signal generator s RF output level RF LEVEL CONTROL SIGNAL GENERATOR OUTPUT CONTROL MIXER LO IF ALC LEVEL DETECTOR MEASURES 2 dBm ALC LEVEL DETECTOR MEASURES 15 dBm REVERSE POWER LO F...

Page 202: ... of detection Use the following steps to set the signal generator to the ALC off mode 1 Preset the signal generator press Preset 2 Set the desired frequency press Frequency and enter the desired frequency 3 Set the desired amplitude press Amplitude and enter the desired amplitude 4 Turn the RF off set RF On Off to Off 5 Turn the signal generator s automatic leveling control ALC off press Amplitude...

Page 203: ...uency or amplitude of the RF output is changed When Power Search is set to Span pressing Do Power Search executes the power search calibration routine over a selected range of frequencies at one time The power search corrections are then stored and used whenever the signal generator is tuned within the selected range of frequencies No Modulation at the RF Output Check the MOD ON OFF annunciator on...

Page 204: ...etting the mode to continuous to determine if the missing single sweep is blocking the sweep Is the signal generator receiving the appropriate sweep trigger Try setting the Sweep Trigger softkey to Free Run to determine if a missing sweep trigger is blocking the sweep Is the signal generator receiving the appropriate point trigger Try setting the Point Trigger softey to Free Run to determine if a ...

Page 205: ...G OUT connector however is asserted high only during the actual dwell time If the list dwell values are correct continue to the next step 4 Observe if the Dwell Type List Step softkey is set to Step When Step is selected the signal generator will sweep the list points using the dwell time set for step sweep rather than the sweep list dwell values To view the step sweep dwell time follow these step...

Page 206: ...nerator 4 Turn on the signal generator 5 Observe the display for error messages If either error message 311 or 700 is stored in the error message queue the signal generator s battery has failed 6 Refer to the Service Guide for battery replacement instructions Saved Instrument State but Register is Empty or Contains Wrong State If you select a register number greater than 99 the signal generator au...

Page 207: ...and continuous When you press Help in single mode the factory preset condition help text is provided for the next key you press Pressing another key will exit the help mode and activate the key s function When you press Help in continuous mode help text is provided for the next key you press and that key s function is also activated except for Preset You will stay in help mode until you press Help...

Page 208: ...the signal generator Fail Safe Recovery Sequence Use the fail safe recovery sequence only if the previous suggestions do not resolve the problem CAUTION This process does reset the signal generator but it also destroys the following types of data all user files instrument state and data files DCFM DCΦM calibration data persistent states NOTE Do not attempt to perform any other front panel or remot...

Page 209: ...options Because calibration files are restored from EEPROM you should see several error messages b Perform the DCFM DCΦM calibration Refer to the DCFM DCΦM Cal softkey description in the Key Reference c Agilent Technologies is interested in the circumstances that made it necessary for you to initiate this procedure Please contact us at the appropriate telephone number listed in Table 10 1 on page ...

Page 210: ...e error message list an explanation is generally included with each error to further clarify its meaning The error messages are listed numerically In cases where there are multiple listings for the same error number the messages are in alphabetical order Characteristic Front Panel Display Error Queue Capacity errors 30 Overflow Handling Circular rotating Drops oldest error as new error comes in Vi...

Page 211: ...s through the front panel display error queue the error numbers messages and descriptions are displayed on an enumerated 1 of N basis Error messages appear in the lower left corner of the display as they occur Explanation provided in the Error Message List This is not displayed on the instrument ...

Page 212: ...within the GPIB system within the instrument s firmware or hardware during the transfer of block data or during calibration Execution Errors 299 to 200 indicate that an error has been detected by the instrument s execution control block Errors in this class set the execution error bit bit 4 in the event status register IEEE 488 2 section 11 5 1 In this case Either a PROGRAM DATA element following ...

Page 213: ...rly protect the instrument Table 10 1 Contacting Agilent Online assistance www agilent com find assist United States tel 1 800 452 4844 Latin America tel 305 269 7500 fax 305 269 7599 Canada tel 1 877 894 4414 fax 905 282 6495 Europe tel 31 20 547 2323 fax 31 20 547 2390 New Zealand tel 0 800 738 378 fax 64 4 495 8950 Japan tel 81 426 56 7832 fax 81 426 56 7840 Australia tel 1 800 629 485 fax 61 3...

Page 214: ...204 Chapter 10 Troubleshooting Returning a Signal Generator to Agilent Technologies ...

Page 215: ...also Dual Arbitrary waveform generator ARMED annunciator 14 arrow hardkeys 11 ATTEN HOLD annunciator 14 attenuator external leveling 63 automatic leveling control See ALC AUXILIARY I O connector 21 AUXILIARY INTERFACE connector 18 B bandwidth ALC selecting 59 reference oscillator adjusting 76 baseband generator custom Arb mode 119 custom real time I Q mode 145 Dual Arb mode 87 Multitone mode 169 R...

Page 216: ... 145 167 dual arb 87 118 multitone 169 178 two tone 179 186 diode detector response 62 display 11 13 DMOD files 52 dual ARB player 99 Dual Arbitrary waveform generator 87 118 dwell time 32 E Edit Item softkey 27 ERR annunciator 14 200 error messages 16 200 EVENT connectors 20 EVM 126 154 EXT annunciators 14 INPUT connectors 8 9 external data clock setting 159 detector diode response 62 trigger set...

Page 217: ...ing 54 See also memory catalog interface connectors AUXILIARY INTERFACE 18 GPIB 18 LAN 18 RS 232 18 interface remote 69 intermodulation distortion from power peaks 115 testing non linear devices 170 180 K key license 57 keypad numeric 9 keys 6 11 knob front panel 7 L L listener mode annunciator 14 LAN connector 18 LEDs 10 leveling ALC 9 192 external 60 63 internal 59 mm wave source module using 47...

Page 218: ...0 options 4 57 oscillator reference adjusting BW 76 output See LF output and RF output OVEN COLD annunciator 15 P Page Down softkey 27 Page Up softkey 27 PATTERN TRIG IN connector 20 peak to average characteristics 177 peak to average power reducing 116 performance optimizing 59 76 phase error simulation 140 modulation See ΦM polarity 160 player dual ARB 99 power meter 64 192 peaks 113 115 recepta...

Page 219: ...ignal loss troubleshooting 189 Signal Studio software 170 180 single step sweep 32 SMI connector 24 softkeys 7 16 27 SOURCE SETTLED OUTPUT connector 19 spectral regrowth 115 spectrum analyzer troubleshooting signal loss 192 standby LED 10 state files 52 step array user flatness 64 See also user flatness correction step attenuator external leveling 63 step sweep 32 33 STOP SWEEP connector 19 storag...

Page 220: ...der files 88 98 clipping 112 118 custom 119 144 Custom Real Time I Q baseband 145 167 dual arb 87 118 file catalogs 52 file renaming 103 markers 104 multitone 169 178 player dual ARB 99 segments 100 103 sequence blanking markers 110 building and storing 101 103 renaming 102 toggling markers 106 107 triggers 111 two tone 179 186 WFM1 files 52 WIDEBAND I INPUT connector 22 WIDEBAND Q INPUT connector...

Reviews: