AGCO Valtra Smart farming Operator'S Manual Download Page 139

9.1.1  Export data to a USB device

Procedure
1.

Connect the USB device to the SmartTouch.
A USB pop-up screen will show.

2.

Select the Export tab.

3.

Select the item type that you will export.

4.

To select the items you can export:
a) Tap the checkbox to select the items.
b) Tap Select all to select all items.

5.

Tap Export.
° If a file or item with the same name is on

the USB device, select Overwrite,

Rename or Merge on the screen that

shows.

° If fields contain worked area data, it can

be some time before the export

completes.

° Select from the screen that shows if you

want to transfer the worked area data.

6.

Tap Remove to disconnect the USB device.

GUID-924A14A2-C928-47E2-A929-D195E523A09C-low.jpg [Low]
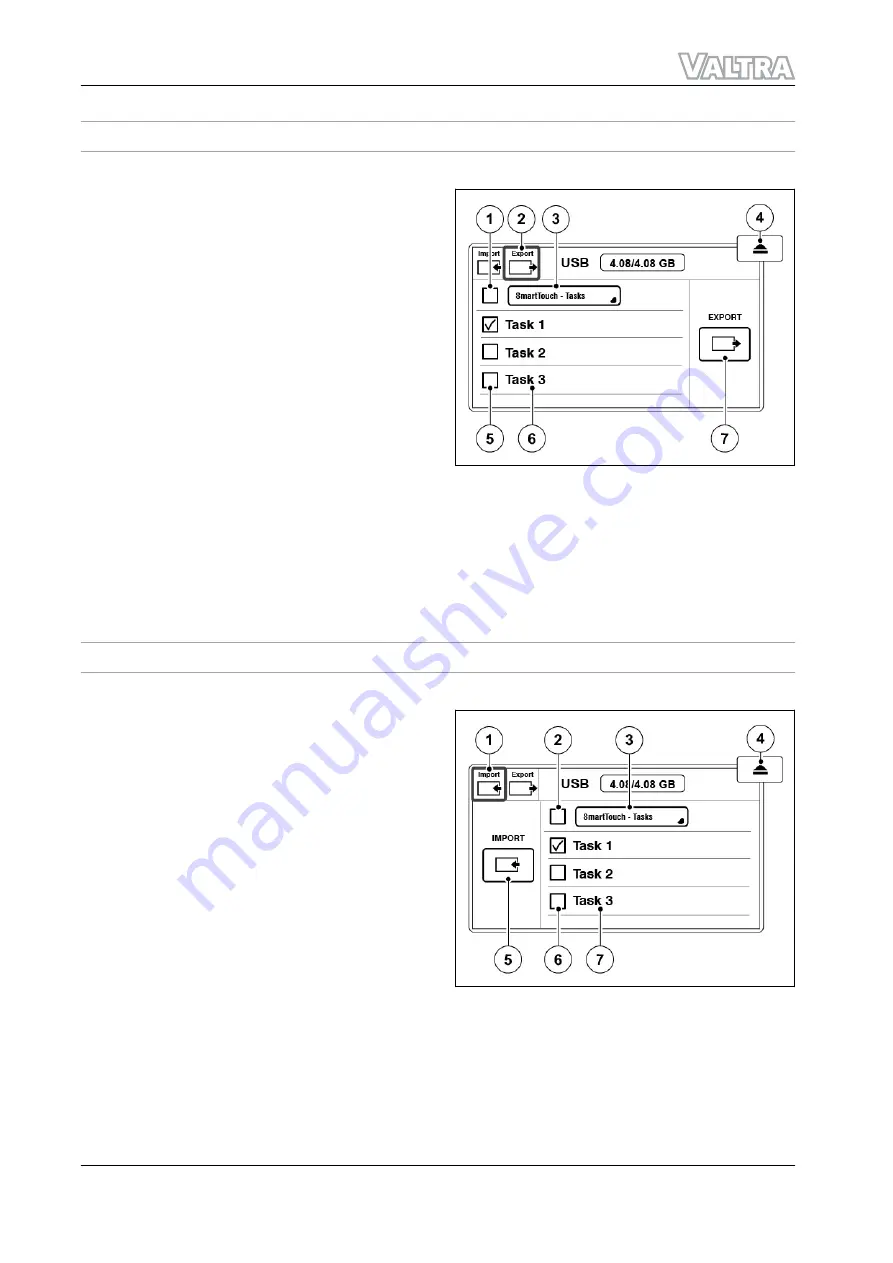
Fig. 2  

(1)

Select all items 

(2)

Export tab

(3)

Select displayable items 

(4)

Remove the USB device 

(5)

Select item 

(6)

Item name 

(7)

Export the selected items 

9.1.2  Import data from a USB device

Procedure
1.

Connect the USB device to the SmartTouch.
A USB pop-up screen will show.

2.

Select the Import tab.

3.

Select the item you want to import.

4.

To select the items you want to import:
a) Tap the checkbox of the items.
b) Tap Select all to select all of the items.

5.

NOTE: 

When you import profiles, it erases all the

profiles in the SmartTouch.

Tap import.
If an item with the same name is in

SmartTouch, select Overwrite, Rename or

Merge on screen that shows.

6.

Tap Remove to disconnect the USB device.

GUID-8AFCED5D-F534-468D-8C28-2568AEDCE17F-low.jpg [Low]

Fig. 3  

(1)

Import tab

(2)

Select all items 

(3)

Select displayable items 

(4)

Remove the USB device 

(5)

Import selected items 

(6)

Select item 

(7)

Item name 

GUID-991E1E45-1D5E-47CC-8A54-AD70C4FEBEC1 [V2]

GUID-97960A1E-EF28-4C7D-B364-AB8370AC7E16 [V2]

9. USB Device

144

Smart farming

39 924 21 5

Summary of Contents for Valtra Smart farming

Page 1: ...OPERATOR SMANUAL Smartfarming 39 924 21 5 01 2020 YOUR WORKING MACHINE...

Page 2: ...e time 25 3 1 6 Accuracy and strength indicator 25 3 1 7 Valtra Guide status 26 3 1 8 Basic system features 26 3 1 9 Restrictions 27 3 1 10 Deactivation 27 3 2 Specifications 28 3 2 1 Overview of corr...

Page 3: ...the segmented wayline offset 79 4 4 7 Wayline offset adjustment 80 4 4 7 1 Use the manual wayline offset 81 4 4 7 2 Save wayline offset as new wayline 81 4 4 7 3 Automatic wayline offset 82 4 4 7 4 U...

Page 4: ...een tractor and PC through Bluetooth connection 126 6 1 7 5 Exchange information between tractor and PC through internet connection 128 7 Variable Rate Control 129 7 1 Variable Rate Control 131 7 1 1...

Page 5: ...up and connect the base station 168 11 2 7 Operate base station with external battery 169 11 2 8 Switch base station to ON mode 169 11 2 9 Switch base station to STANDBY mode 169 11 2 10 Switch base s...

Page 6: ...1 Introduction 1 1 About this manual 13 1 2 Intended use 14 Table of contents Smart farming 11 39 924 21 5...

Page 7: ...Table of contents 12 Smart farming 39 924 21 5...

Page 8: ...which steers the tractor along predefined path Read this manual carefully before you use the Valtra Guide system When you use the Valtra Guide system obey the safety instructions of this manual and t...

Page 9: ...ufacturer instructions constitute essential elements for the intended use of this machine Only qualified persons who are familiar with Valtra Guide and its characteristics and relevant safety rules an...

Page 10: ...2 1 4 Safety signs 17 2 1 5 A word to the operator 18 2 1 6 Safety information 19 2 1 7 Electrical components 19 2 1 8 Correct disposal of waste 19 2 1 9 How to disengage the automatic steering 20 2...

Page 11: ...Table of contents 16 Smart farming 39 924 21 5...

Page 12: ...bly occur GUID 73F05026 C37B 415A 8140 AD939A283378 high jpg High Fig 2 2 1 3 Information messages The instructions important and note are not related to personal safety They give information about th...

Page 13: ...safety instruction in other sections of this manual Injury or death can occur if the safety instruction is not obeyed Learn how to operate the machine and how to use the controls correctly Do not ope...

Page 14: ...s can have an effect on the service that is given to the product Before you start to use the equipment you can get the complete and most current information from approved Valtra dealers If the GNSS sa...

Page 15: ...sure requirements maintain at least 25 cm 10 in between the user and the radio modem Handling the cord of this product or cords associated with accessories sold with this product will expose you to le...

Page 16: ...correction signals depending on the receiver 28 3 2 2 Available correction signals NovAtel receiver 28 3 2 3 NovAtel TerraStar frequencies and coverage 29 3 2 4 Available correction signals Trimble re...

Page 17: ...Table of contents 22 Smart farming 39 924 21 5...

Page 18: ...tional accuracy by transmitting correction signals DGPS to users With geostationary satellites such as the European EGNOS the American WAAS and various other providers Terrestrially with a base statio...

Page 19: ...operated on slopes Slopes can cause the satellite to be out of the reception range of the antenna 1 Angle 5 8 2 GPS 1 3 Correction signal satellite 4 GPS 2 5 GPS 3 6 GPS 4 1 2 3 4 5 6 GUID 2A6BB5F3 F0...

Page 20: ...of time passes between two passes a certain amount of drift will be noticeable 3 1 5 Convergence time The convergence time is the time necessary for the system to determine the position of the tractor...

Page 21: ...state or it is not possible to activate The icon shows that you have not turned the steering wheel in a period of 5 minutes 3 1 8 Basic system features Operating conditions Best conditions for the rec...

Page 22: ...the East West axis Precision is also decreased if you drive on a slope and pull an implement with a strong side pull A too high or too low load on the front axle can decrease the precision Slippery s...

Page 23: ...l radio modem RTK network Internal GSM GPRS modem External mobile radio modem 3 2 2 Available correction signals NovAtel receiver NOTE The actual accuracy of the Valtra Guide correction signals depend...

Page 24: ...5 min 1 to 5 min 5 min 30 to 45 min 1 to 5 min 1 RTK Network equals NTRIP Networked Transport of RTCM via Internet Protocol NOTE To order a correction signal please contact your Valtra dealer 3 2 3 No...

Page 25: ...SBAS Trimble Autonomus SBAS RangePoint RTX CenterPoin t RTX Standard CenterPoin t RTX Fast RTK Network 1 and base station Receiver Authorisation level Sub meter Sub meter Sub meter Decimeter Centimet...

Page 26: ...uency Baud rate North America RTXNA 1555 8080 MHz 2400 Baud South America RTXSA 1539 8325 MHz 600 Baud Europe RTX Fast RTXEU 1539 8125 MHz 2400 Baud Europe Africa RTXEA 1545 4900 MHz 2400 Baud Asia Pa...

Page 27: ...South 270 is West The precision of the altitude is 10 20 m as there is no correction signal for altitude GUID 4E2538CB 6CC3 4D94 8821 535EE834B801 high jpg High Fig 9 3 3 2 Valtra Guide receiver info...

Page 28: ...settings tabs at maximum Only tabs relevant for selected correction signal show SBAS and the Base station are free but for all the other correction source signals you need to purchase the license GUI...

Page 29: ...ate from the TerraStar internet pages NMEA FREQUENCY 1 525 0000 MHz Signal name 25E BAUD RATE 1200 SERIAL NUMBER 1313131313 Signal settings Automatic SIGNAL LAG 4 00s CORRECTION SIGNAL CONNECTION STAT...

Page 30: ...N ON OFF MODEM TYPE VALTRA MODEM PROTOCOL SATEL FREQUENCY 433 5250 MHz SIGNAL LAG 4 00s DISTANCE TO BASE 50 00m CORRECTION SIGNAL CONNECTION STATUS Base Station Good 3 4 6 5 7 8 9 10 11 1 2 GUID 1C6BF...

Page 31: ...rmat When you turn the tractor main power off and again on connection to the NTRIP server connects automatically If the Valtra Guide receiver does not receive the NTRIP correction signal disconnect an...

Page 32: ...0s NMEA CORRECTION SIGNAL SBAS 1 2 3 4 GUID A39FA454 E0E2 4BBD A23B BC7BCAACE27A low svg Low Fig 23 RangePoint RTX 1 Correction signal 2 Signal settings 3 Frequency 4 Baud rate 5 Serial number 6 Signa...

Page 33: ...col 5 Frequency 6 Mode 7 Distance to base 8 Signal lag 9 Connection status 10 Fallback ON OFF Base station is a correction signal which provides centimetre level accuracy Signal is only available if V...

Page 34: ...correction signal and therefore a SIM card is required for the connection Refer to the service provider for the data settings NOTE Roaming function can cause additional costs if it is enabled PIN CURR...

Page 35: ...ID 40A16E38 9DD3 4000 A157 22B76EEC61D8 low svg Low Fig 30 3 3 5 Use Fallback Fallback makes it possible to continue guidance when the selected correction signal with a higher accuracy is temporarily...

Page 36: ...ack 3 3 6 NMEA output 1 NMEA output ON OFF 2 Baud rate 3 Parity setting 4 Data format 5 Transfer rate NMEA allows you to receive position information in NMEA0183 standard format from the RS 232 connec...

Page 37: ...EB 4655 85AB 792CEC5E501E low svg Low Fig 34 1 Top dock 2 Screw 3 Handle 4 Connector 4 Remove the 4 screws and the nut 5 Remove the cover 1 3 3 2 GUID D9B82E7F F9BE 428F A727 A9AD41671234 low svg Low...

Page 38: ...o place 10 Position the SIM card holder to its guides on the top of the card slot and then push the holder into its place NOTE Be careful not to drop the SIM card inside the modem When the SIM card ho...

Page 39: ...808 48A9 4AA6 8E17 BB6F9C4F2429 low svg Low Fig 38 1 Red handle 2 Connector 14 Install the cover 15 Install the 4 screws and the nut 1 3 3 2 GUID D9B82E7F F9BE 428F A727 A9AD41671234 low svg Low Fig 3...

Page 40: ...l You can upgrade the Valtra Guide receiver s authorization level to use a correction signal of higher precision Purchase the authorization code from your local Valtra dealer Procedure 1 Open the Map...

Page 41: ...ra dealer 5 Tap the Input authorization code icon 6 Enter the authorization code 7 Tap to accept the change GUID 34C0A179 B838 4248 8119 176A86990391 high jpg High Fig 42 1 Receiver info tab 2 Input a...

Page 42: ...ed wayline from boundary 75 4 4 6 4 Make a segmented wayline from existing waylines 76 4 4 6 5 Use the wayline configurator 77 4 4 6 6 Segmented wayline in Map screen 79 4 4 6 7 Adjust the segmented w...

Page 43: ...4 10 Valtra Guide with TwinTrac and QuickSteer 102 Table of contents 48 Smart farming 39 924 21 5...

Page 44: ...save Fields and Waylines When you make a new Wayline in GO mode it overwrites the previous one Field mode is an advanced mode where all the Valtra Guide functions are available Settings mode is to ad...

Page 45: ...ight have positive numbers 3 Field name Displays field name when a field is selected Opens a pop up screen of the field configurator Displays Field is not selected when a field is not activated 4 Cros...

Page 46: ...to Manual 8 GPRS signal Shows the GPRS signal status and strength 9 Compass Red arrow points to North 10 Toggle view mode 2D 3D 11 Center map to tractor Set the map and tractor in the center of the di...

Page 47: ...2 Tap the Valtra Guide icon to pre activate it Valtra Guide is pre activated when the icon is green blue M 5s AUTO M1 M2 M3 ACTIVATED FUNCTIONS 1 2 GUID 654A585B A69B 4DD2 BEDF B5924C416605 low svg L...

Page 48: ...as in the profile If you change them the new values are not stored to the profile GUID EDC5AED4 7CF8 41FE 9883 11AC450D0FD6 low jpg Low Fig 5 1 Overlap 2 Implement width 3 Wayline width 7 Select the...

Page 49: ...set the end point B Parallel waylines show on the left negative numbers and right positive numbers side of the tractor The system calculates the wayline intervals from the preset implement width and o...

Page 50: ...s 3 Tap the Continue recording icon to continue recording 4 Drive to end of the field 5 Tap to accept Parallel waylines show on the left negative numbers and right positive numbers side of the tractor...

Page 51: ...dth and overlap GUID A75C4A0D 677C 422C 9C3C 1CA0C00D254C high jpg High Fig 9 1 Angle 2 Accept 3 Angle wayline 4 Start of wayline 5 End of wayline 4 3 3 Engage Valtra Guide Procedure 1 Make sure that...

Page 52: ...met within 5 seconds from the push of the button Valtra Guide engages automatically NOTE When the steering valve is on the driving speed is limited to 25 km h It is not possible to turn the steering v...

Page 53: ...e Valtra Guide Valtra Guide is pre activated when the icon is green blue M 5s AUTO M1 M2 M3 ACTIVATED FUNCTIONS 1 2 GUID 654A585B A69B 4DD2 BEDF B5924C416605 low svg Low Fig 11 1 Valtra Guide receiver...

Page 54: ...point If the rear implement has offset Set the Offset selector to YES position Set the Offset value Adjust the overlap or underlap to previous wayline IMPLEMENT SETTINGS REAR 21 12 2016 06 39 21 C VAL...

Page 55: ...87AC 299E5C41BB24 low svg Low Fig 14 1 Front rear implement selector 2 Front implement offset selector 3 Overlap or underlap to previous wayline 4 Front implement width 5 Front implement offset 6 Fro...

Page 56: ...lete field icon The field is deleted immediately without confirmation GUID 3EF88369 688F 457E 9FA4 15C6EA9380CE low jpg Low Fig 16 1 Field name 2 Rename name 3 Delete field 4 Add field 4 4 3 1 Navigat...

Page 57: ...o the field GUID DA5BE85D B6AE 4F9B BE78 A9D2B3479B3E high jpg High Fig 19 5 To stop the navigation Tap the Field name Tap the Navigate icon GUID 22950681 B7BA 4C24 AFEC BDFD0B4645C3 high jpg High Fig...

Page 58: ...hear a sound and a pop up screen shows to tell you the field name GUID A57B36C5 FB74 48B8 A49C 1A592B3D56AB low jpg Low Fig 22 1 Automatic field detection 4 4 4 Record the field boundary NOTE You can...

Page 59: ...ctor position of the Valtra Guide receiver or rear implement GUID 4733C251 14DC 4C41 958A 4255822975F4 low jpg Low Fig 24 1 Recording position 6 Choose the recording position This selection is comes i...

Page 60: ...cedure before you drive to a field corner to get straight corners a Tap the Pause icon b Tap the Continue icon to continue to record after the corner The recording makes a straight line between the Pa...

Page 61: ...e 1 Open the Map screen AUTO 2 Select a field 3 Tap the Add new wayline GUID B5986E5D 2984 446F 8929 F76405FD2B33 low jpg Low Fig 28 1 Add new wayline 4 Tap the straight wayline 5 Tap to accept GUID F...

Page 62: ...right positive numbers side of the tractor The system calculates the wayline intervals from the preset implement width and overlap GUID 8BC6238B ACF4 4845 8250 DE3AD06247E8 low jpg Low Fig 30 1 Start...

Page 63: ...33 low jpg Low Fig 31 1 Add new wayline 4 Tap the contour wayline 5 Tap to accept GUID F8CABAC1 3AF1 4EF3 BF8E FEA23F5EA054 low jpg Low Fig 32 1 Straight wayline A B 2 Countour wayline 3 Angle wayline...

Page 64: ...end of the field 10 Tap to accept Parallel waylines show on the left negative numbers and right positive numbers side of the tractor The system calculates the wayline intervals from the preset impleme...

Page 65: ...Guide shows the angle to which the head of the tractor points 0 is North 90 is East 180 is South and 270 is West 7 Tap to accept Waylines for the selected angle come into view Parallel waylines show o...

Page 66: ...of the wayline To delete a wayline tap the Delete icon Wayline is deleted immediately without confirmation Tap to accept the change GUID 46BAD05D 6916 4FDB 9DD3 850AF5F219DC low jpg Low Fig 38 1 Check...

Page 67: ...e made from existing waylines and boundaries or you can record new waylines 4 4 6 1 Record a single contour Single contour wayline is as regular contour wayline though it does not make parallel waylin...

Page 68: ...Cancel recording 2 Record wayline 7 Tap the Accept icon The green arrows shows the start point and the red arrow shows the end point Tails of 10 meters are created at the start and end of the wayline...

Page 69: ...n 4 Tap the Segmented wayline recording GUID C53B5897 8897 418A B598 BF7156097095 low jpg Low Fig 44 1 Segmented wayline recording 5 Tap the Plus icon for example in the corner of the field GUID CA7FB...

Page 70: ...11 Tap the Accept icon to save the segmented wayline GUID 6E99E414 2C63 4F54 AD6B 939B77424028 low jpg Low Fig 46 1 Pause icon 2 Stop icon 3 Accept icon 4 4 6 3 Make a segmented wayline from boundary...

Page 71: ...gment 7 Tap Accept to save the segmented waylines 8 Rename the segmented wayline if needed and tap Accept to save GUID BEBC0B8B E6A8 4270 9778 AA483E05E7A7 low jpg Low Fig 48 1 Maximum number of segme...

Page 72: ...nted wayline 6 Rename the segmented wayline if needed and tap Accept to save GUID 2D994A4B EC37 4389 9BFB 211381E04540 low jpg Low Fig 51 1 Wayline name 2 Wayline type 3 Preview 4 4 6 5 Use the waylin...

Page 73: ...ll fixed segments 6 To adjust the wayline overlaps and corners tap Merge settings a Select the segments with the icon Segments show in yellow in the preview with selected segment highlighted in green...

Page 74: ...creen When the segmented wayline is in use current wayline and segment numbers show in the Map screen GUID 33EBC606 01D7 4EBF 8C30 BD33A14DC601 low jpg Low Fig 56 1 Current segment number 2 Current wa...

Page 75: ...offset to the right 4 4 7 Wayline offset adjustment Wayline position moves with low accuracy correction sources because of GNSS position drift With the wayline offset setting you can move the position...

Page 76: ...ual nudge offset Total offset shows the sum of the auto and manual offset To set the auto and manual offset to the center tap the Reset offset icon Tap the map to close the offset settings GUID A321F3...

Page 77: ...map to close the offset settings GUID 61BAB502 54F5 4E55 A215 C3B9F4801A8C low jpg Low Fig 62 1 Save offset as new wayline 4 4 7 3 Automatic wayline offset Automatic wayline offset automatically move...

Page 78: ...et setting If Valtra Guide does not steer the tractor along same tracks when you drive the wayline in both directions there might be an error on Valtra Guide installation or implement settings are not...

Page 79: ...of the two driving directions are not aligned edit the mounting offset settings a Measure the difference between the center lines of the tracks b Enter the difference in the Mounting offset settings...

Page 80: ...eder with a 2m working width and sprayer with a 10m working width for example 6 Adjust the number of waylines between the tramlines 7 Set the number of first wayline to be set as tramline 8 Tap to acc...

Page 81: ...line menu bar 4 4 10 Make a headland Procedure 1 Open the Map screen AUTO 2 Select a field 3 Tap the Map screen 4 Tap the Headland setting icon 5 Enter the width of the headland GUID D4D23577 29A2 4B1...

Page 82: ...rees Obstacles saved for the field are shown in the Obstacle configurator When you drive near an obstacle you can hear a warning sound and see a notification on the SmartTouch screen NOTE You can make...

Page 83: ...OF OBSTACLE 1 2 GUID A951AF32 96BF 4966 A0DC 91C99B23D00E low svg Low Fig 73 1 Small obstacle 2 Area obstacle 8 Tap the Record icon 9 To rename the obstacle tap the suggested name 10 Tap to accept Obs...

Page 84: ...Add obstacle GUID E96D7C13 F645 4531 B2C3 F860A7C2617D high jpg High Fig 75 1 Add obstacle 6 Tap the Area obstacle 7 Tap to continue CHOOSE TYPE OF OBSTACLE 1 2 GUID A951AF32 96BF 4966 A0DC 91C99B23D...

Page 85: ...e the recording a Tap the Pause icon b To continue to record after a pause tap the Continue recording icon The recording procedure makes a straight line between the Pause and Continue recording taps 1...

Page 86: ...on CHOOSE TYPE OF OBSTACLE Obstacle 01 Obstacle 02 Obstacle 03 2 3 1 GUID F088A0AB CE0A 49A0 A7E3 89E1C61757FB low svg Low Fig 80 1 Obstacle name 2 Delete obstacle 3 Small obstacle area obstacle selec...

Page 87: ...Select the color 3 To add a marker a Tap the Add marker icon b Type the marker name 4 To delete a marker a Tap the Marker configurator b Tap the Delete icon The marker deletes immediately 5 To naviga...

Page 88: ...Fig 83 1 Markers 2 Stop navigation to marker 4 4 13 Do a check of the system information Procedure 1 Open the Map screen AUTO 2 Tap the Valtra Guide status GUID F337CE22 C4E4 4F0C BA57 8679B364A36C h...

Page 89: ...rned the steering wheel in a period of 5 minutes 8 Distance to the nearest wayline The distance must be less than 10 m 9 Tractor speed OK when the tractor speed is between 0 1 25 km h 10 Angle to the...

Page 90: ...within 5 seconds from the push of the button Valtra Guide engages automatically NOTE When the steering valve is on the driving speed is limited to 25 km h It is not possible to turn the steering valve...

Page 91: ...right the tractor steers toward the wayline quickly Use this when the implement is connected to the pick up hitch b To adjust the steering sensitivity drag the slider for steering sensitivity When the...

Page 92: ...ed area to paint on the Map screen With the Valtra Guide trigger the worked area is painted on the Map screen only when the Valtra Guide is engaged 4 Tap to start counter 1 5 Set the worked area paint...

Page 93: ...9FA60DD7 3BDB 4EB8 A412 6B3DF32F763A low jpg Low Fig 91 1 Track settings 5 Tap Reset to remove the painted area 6 Tap YES to reset or NO do cancel GUID 78FD2B84 2468 4B25 A061 CD6BD4B40D83 low jpg Low...

Page 94: ...approach an obstacle you can hear a warning Set the fallback alarm ON or OFF When a fallback occurs and the system starts to use a more accurate inaccurate signal you can hear a warning sound Set the...

Page 95: ...e receiver a Push the master activation switch b Tap the Valtra Guide icon Valtra Guide is pre activated when the icon is green blue M 5s AUTO M1 M2 M3 ACTIVATED FUNCTIONS 1 2 GUID 654A585B A69B 4DD2...

Page 96: ...is above 25 km h 3 Adjust the QuickSteer settings from the Steering settings screen 4 To deactivate QuickSteer push the QuickSteer button again M STEERING SETTINGS 21 12 2016 06 39 21 C VALTRA 5 4 3 2...

Page 97: ...ated if you turn the seat You can use the normal steering or QuickSteer to steer the tractor with the TwinTrac reverse drive system When you turn the operator s seat to the normal or TwinTrac position...

Page 98: ...p settings 108 5 1 5 1 Adjust the in field overlap 108 5 1 5 2 Adjust the boundary overlap 109 5 1 5 3 Adjust overlap for driving direction 109 5 1 5 4 Adjust the tolerance of the outer section of the...

Page 99: ...Table of contents 104 Smart farming 39 924 21 5...

Page 100: ...ing widths Makes the work pattern always accurate even at night and poor visibility Section Control operates with all the ISOBUS implements which obey the ISO 11783 standard and are compatible with Se...

Page 101: ...f the implements 5 1 3 Activate and deactivate Section Control You can set the Section Control to work automatically or manually In the auto mode Section Control switches the sections of the implement...

Page 102: ...e automatic Section Control MAN AUTO 1 2 GUID C6DD18DC 2129 4FEB BD43 3ACED2EC304A low svg Low Fig 4 1 Auto Manual mode 2 Automatic settings tab 5 1 4 Activate and deactivate headland mode The headlan...

Page 103: ...es not deactivate until it fully completes the work in its area possible overlap You can use for example these settings as a guideline for overlap 100 for fertilizers to avoid gaps 50 for precision dr...

Page 104: ...BD E60CF0119106 low svg Low Fig 7 1 Overlap settings tab 2 Boundary setting Procedure 1 Go to the Section Control screen 2 Tap the Overlap settings tab 3 Adjust the Boundary overlap setting 5 1 5 3 Ad...

Page 105: ...A0 low svg Low Fig 9 1 Overlap settings tab 2 Tolerance of the outer section of the implement Procedure 1 Go to the Section Control screen 2 Tap the Overlap settings tab 3 Adjust the Tolerance of the...

Page 106: ...1 6 1 Adjust the switch on time Procedure 1 Go to the Section Control screen 2 Tap the Delay settings tab 3 Tap Adjusted switch on time DELAY SWITCH ON TIME DEFAULT 0 00 ADJUSTED DELAY SWITCH OFF TIM...

Page 107: ...0 cm 13 00km h 1 2 3 4 GUID 40518C05 9344 4393 A7C6 DFAC380376EC low svg Low Fig 12 1 Planter seeder switches on too early 2 Planter seeder switches on too late 3 Length of the current gap 4 Working...

Page 108: ...F29B5E10D low svg Low Fig 14 1 Planter seeder switches off too early 2 Planter seeder switches off too late 3 Length of the current gap 4 Working speed 5 1 6 3 Reset the adjusted delay times Procedure...

Page 109: ...5 Section Control operation 114 Smart farming 39 924 21 5...

Page 110: ...sk 122 6 1 7 Data exchange information 123 6 1 7 1 Pair the Bluetooth radio module with the SmartTouch display 123 6 1 7 2 Operate the TaskDoc Manager software 124 6 1 7 3 Test the Bluetooth and inter...

Page 111: ...Table of contents 116 Smart farming 39 924 21 5...

Page 112: ...ernet connection This requires a licence to the TaskDoc Pro Server and a GPRS connection TaskDoc Pro also records GPS position of the tractor 6 1 1 Activate and deactivate Task Controller It is necess...

Page 113: ...t 3 To add a new task a Tap the Add new task b Type the task name and tap to accept New task appears on the task list LIST OF TASKS Sowing Seeding Ploughing 1 3 2 GUID B25AD5F6 242C 4FB3 99EA 43A6D9C2...

Page 114: ...ransport tasks but it is possible that some of the farm management softwares do not have support for it which can cause incorrect entries Procedure 1 Select a task 2 Tap the Add new item TASK MANAGER...

Page 115: ...item Grain farm Organic farm 1 GUID BA7DA5C4 4A02 4560 82A3 BC6FA5E13366 low svg Low Fig 6 1 Items 5 To make an item You can make fields only in the Valtra Guide screen a Tap the Add new item b Type...

Page 116: ...ask a Tap the Delete item b Tap YES to remove or NO to cancel 6 1 5 Start and pause task Procedure 1 To start a task tap the Record task You can have only 1 task in operation at a time The status of e...

Page 117: ...t the task To return to previous screen tap to cancel TASK SUMMARY 1 2 3 1 2 3 1 2 3 Sowing Field 1 Farmer John Precision Drill Time ON Time OFF 1 3 hr Distance ON Distance OFF 13 1 km Area 1 3 ha GUI...

Page 118: ...u can send all field data to your computer via Bluetooth or GPRS 1 PC software version 2 Last exchange 3 Booked tasks 4 Delete booked tasks 5 Radio connection status 6 Type of connection 7 GPS recepti...

Page 119: ...Tap to accept 5 Disconnect the bluetooth radio module from the SmartTouch display Bluetooth A Bluetooth dongle has been paired MAC address 00 06 77 25 66 CE GUID EFA7125C 99E1 457E 8B82 B03B86059354 l...

Page 120: ...ber of tasks sent to the vehicle 5 Total number of tasks sent from the vehicle 6 Date and time of last connection 7 Reset the connection to the tractor 4 To set a username and password The username an...

Page 121: ...results 2 Tap the Connection test Pop up screen opens to show the connection test result Scroll down the screen and make sure that the status of all the items is If the status is follow the instructio...

Page 122: ...B FA9FA4E88D6D low jpg Low Fig 20 1 Radio connection status 2 Type of connection 4 The SmartTouch display and computer synchronize data automatically Receiving a task from a PC Task import finished 28...

Page 123: ...1 Radio connection status 2 Type of connection 2 The SmartTouch display and the TaskDoc Pro Server synchronize data automatically Receiving a task from a PC Task import finished 28 Data OK Exporting a...

Page 124: ...7 Variable Rate Control 7 1 Variable Rate Control 131 7 1 1 Use Variable Rate Control 131 Table of contents Smart farming 129 39 924 21 5...

Page 125: ...Table of contents 130 Smart farming 39 924 21 5...

Page 126: ...OBUS implement which obey the ISO 11783 standard and is compatible with TC GEO functionality 7 1 1 Use Variable Rate Control Procedure 1 Transfer a task and a prescription map related to it to your tr...

Page 127: ...13 1 GUID B1015D00 2328 4C99 A93F A897CF39DD34 low svg Low Fig 3 1 Implement tank 2 Prescription map selection 5 Tap the Implement tank to select the prescription map 6 Select the correct prescriptio...

Page 128: ...g 5 1 Map layers 12 Select the desired layer Map legends appear when the Application layer is selected 13 Tap to accept GUID 1D47FBDA 3F69 4645 9DA1 44BDC0881A1B high jpg High Fig 6 2 Application laye...

Page 129: ...pause the task with the Pause task icon Icon of the Variable Rate Control activated goes out GUID 74765745 58F7 4E07 A28B 1890141BD407 high jpg High Fig 7 1 Record task 2 Pause task 7 Variable Rate C...

Page 130: ...8 ISOBUS AUX 8 1 ISOBUS AUX 137 8 1 1 Functions types 137 8 1 2 Add ISOBUS AUX function to SmartTouch 138 8 1 3 Clear all the ISOBUS AUX allocations 140 Table of contents Smart farming 135 39 924 21 5...

Page 131: ...Table of contents 136 Smart farming 39 924 21 5...

Page 132: ...t is connected again the ISOBUS AUX allocations become active The Valtra profile is an exception as it has always the default settings when you select it 8 1 1 Functions types Following type of ON OFF...

Page 133: ...tion to SmartTouch Procedure 1 Connect an applicable ISOBUS implement to the tractor 2 Push the master activation switch 3 Tap the ISOBUS AUX to activate it 4 Open the Armrest screen GUID 8FAFF1A1 D14...

Page 134: ...p to add a function GUID 4F368BB9 A0F5 43CF 8375 4698DA2F67E7 low jpg Low Fig 4 10 Select the implement function and tap accept GUID F57ACDDF 1286 41CD BD37 CEE4804AE760 low jpg Low Fig 5 11 Select th...

Page 135: ...Fig 8 8 1 3 Clear all the ISOBUS AUX allocations Procedure 1 Turn the tractor main power off 2 Make sure the ISOBUS implement is connected to the tractor 3 Turn the power on When the SmartTouch displ...

Page 136: ...9 USB Device 9 1 USB data transfer 143 9 1 1 Export data to a USB device 144 9 1 2 Import data from a USB device 144 Table of contents Smart farming 141 39 924 21 5...

Page 137: ...Table of contents 142 Smart farming 39 924 21 5...

Page 138: ...lds ISO xml You can import Profiles Task data zip or unzipped Task data xml without attachments Fields KML NOTE The USB device must have FAT32 file system NOTE When you import profiles it erases all t...

Page 139: ...le items 4 Remove the USB device 5 Select item 6 Item name 7 Export the selected items 9 1 2 Import data from a USB device Procedure 1 Connect the USB device to the SmartTouch A USB pop up screen will...

Page 140: ...t 147 10 2 Store diagnostic data for fault finding 148 10 3 Calibrate the navigation controller GYRO 149 10 4 Reset the Valtra Guide and QuickSteer steering valve 151 10 5 Errors and faults 152 10 6 T...

Page 141: ...Table of contents 146 Smart farming 39 924 21 5...

Page 142: ...ent This can help if a malfunction occurs Procedure 1 Open the Map screen AUTO 2 Tap the Valtra Guide status 3 See the reason for Valtra Guide to disengage GUID C443D7F8 6531 46F3 A3D9 6029B2F30987 lo...

Page 143: ...rvice personnel to find the malfunction System stores 5 most recent logs Procedure 1 Open the Map screen AUTO 2 Tap the Valtra Guide status 3 Tap the Store diagnostic data 4 Do again the operation tha...

Page 144: ...vel ground 4 Apply the parking brake 5 Open the Tractor health screen 6 Tap the Calibrations icon TRACTOR HEALTH 21 12 2016 06 39 21 C VALTRA 14 4V 17 0h 31h 1 0 1 2 1 0 1 2 SERVICE CODES SPN FMI SA 7...

Page 145: ...ounter shows that first Calibration in progress Remaining time 32s GUID E429ED39 7010 4ACB ABDB 1E38F2AC1CCD low svg Low Fig 6 11 Calibration is completed successfully If the calibration was not corre...

Page 146: ...e Valtra Guide steering valve on off button flashes the steering valve is in the error mode The service code can show on the SmartTouch display Reset the steering valve to recover from the fault Proce...

Page 147: ...ted for the Valtra Guide engagement More information on the System info screen 2 White steering controller status symbol All conditions for the Valtra Guide engagement are satisfactory but Valtra Guid...

Page 148: ...rs on the Tractor Health screen we recommend that you first stop the tractor turn off the power and then start again If the error occurs again an approved Valtra dealer can help GUID 52E5CB3A 5CE0 415...

Page 149: ...Give the system sufficiently time to connect Speak to your dealer about the correct signal and license data Make sure that the settings are correct Give the correct serial number 3 Steering wheel acti...

Page 150: ...Correction signal lag Correction signal satellite is not available Correction signal data or license data is incomplete Incorrect settings of the correction signal Incorrect serial number for correct...

Page 151: ...Valtra dealer The front axle suspension or bearing has play Speak to an approved Valtra dealer The middle position of the steering angle sensor is not calibrated correctly Calibrate the steering angl...

Page 152: ...the Correction source screen Make sure that there is a valid correction signal license available Make sure that the correction signal is not blocked for example forests buildings high voltage power li...

Page 153: ...10 Troubleshooting 158 Smart farming 39 924 21 5...

Page 154: ...Base station overview 166 11 2 3 LEDs 167 11 2 4 Operating modes 167 11 2 5 Charge battery 168 11 2 6 Set up and connect the base station 168 11 2 7 Operate base station with external battery 169 11 2...

Page 155: ...Table of contents 160 Smart farming 39 924 21 5...

Page 156: ...display Procedure 1 Open the ISOBUS settings screen ISOBUS from the SmartTouch display on the armrest 2 Set the ISOBUS universal terminal to OFF position 3 Set the Primary device to SmartTouch 4 Set t...

Page 157: ...UX N ISOBUS UT ISOBUS UT Valtra VERSION TC TC ISOBUS TERMINAL NUMBER 0 1 2 3 GUID CD21732B 3F19 4B17 A152 2ED5AC384C15 low svg Low Fig 2 1 ISOBUS universal terminal 2 Version 3 Primary device 11 Open...

Page 158: ...he mobile units in a radius of 3 km to 5 km GNSS satellites transmit position signals The base station compares this data with its accurate position Correction signals are transmitted from the base st...

Page 159: ...base station GUID A5FD1029 1E33 43E7 BD46 0387D9D8B1D3 high eps High Fig 7 SAE connecting cable alligator clips GUID 5F3CD849 7BBC 4ABB B1DE 587DBF36BB0F high eps High Fig 8 SAE connecting cable cigar...

Page 160: ...l connecting cable GUID FE01C6A5 84C6 414D 919B 3C476BFB1A74 high eps High Fig 11 Null modem DB9 M M adapter GUID D3320E7E 1AFB 407E B562 F6E1E4B0E9E6 high jpg High Fig 12 Tripod GUID 56998C3B 5129 47...

Page 161: ...ply connector Input Operation 6 28 VDC Load 9 28 VDC power consumption 2A G Modem status LED H Battery status LED I Reset button J Recording status LED K Implement status LED GUID 013EE8E1 C5DE 4B9C 8...

Page 162: ...ving satellites one flash per received GPS satellite Flashing orange Receiver is switched on and receiving satellites one flash per received GLONASS satellite 11 2 4 Operating modes OFF mode The base...

Page 163: ...gh Fig 18 NOTE If the internal battery is flat and no external current supply is connected the receiver will switch to OFF mode to protect the battery from deep discharge 11 2 6 Set up and connect the...

Page 164: ...to ON mode Procedure Alternatively press the following button Base station in OFF mode Press Reset I button Base station in STANDBY mode Press ON OFF button A NOTE In ON mode LEDs G H and J are on GUI...

Page 165: ...o OFF mode Before starting the procedure Base station must be in ON mode Procedure 1 Hold down ON OFF button A 2 LEDs K and J will turn green and then go out 3 LEDs K and J will turn orange 4 LEDs K a...

Page 166: ...23 Deactivation 27 delay switch off time 110 delay switch on time 110 delay time reset 113 delete task 118 discarding the waste 19 disengagement fault finding 147 reason 147 disengaging automatic stee...

Page 167: ...33 36 section control open the screen 105 Section control implement settings 106 Section Control activate 106 deactivate 106 headland mode 107 segmented wayline make from boundary 75 make from existi...

Page 168: ...9 assistant 71 automatic offset 82 contour 55 67 manual offset 81 offset adjustment 80 segmented offset 79 straight 54 66 wayline boundary 85 wayline configurator 77 wayline offset save as new wayline...

Page 169: ...Index 174 Smart farming 39 924 21 5...

Page 170: ...English AGCO Corporation All rights reserved VALTRA is a worldwide brand of AGCO Valtra Inc 44200 Suolahti Finland Tel 358 20 45501 www valtra com...

Reviews: