6
IMPORTANT: Make sure that you always fasten the chinstrap securely
beneath your chin when wearing your helmet. Before you ride test to
see that the helmet cannot be removed from your head when fastened
in that manner.
The helmet must not be worn or fastened so loose that it can rotate freely
front or back so that it could be removed from your head with the
chinstrap correctly fastened.
The quick release retention system featured on this helmet offers the
rider the benefits of being easy to do up and remove while wearing
bulky gloves; as well it offers a range of easy adjustability because of
the ratcheting nature of the system. Before you ride test to see that the
helmet cannot be removed from your head when the quick release
retention system is adjusted for your specific fit.
To securely fasten the quick release retention systems for the first time
please follow these very important set up safety instructions. Please take
appropriate time to initialize this procedure, when completed and set
up correctly it will provide a convenient and comfortable way to secure
your helmet. It may take several attempts to get just the right fit based
on your requirement, but when correctly set up the quick release
retention system provides for a quick and convenient way to make sure
you have the helmet secured safely and correctly.
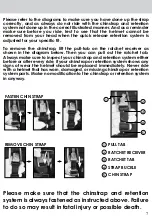
Put the helmet on and insert the ratchet tab into the ratchet receiver.
We recommend inserting the tab more then half way (5 clicks) into
the receiver to initially set up your specific fit. If you don’t have enough
length on the strap please follow the illustrations to see how to lengthen
the strap. Alternately if you have too much length on the strap following
the illustrations in these directions can shorten it.
Under no circumstances should you cut the strap to make it shorter.
When correctly adjusted the quick release ratchet tab should be more
then half way (5 clicks) inserted into the ratchet receiver when you wear
the helmet. Any excess length of strap can be threaded back through
the strap buckle and the strap buckle can be positioned anywhere on
the ratchet tab side of the strap to allow for extra length of strap to be
secured.
Under no circumstances should the strap buckle be removed from this
system. When adjusting the strap through the strap buckle make sure
you always rethread it through correctly so the loose end is on the
outside and is threaded through as the illustration shows. The function of
the strap buckle is to stop the strap from unthreading from the ratchet
tab. Failure to incorrectly use the strap buckle as illustrated could result
in the failure of the retention system and the helmets ability to protect
you in an accident.
CHIN STRAP RETENTION SYSTEM: QUICK RELEASE
Summary of Contents for FX-120
Page 9: ...CHEEK PAD 9 COMFORT LINER CHEEK PAD ...
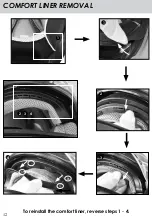
Page 12: ...COMFORT LINER REMOVAL 12 1 2 3 4 1 2 3 To reinstall the comfort liner reverse steps 1 4 4 ...
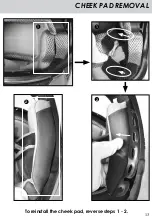
Page 13: ...CHEEK PAD REMOVAL 13 1 2 1 2 To reinstall the cheek pad reverse steps 1 2 ...
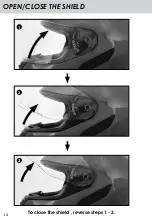
Page 14: ...14 OPEN CLOSE THE SHIELD To close the shield reverse steps 1 3 2 3 1 ...
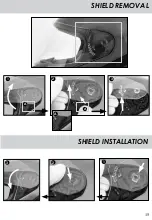
Page 15: ...SHIELD REMOVAL 1 2 3 15 SHIELD INSTALLATION 1 2 3 A A A ...
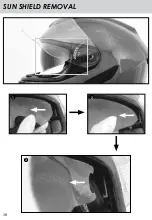
Page 16: ...SUN SHIELD REMOVAL 1 2 3 16 ...
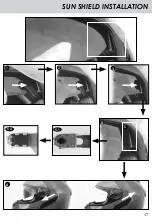
Page 17: ...SUN SHIELD INSTALLATION 1 2 3 4 5 5 1 5 2 17 6 ...
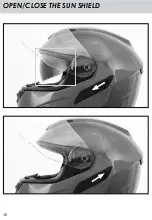
Page 18: ...18 OPEN CLOSE THE SUN SHIELD ...
Page 19: ...19 VENTILATION 2 3 1 2 3 1 ...
Page 29: ...29 MOUSSE DE JOUE MOUSSE DE JOUE DOUBLURE CONFORT ...
Page 34: ...OUVERTURE FERMETURE DE L ECRAN 34 2 3 1 Pour fermer l écran voir point 1 3 ...
Page 35: ...INSTALLATION DU VISIÈRE RETRAIT DE L ECRAN 35 1 2 3 1 2 3 A A A ...
Page 36: ...RETRAIT DE L ECRAN SOLAIRE 1 2 3 36 ...
Page 37: ...MISE EN PLACE DE L ECRAN SOLAIRE 1 2 3 4 5 5 1 5 2 37 6 ...
Page 38: ...38 OUVERTURE FERMETURE DE L ECRAN SOLAIRE ...
Page 39: ...39 VENTILATION 2 3 1 2 3 1 ...
Page 49: ...49 WANGENPOLSTER WANGENPOLSTER KOMFORT KOPFPOLSTER ...
Page 55: ...VISIER MONTAGE ENTFERNEN DES VISIERS 55 1 2 3 1 2 3 A A A ...
Page 56: ...ENTFERNEN DES SONNENVISIERS 1 2 3 56 ...
Page 57: ...BEFESTIGUNG DES VISIERS 1 2 3 4 5 5 1 5 2 57 6 ...
Page 58: ...58 ÖFFNEN SCHLIESSEN DES SONNENVISIERS ...
Page 59: ...59 BELÜFTUNG 2 3 1 2 3 1 ...
Page 69: ...69 ALMOHADILLA ALMOHADILLA FORRO INTERIOR ...
Page 74: ...ABRIR CERRAR LA PANTALLA 74 2 3 1 Para cerrar la pantalla invierta los pasos 1 3 ...
Page 75: ...INSTALACIÓN DE LA PANTALLA DESMONTAJE DE LA PANTALLA 75 1 2 3 1 2 3 A A A ...
Page 76: ...DESMONTAJE DE LA PANTALLA INTERIOR 1 2 3 76 ...
Page 77: ...INSTALACIÓN DE LA PANTALLA INTERIOR 1 2 3 4 5 5 1 5 2 77 6 ...
Page 78: ...78 SUBIR BAJAR LA PANTALLA INTERIOR ...
Page 79: ...79 VENTILACIÓN 2 3 1 2 3 1 ...
Page 89: ...89 IMBOTTITURA PER LA GUANCIA IMBOTTITURA PER LA GUANCIA FODERA INTERNA ...
Page 94: ...94 APRIRE CHIUDERE LO SCHERMO 2 3 1 Per chiudere lo schermo inverti i punti 1 3 ...
Page 95: ...95 INSTALLAZIONE DELLA VISIERA SMONTAGGIO DELLO SCHERMO 1 2 3 1 2 3 A A A ...
Page 96: ...SMONTAGGIO DELLO SCHERMO INTERNO 1 2 3 96 ...
Page 97: ...INSTALLAZIONE DELLO SCHERMO INTERNO 1 2 3 4 5 5 1 5 2 97 6 ...
Page 98: ...98 APRIRE CHIUDERE LO SCHERMO INTERNO ...
Page 99: ...99 VENTILAZIONE 2 3 1 2 3 1 ...
Page 102: ...NOTES 102 ...
Page 103: ...NOTES 103 ...
Page 104: ...AFXHELMETS COM PRINTED IN CHINA ...


