CARE & CLEANING OF YOUR AFX HELMET
STORAGE OF YOUR AFX HELMET
Keep your helmet in a secure place when you’re not using it. We
recommend storing the helmet in the protective bag that was provided
with your helmet; alternately we make a secure vented storage carry
bag available as an option. Please see afxhelmets.com for more
information
Helmets are tough, but to maintain appearance and integrity, your
helmet should be protected if it is to be stored for a long time. However
we don’t recommend storing your helmet for a long time because it’s
more fun to be riding then not riding. Any attempt to install or replace a
visor or shield should be done at room temperature, as these items may
be susceptible to crack in the very cold.
Be aware that pets are attracted by the accumulated salt from
perspiration and may be tempted to chew on the helmet liner and
cheek pads. This really does happen, so feed your pet’s food, not
helmets.
Clean your helmet liner only with mild soap and water. We recommend
a mild liquid soap solution with warm but not hot water. After cleaning
helmet interior, rinse with cold water and allow it to air dry at room
temperature. High heat and strong cleaning solvents will damage the
liner. Your helmet can be damaged without the damage being visible,
by any of the following:
• Gasoline, oil, petroleum-based fluids and solvents
• Harsh or abrasive cleaning compounds
• Paints
• Adhesives
Automotive type waxes may be applied to the painted surfaces of the
helmet shell to protect the finish. Only use a wax suitable for a
clear-coated painted finish. If this helmet has a face shield we
recommend that you use only mild soap and warm water, and dry with
a soft cloth. Never use paper towels or tissues to wipe the face shields.
And never use any kind of commercial glass cleaner. You may however use
certain glass cleaners if they are approved for plastic surfaces. Please
read all warning labels on any protectant or cleaner before using
anywhere on your helmet.
20
Summary of Contents for FX-120
Page 9: ...CHEEK PAD 9 COMFORT LINER CHEEK PAD ...
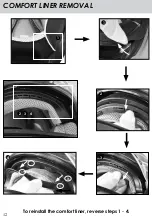
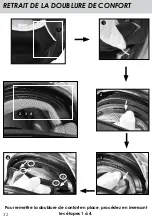
Page 12: ...COMFORT LINER REMOVAL 12 1 2 3 4 1 2 3 To reinstall the comfort liner reverse steps 1 4 4 ...
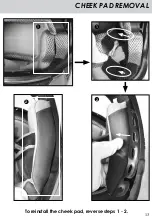
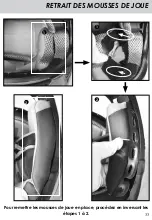
Page 13: ...CHEEK PAD REMOVAL 13 1 2 1 2 To reinstall the cheek pad reverse steps 1 2 ...
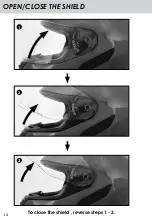
Page 14: ...14 OPEN CLOSE THE SHIELD To close the shield reverse steps 1 3 2 3 1 ...
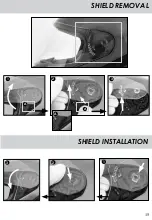
Page 15: ...SHIELD REMOVAL 1 2 3 15 SHIELD INSTALLATION 1 2 3 A A A ...
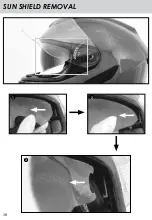
Page 16: ...SUN SHIELD REMOVAL 1 2 3 16 ...
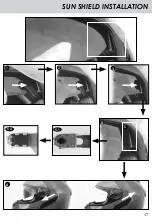
Page 17: ...SUN SHIELD INSTALLATION 1 2 3 4 5 5 1 5 2 17 6 ...
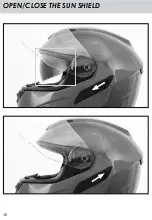
Page 18: ...18 OPEN CLOSE THE SUN SHIELD ...
Page 19: ...19 VENTILATION 2 3 1 2 3 1 ...
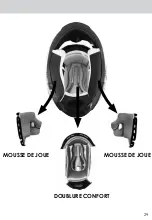
Page 29: ...29 MOUSSE DE JOUE MOUSSE DE JOUE DOUBLURE CONFORT ...
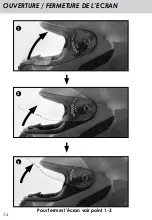
Page 34: ...OUVERTURE FERMETURE DE L ECRAN 34 2 3 1 Pour fermer l écran voir point 1 3 ...
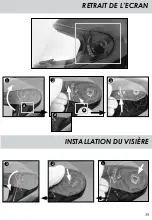
Page 35: ...INSTALLATION DU VISIÈRE RETRAIT DE L ECRAN 35 1 2 3 1 2 3 A A A ...
Page 36: ...RETRAIT DE L ECRAN SOLAIRE 1 2 3 36 ...
Page 37: ...MISE EN PLACE DE L ECRAN SOLAIRE 1 2 3 4 5 5 1 5 2 37 6 ...
Page 38: ...38 OUVERTURE FERMETURE DE L ECRAN SOLAIRE ...
Page 39: ...39 VENTILATION 2 3 1 2 3 1 ...
Page 49: ...49 WANGENPOLSTER WANGENPOLSTER KOMFORT KOPFPOLSTER ...
Page 55: ...VISIER MONTAGE ENTFERNEN DES VISIERS 55 1 2 3 1 2 3 A A A ...
Page 56: ...ENTFERNEN DES SONNENVISIERS 1 2 3 56 ...
Page 57: ...BEFESTIGUNG DES VISIERS 1 2 3 4 5 5 1 5 2 57 6 ...
Page 58: ...58 ÖFFNEN SCHLIESSEN DES SONNENVISIERS ...
Page 59: ...59 BELÜFTUNG 2 3 1 2 3 1 ...
Page 69: ...69 ALMOHADILLA ALMOHADILLA FORRO INTERIOR ...
Page 74: ...ABRIR CERRAR LA PANTALLA 74 2 3 1 Para cerrar la pantalla invierta los pasos 1 3 ...
Page 75: ...INSTALACIÓN DE LA PANTALLA DESMONTAJE DE LA PANTALLA 75 1 2 3 1 2 3 A A A ...
Page 76: ...DESMONTAJE DE LA PANTALLA INTERIOR 1 2 3 76 ...
Page 77: ...INSTALACIÓN DE LA PANTALLA INTERIOR 1 2 3 4 5 5 1 5 2 77 6 ...
Page 78: ...78 SUBIR BAJAR LA PANTALLA INTERIOR ...
Page 79: ...79 VENTILACIÓN 2 3 1 2 3 1 ...
Page 89: ...89 IMBOTTITURA PER LA GUANCIA IMBOTTITURA PER LA GUANCIA FODERA INTERNA ...
Page 94: ...94 APRIRE CHIUDERE LO SCHERMO 2 3 1 Per chiudere lo schermo inverti i punti 1 3 ...
Page 95: ...95 INSTALLAZIONE DELLA VISIERA SMONTAGGIO DELLO SCHERMO 1 2 3 1 2 3 A A A ...
Page 96: ...SMONTAGGIO DELLO SCHERMO INTERNO 1 2 3 96 ...
Page 97: ...INSTALLAZIONE DELLO SCHERMO INTERNO 1 2 3 4 5 5 1 5 2 97 6 ...
Page 98: ...98 APRIRE CHIUDERE LO SCHERMO INTERNO ...
Page 99: ...99 VENTILAZIONE 2 3 1 2 3 1 ...
Page 102: ...NOTES 102 ...
Page 103: ...NOTES 103 ...
Page 104: ...AFXHELMETS COM PRINTED IN CHINA ...

