


0-6
ADAM-5510/P31
Quick Start
2. Key in install <Enter>. The install program on the diskette will
automatically complete the installation. When installation is
completed, the default working directory will be automatically
changed to c:\5510.
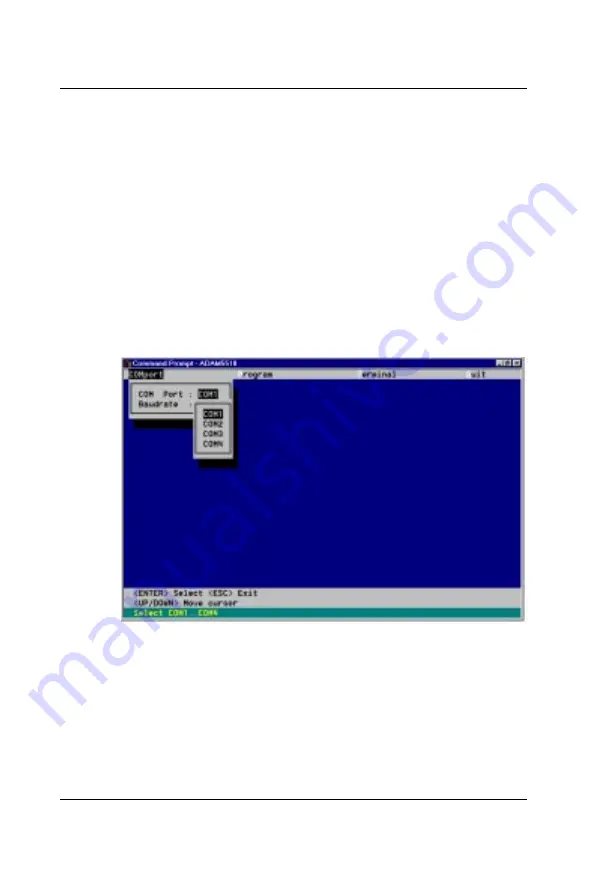
3. Key in adam5510 <Enter>.
4. This starts the utility program for ADAM-5510/P31. The highlight-
ed cursor will be at its default location at "COMport" on the menu
bar.
5. Press <Enter>; a pop-up window will appear. Use the arrow keys to
move the highlighted cursor to select a COM port on the host PC,
then press <Enter> to confirm the selection. Press <ESC> to return
to the menu bar.
Figure 0-2:
Menu for setting up compiler working paths
0.3.2 I/O modules configuration
1. Move the cursor to “Terminal” and press <Enter>.
2. Press “Ctrl-X”; the operating environment will be changed to DOS
and the active drive to the “D” drive.
3. Set the network address of the ADAM-5510/P31 as “1” (All bits of
the DIP switch except bit 0 are “OFF”).
Summary of Contents for ADAM-5510/P31
Page 17: ...0 Quick Start...
Page 38: ...0 22 ADAM 5510 P31 Quick Start...
Page 39: ...1 Introduction...
Page 43: ...2 Installation Guidelines...
Page 52: ...2 10 ADAM 5510 P31 Installation Guideline Figure 2 10 ADAM 5510 P31 network address DIP switch...
Page 58: ...2 16 ADAM 5510 P31 Installation Guideline...
Page 59: ...3 System Specifications...
Page 65: ...4 I O Modules...
Page 116: ...4 52 ADAM 5510 P31 I O Modules...
Page 117: ...ADAM 5510 P31 5 1 Chapter 5 5 Troubleshooting...
Page 129: ...ADAM 5510 P31 A 1 Appendix A A Quick Start Example...
Page 132: ...A 4 ADAM 5510 P31 Quick Start Example...
Page 133: ...ADAM 5510 P31 B 1 Appendix B B COM Port Register Structure...
Page 137: ...ADAM 5510 P31 C 1 Appendix C C Data Formats and I O Ranges...
Page 147: ...D Performance...
Page 173: ...E RS 485 Network...
Page 181: ...ADAM 5510 P31 F 1 Appendix F F ADAM 4000 5000 System Grounding Installation...
Page 187: ...ADAM 5510 P31 G 1 Appendix G G Grounding Reference...


